.
Unlock the layer by double-clicking on the lock in the “Layers” tab on the right. A daw will appear instead of a lock. If you uncheck the box, the visibility of the layer will be disabled.
If we want the photos to have the same size, then we reduce the width of this image to the size of the second one. This can be done by clicking on the main menu tab of the editor (horizontal menu at the top of the page), as shown in the picture.

In the new window that opens, enter a width value equal to the width of the second, smaller photo. Also, if it is not checked, check the box next to “Keep proportions”. Click on the “Yes” button.
If you don’t want to end up with photos of the same size, then we omit this item.
Then you need to increase the height of the working document canvas by a value equal to the height of the second image (or larger if you want there to be a gap between the photos). You can do this by going to the Image tab --> Canvas Size, as shown in the figure:

As a result, the following window opens:

In my case, the height of the second photo is 420 pixels, I add this value to the height of the document 450 pixels, and enter the resulting result of 970 pixels in the “Height” line.
Set the position of the anchor as in the figure, then a new section will be added to the canvas from below. If you need to insert a photo from above, then set the anchor position like this:

But I'm attaching the photo from below, so my anchor will be on top.
So, I enter the value 970 in the “Height” line and press the “Yes” button. For ease of viewing, you can zoom out the document by rotating the mouse wheel. The document took the following form:

Now you need to upload the second image to the free space below. To do this, go to the Layer tab --> Open image as layer, as shown in the figure:

A new window will open in which you need to select the desired image on your computer, click OK. The image opened in the document in a new layer in the middle:

Now all that remains is to move the photo exactly down the document using the Move tool.
Well, save the resulting document to your computer by clicking on the File tab --> Save image, in the new window that opens, click on the “Yes” button
Watch the video tutorial demonstrating these steps.
If you've always wondered how to combine “two photos in one” - our new app has the answer!
This photo blender is the perfect “photo editor” for you and a great “photo montage app” where you can use your photos and add frames and effects to create fancy collages instantly by blending photos together. Just download our 📸Merge Two Photos into One: Photo Editor📸, combine and overlay multiple images, blend two photos gradually, combine two photos in one and easily adjust the transparency effect. Choose the color, pattern and shape of your favorite photo frame and show your friends that matching images has never been easier. Take a transparent photo and then mix multiple photos into one stunning collage. Become a true picture manipulation pro and use our photo mixing mix for free to create beautiful customized photos. Go and get it now! Show off your creativity, create a wonderful collage and have a great time with your friends!
🔸📷🤳📸🔹🔸📷🤳📸🔹🔸📷🤳📸🔹🔸📷🤳📸
🤳 One of the best easy-to-use “photo editing” apps;
🤳 Combine images, perform the best image blending with transparency and mirror effect and various photo effects;
🤳 Take a photo using your camera or select an image from your phone gallery;
🤳 merge two photos together;
🤳 Add cute photo frames to decorate your montage;
🤳 Adjust photo blending and blending levels and crop, resize, rotate and drag photos using best application for image editing;
🤳 Save photos to the gallery of your phone or tablet;
🤳Combining two pictures has never been as easy as it is now with our 📸Merge Two Photos into One: Photo Editor📸, try it out and share your photo with your friends on all social networks!
🔸📷🤳📸🔹🔸📷🤳📸🔹🔸📷🤳📸🔹🔸📷🤳📸🔹
Set your imagination free and enhance your pictures using the best photo blender collage maker!
You don't need complex blending programs to blend two photos because now you can do great manipulations on your own phone.
If you have always wondered how to “blend two pictures together” - our new app has the answer!
This “photo blender” is the perfect“photo editor” for you and a great “photo montage” app where you can use your pics and add “picture frames and effects” to create unusual collages instantly with “blending photos” together. Just download our 📸Photo Blender - Mix Photos Editor📸, “merge and overlap multiple image”, “blend two photos” gradually, “combine two pictures in one” and adjust the transparency effect with ease.
So, we have two completely independent documents that have nothing in common with each other. I would like to combine the photos from these documents into one. Let's look at a few simple ways do it.
Method 1: Drag and Drop
Simply dragging an image from one document to another is the easiest and most common way to move images between documents in Photoshop. This is done using the Move Tool, which is located at the very top of the toolbar:
With the Move Tool active, left-click on the photo you want to move and, while holding down the mouse, drag it into the document window of another photo. When you release the mouse button, the photo will move to another document. I'll transfer the photo with the drops into a document with the woman's face. Here's what I got:

Note that Photoshop simply "dropped" the photo being moved to the place where I released the mouse button. This result is not very good. It is better to move the photo using the Move Tool, after holding down the Shift key. Move the photo, release the mouse button, and only later release the Shift key. Holding Shift tells Photoshop to place the image being moved in the center of the document.
Let's undo the previous step by pressing Ctrl+Z and try dragging the photo again, this time holding Shift. Now the photo with water drops is located in the center of the document:


Method 3: Copy And Paste
Another way to move images between documents is the standard "copy-paste" method, popularly called "copy-paste." This method is familiar to any computer user.
Its difference is that before copying you need to select the document using Ctrl+A. In addition, you can select the entire image by clicking on the main menu tab Select --> All. When you select the entire image, “marching ants” will appear along the perimeter of the entire image.
So, the steps required to move an image from one document to another are:
- Click on relocatable document for its activation
- Select all pixels in the image by pressing Ctrl+A or Select tab --> All
- Copy the image by pressing Ctrl+C
- We click on the target document, i.e. That's why, into which we will insert image
- Press Ctrl+V
And finally, let's mix our two images. As you remember. We have a photo with drops above the photo with a woman.
In order to get a photo montage - the effect of a woman's face through glass with rain drops - you just need to apply the Soft Light blending mode to the top layer with drops. This is what we got as a result:

So now we know three ways to combine photos into one, and how to make a simple photo montage using blend mode changes!
Create colorful collages from photographs - it's quick and convenient! Need to stitch photos together? Using the Home Photo Studio program, this procedure will take no more than two minutes. Watch the video tutorial and find out for yourself how to combine two or more photographs into one image in the Home Photo Studio program.
Method number 1: quickly combining several photos into one
“Home Photo Studio” will help you smoothly connect two, three or four photos and effectively disguise the connection line in just a couple of mouse clicks. Similarly, you can create an unusual collage from several photos! Photos may be different in size or the same. You can design collages at your discretion, for example, add a bright fill that effectively completes the composition of the photo.
The finished image can be saved on your computer or printed immediately!
Method number 2: simple photo montage To combine two photos, you can use the Photo Montage tool, which has the most advanced simple work
with layers and masks. Thanks to fine adjustments of the parameters, you can create the effect of old paper on the background layer, beautifully trim the edges, or give objects a mystical glow. Ours has a convenient search function, and the tool for combining photos is easy to find by searching for “Merge” or “Photo Montage”. From the brief instructions you will learn how to combine two photos into one using our program.
To do this you will need to download it. Installation file. After installation, you will need a couple of photos that you want to process and a little time. We recommend making copies of these images in case something goes wrong and you accidentally save a bad adjustment.
Step 2. Choose a method for adding photos
Click the “Open Photo” button to select the desired image. Alternatively, you can type “Connect” or “Photo Montage” (without quotes) into the search bar at the bottom of the list. You can also use one of the images that you recently edited - they will appear above the search bar.
Step 3. Add photos to the program
Select a photo that will become the background layer. You can only select one image option. In this mode, the main characteristics of the picture are shown and in the preview window you will see what is shown on it. This is very convenient if you have a lot of photos and the folder is configured to display small icons, a table or a list.

Step 4. Go to the “Photo Montage” mode
If you worked through the “Open Photo” button, the program will display the picture you selected. You will see the main menu of the program, where you can retouch the photo before sending it to “Photo Montage” or go straight to this option. If the photo was loaded directly into the photo montage section after searching by functions, the image will be opened in the appropriate mode.

Step 5. Working with layers
To select a second photo that will lie on top of the background one, click the “Add Layer” button and select one of the options from the drop-down menu. The catalogs of decorations, backgrounds and textures contain basic images supplied with the program. To use another picture, click on “Photo”.

Step 6: Select and Edit the Overlay Frame
This is what the interface for selecting the second photo looks like. After selecting a picture, it will be immediately placed on top of the background as a new layer. You can move it with the left mouse button, stretch it, tilt it at different angles, and set transparency. Layers, with the exception of the background layer, can be easily removed using the red "X" button. The button in the form of two blue sheets of paper copies the layer. Each layer can be trimmed without harm to the entire painting. You can immediately save your creation through the “Save to file” button in the lower left corner.

Step 7. Saving the result
After clicking the “Apply” or “Save to file” button in the “Photo Montage” mode window, all changes made to the photo will be saved and cannot be rolled back. So don't forget about backups. original pictures. In any case, the program will take you to its main window, where you can retouch the photo and save it as a memory.

You can also try experimenting and find out using the Stylization menu settings.
Almost every novice “photo editor” has tried to create collages. Any collage begins with the simplest action - combining two photographs into one. Moreover, a professional can do this in a couple of minutes, but an ordinary user will have to spend several hours of precious time creating a collage. But everything needs to be learned, because every professional was once a beginner. First of all, let's move on to the question of how to combine two photos into one.
Strictly speaking, there is nothing complicated in combining two photographs. You can combine two photos using either standard Paint or a powerful photo editor. However, you can use a special service or online Photoshop.
Online services
To combine two photos into one using an online service, you need to open the website http://croper.ru/join in your browser. This online service allows you to stitch together photos directly in the browser without installing any programs. For the service to work correctly, it is better to use Google Chrome.
We read the information about the capabilities of the service and follow the “download files” link.

After that, we alternately upload two photos to the service that need to be glued together.

Uploaded photos will appear at the top of the page. Click on both photos one by one. They will move from the "files" category to the "selected" category. At the bottom left you can see the methods for gluing photos together: vertically or horizontally.

Click on the method we need and wait for the stitched photo to load. The browser will display the stitched photo. To continue, click on the “Accept” link.

In the new window, select the “Files” tab and follow the “Save to disk” link.
Download the finished stitched photo using the “Download file” link.
The operating principles of all photo services are the same. But Cropper is good because it does not require registration on the project.
Most ordinary users only know about the existence of Photoshop. But there are a bunch of other photo editors, among which Paint.Net stands out. Developed on the basis of regular Paint, the modification is an excellent photo editor for beginners. Almost any user can understand Paint.Net, and the Russian-language interface will allow you to quickly master the basics of photomontage.
Combining two photos into one in Photoshop or another program is as easy as with the online service. Download the Paint modification and install it on your computer.
Select two photos that need to be combined and right-click on one of them. In the context menu, go to the “Open with” tab and click Paint.Net.

In the photo editor that opens, go to the “Image” tab and click “Canvas Size”.

A new window will open in which you need to set the dimensions of the new image and the direction in which the canvas will expand. In the case shown in the image below, the second photo will be located horizontally on the right.

If two photographs are the same size, then you should only double the width of the image. Enter a new number into the “Width” box and click “OK”.
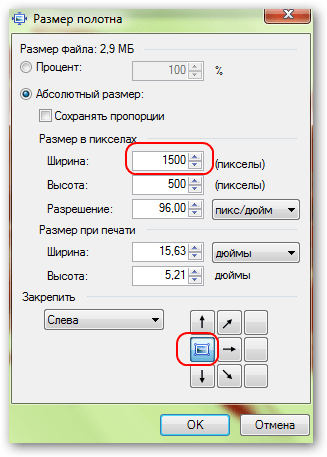
The editor will increase the width of the canvas, and “empty space” will appear on the right side of the open image, which will need to be filled with the second photo.

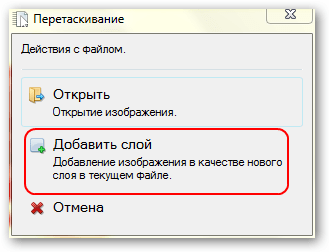
We drag the second photo into the open editor and after asking what to do with the new picture, click “Add layer”.
Then select “Move selected area” on the toolbar (blue arrow with a plus).

Drag the second image to the right, filling the empty space with the second image.

Congratulations, photo stitching using a photo editor has been successfully completed!
Which method to choose depends on you and your skills. But remember: the less the Network knows about you, the better!


