There is nothing better than shelves for organizing space in rooms, as well as for decorating the interior. Comfortable, functional, original in shape, they help to conveniently arrange a lot of things and give the rooms a more comfortable look. Making shelves on the wall with your own hands is not at all difficult, and you can use a wide variety of materials - wood, fiberboard, glass, pieces of tin, plywood.


| Types of Wall Shelves | Description |
|---|---|
| Classic | This type of shelves is the most common due to its simplicity, aesthetic appearance and ease of installation. They represent a huge flight of fancy: from simple square to creative asymmetrical shapes |
| Corner | This type of wall shelves differs in the method of fastening - it is carried out on adjacent adjacent walls. Most often they are installed in utility rooms and bathrooms. |
| Hanging | This original way creating a shelf involves attaching a simple structure to the ceiling using cables or vertical posts |
| Floor-standing | This wall shelf is a floor support design. This type of product is especially relevant in hallways, as well as large rooms, where you don’t have to think about wasting space. |
| Open and closed shelves on the wall | Wall shelves can be designed, for example, with or without glass |

Wood is the most convenient material to work with. Wooden shelves come in simple, complex shapes, open and closed, vertical, horizontal and corner. Taking the basic option as a basis, you can assemble a shelf from several modules and give it the most incredible look. In order for the product to serve for a long time, you should choose the right wood: the boards must be perfectly flat, completely dry, without cracks, voids or traces of mold.

During the assembly process you will need:
- hacksaw;
- drill;
- building level;
- pencil and ruler;
- boards 16 mm thick;
- stain;
- wood varnish;
- sander;
- screws, brackets, dowels.
The example used is a simple rectangular shelf 250mm wide, 300mm high and 1100mm long.

Step 1. Marking
The boards are laid flat on the table and the measurements are transferred from the drawing. The height of the side walls should be 268 mm, since they will be located between the top and bottom: wall height + board thickness x 2 = 300 mm.
Step 2. Cutting the boards

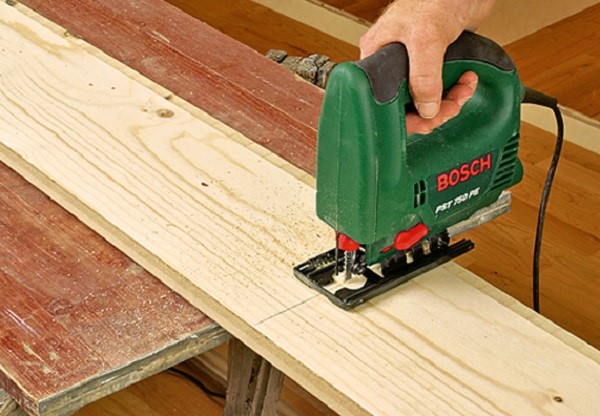
If the markings exactly match the diagram, you can start cutting. It is best to use a jigsaw for this, then the cuts will be perfectly smooth and neat. You should end up with 2 long pieces and 2 short ones.
Step 3. Processing of blanks

Before starting assembly, each workpiece must be sanded, stained and varnished. If you plan to simply paint a shelf, the blanks are processed - this increases their service life and makes the paint apply more evenly.
Step 4. Assembling the product

The bottom board is laid flat on flat surface. From the ends of the workpiece, retreat 8 mm and draw 2 straight lines parallel to the cuts. Now on these lines you need to mark two points at a distance of 5 cm from the edge, and drill holes there for the screws. The same is done with the top blank. When all the holes are ready, install the side blanks on the bottom board and tighten the screws. Place a second board on top and also fix the side walls with self-tapping screws.

Brackets are fixed at the ends of the side walls, holes are drilled in the wall for dowels, screws are inserted and screwed in so that they protrude by about 5 mm. The dowels must be positioned strictly horizontally, so before drilling, mark a line using a level. Now all that remains is to attach the brackets to the fasteners and hang the shelf. If desired, the back wall of the product can be filled with a piece of plywood, and glass can be inserted in front.


To make such a simple shelf more original, you can replace one side wall with a stump of a thick branch. To do this, choose an even branch with a diameter of about 7-8 cm with smooth, clean bark, saw off a piece 28 cm long, and cut off all the side shoots. The chock is treated with a primer, dried and varnished. There is no need to remove the bark. After the varnish has dried, the workpiece is inserted between the upper and lower boards and screwed tightly with self-tapping screws.

Based on this drawing, you can make various variations of wall shelves. For example, reduce the length to 400 mm and make 3-4 blocks at once. Then install them on top of each other in checkerboard pattern and secure them together using metal plates. Or simply mount them on the wall separately, placing them at a short distance from each other.

Often, to save space, shelves are made corner, and they can be mounted both in the inner and outer corners.


The blanks are made according to the scheme described above, only the upper and lower boards consist of two elements, with the ends cut at an angle. The process of making such a shelf is quite simple:
- the halves of the top board are coated at the ends with glue and clamped with clamps;
- repeat the same actions with the bottom board;
- when the glue dries, all workpieces are covered with stain or primed;
- Attachment lines are marked on the upper and lower workpieces and holes are drilled;
- insert the side walls and secure them with self-tapping screws.

| Wall shelf materials | Advantages and disadvantages |
|---|---|
| Wood: plywood, chipboard, MDF and others | This material is relatively easy to work with, it looks beautiful, natural and impressive, its service life is quite long, especially if pre-processed |
| Plastic | This material is the most versatile; it can imitate both wood and stone, while eliminating their shortcomings |
| Metal | Such wall shelves will be very strong, reliable and durable, but in classic interior They will fit in with difficulty. In addition, corrosion can also be a problem, so metal products Requires special processing and conditions |
| Glass | Transparent wall shelves will create an atmosphere of lightness and comfort in your home. Of course, it will be quite difficult to make a glass structure with your own hands, but if you nevertheless decide to do all the work yourself, then you will have to work with glass for quite a long time and very carefully, especially if various cutouts are planned in the shelf design |
Original shelves for books
Shelves of non-standard shape are in increasing demand, so if you wish, you can try to assemble something original. For example, a bookshelf in the form of a simplified labyrinth is used.
To make it you will need:
- edged board 20 mm thick;
- wood glue;
- clamps;
- roulette;
- hacksaw;
- miter box;
- Sander;
- stain;
- furniture screws, self-tapping screws;
- decorative shelf holders.
If you have everything you need, you can start making the shelf.
Step 1. Marking
On the prepared boards, mark the cut lines with a pencil under a ruler. Measurements should be taken very carefully, since all horizontal parts have different lengths.
Step 2. Trimming the blanks
The ends of each workpiece are cut at an angle of 45 or 90 degrees. The diagram shows the first option, so you will need a miter box for sawing. It is very important to correctly install the miter box on the board so that the cuts are symmetrical. If the ends are cut off incorrectly, you will not be able to fold the shelf.
Step 3. Assembling the structure
The ends of the parts are smeared with glue, pressed tightly and additionally secured with slotted furniture screws. Ordinary self-tapping screws are not suitable here. Each joint will require at least 2 screws. Both parts of the shelf are applied to the wall, leveled and the attachment points are marked with a pencil. After this, holes are drilled for the dowels, brackets are screwed to the shelf with self-tapping screws and the structure is hung on the wall. Instead of brackets, decorative pelican shelf holders are often used.


Hanging shelf with straps
If you need a decorative shelf for small items, the following option is perfect - a board suspended on straps.


To make a shelf you will need:
- 2 edged boards 300x750 mm, 30 mm thick;
- 4 leather belts, 75 cm long;
- 4 long screws with plastic dowels;
- 4 short screws;
- building level;
- ruler;
- sharp knife;
- drill.
Step 1: Preparing the belts
The cuts of the belts must be perfectly even, so if necessary they are trimmed with a knife. Fold each belt in half, press the ends to the table, step back 2 cm from the edge and drill a neat through hole with a drill. The same is done with the remaining three.
Step 2. Attaching the straps to the wall
Using a level, two points are determined on the wall at a distance of 60 cm. Holes are drilled and plastic dowels are inserted. The belt folded in half is applied to one of the holes and secured with a long screw - you get a large loop on the wall. Another such loop is attached nearby.
Step 3. Installing the shelf
A sanded board is inserted into the loops and aligned horizontally. To prevent the shelf from moving, the parts of the belts adjacent to the wall near the board itself are screwed with short self-tapping screws. Now another shelf is hung under this shelf, exactly repeating the steps described above. The result is a light and neat two-tier shelf. If desired, you can add another 1-2 tiers.
To make the shelves described above, you can use not only wood, but also plywood, as well as laminated chipboard sheets. The last option is used most often, since laminated chipboard is lightweight, high strength, practicality and durability. When assembling shelves from this material, all sections must be covered with a melamine edge to match the color of the sheet.


Making a glass shelf

Glass shelves fit harmoniously into any interior, and the installation process does not take much time. To work you will need:
- strained glass;
- hammer;
- electric drill;
- building level;
- aluminum profile;
- dowels;
- adhesive tape;
- ruler;
- pencil.
Not everyone knows how to cut glass correctly, and therefore it is better to order the cutting of blanks in a workshop. There they will also grind and polish the edges so that when installing the shelf you will not cut yourself on sharp edges. You can do everything else yourself.

Step 1. Marking for fasteners

The section of the wall where the shelf will hang should be as large as possible. By using building level draw a horizontal line on the wall with a pencil. The locations of the fasteners are marked on the line and holes are drilled.

Step 2. Installing profiles


An aluminum profile is applied to the wall surface and the alignment of the fastening marks is checked. Then insert dowels into the holes, attach the profile with one screw and level it horizontally. After this, tighten the remaining screws.


Instead of a drill, insert a bracket screw

Screw in the bracket screw

Leave the bracket screw protruding from the wall


Checking the position

Arranging the shelves
Step 3. Attaching the shelf
Trailing edge glass shelf cover with adhesive tape. You can use separate spacers made of tape, placing them where the glass will touch the screw heads. The shelf is inserted into the profile, the edges of the profile are covered with protective caps. If two shelves touch on the sides, their edges are fastened with metal fittings.
If there free time and a desire to experiment, you can create very unusual shelves on the wall from scrap materials. For example, a corner shelf made of plastic pipes. To make it you will need pieces sewer pipes and corner cuts. The shelf is attached to the wall with screws and dowels.


Old suitcases and briefcases also make great wall shelves. To do this, they are cut to half their height, covered with plywood at the back and secured to the wall with screws or on brackets.

Drawers from unnecessary bedside tables are quite suitable for making shelves. To give them an elegant look, the boxes should be thoroughly sanded, primed and painted. bright colors. Then they are leaned against the surface with the back wall, the attachment points are marked and holes are drilled for them. Even one such shelf looks very original, and a composition of 2-3 drawers will become a real decoration.


Video - DIY wall shelves
Interesting wooden shelf. Master Class

You will need:
- Rope;
- Board at least 2 cm thick;
- 2 corners (mounts) for shelves;
- Steel washers;
- Lighter;
- Drill;
- Saw.


Long gone are the days when handicraft furniture was considered the lot of very poor people. Each apartment or house had cabinets, walls, shelves and other furniture made according to a single pattern. What kind of design could we talk about with this approach?
Choose today suitable furniture easier, but it does not always correspond to the wishes of the owner or the preferences of the hostess. In addition, it often happens that exactly what you need and you cannot find, for example, a suitable wall shelf. In this case, there are two options left: order its production in a workshop, hoping that you are understood and the product will be of adequate quality, or you can make shelves on the wall with your own hands, which will be a good and convenient addition to the intended design.
Types of Wall Shelves

Thanks to modern universal tools home craftsman can make almost any shelf, even in an apartment, not to mention working in his workshop. However, before you take up the tool, it is important to decide on the type of shelf to be constructed. A table that describes design features wall shelves and their scope.
|
Wall shelf type |
Description |
|
Classic |
It is generally accepted that classics are part of ancient culture that has come down to us. It is also called a generally accepted style example. Shelves made in classic style, are easy to manufacture and have a simple shape, so they are easy to make at home. |
|
Corner shelves have a triangular shape and are attached to two walls at once. Most often this is a small structure placed in the bathroom or in a room where other types of shelves would be in the way. Also, corner shelves can be external. |
|
|
Mounted |
Wall shelves are intended only for hanging on a flat surface and are most often located above the average level. This arrangement allows you not to take up free space premises. |
|
Floor-standing |
Floor shelves can not only stand on legs, but also, for greater stability, be attached to the wall, especially when they are narrow and tall. Most often these are shelving type shelves or vertically located moduses. |
|
The word mode is often used to designate varieties of forms. For this reason, shelves with different sizes of used parts began to be called mods. Sometimes it can resemble abstract art. Various types modes can be found in one or another style of room. |
|
|
Exclusive |
This is not a separate section, but a collection of everything extraordinary and non-standard. You can find shelves made from old suitcases, an outdated TV, and even water pipes. There is no limit to the imagination. |
Wooden shelves on the wall
Wood is an excellent material, as a shelf made from it will be attractive, high-quality, ergonomic and practical. Although the rapid development of scientific and technological progress, as well as the emergence of new technologies and innovative materials on the market, have not made the use of natural wood less popular and in demand, still among admirers natural beauty and style it is still in demand.

There are plenty of advantages of furniture made from natural solid wood, and it’s not only about the attractive appearance, but also about the high performance qualities, thanks to which wood has been used for many centuries both for construction purposes and for the manufacture of original interior items. Even without great experience in carpentry, you can make a beautiful wooden shelf. If you are a beginner, then it is best to start with this universal building material, taking as a basis soft, inexpensive types of wood intended for making furniture.
Manufacturing
The first thing you need to think about is the size of the shelf being made and decide on the place where it will be located, only then purchase boards. If the structure is assembled from the material at hand, you will have to adapt to its dimensions.
Of course, you can’t do without a tool. The minimum is a wood saw and a Phillips screwdriver. Of course, with such a set of tools there is no point in making a complex structure.
Video: a minimal set of tools for a novice carpenter
To assemble something solid and beautiful, you will need:
|
Jigsaw or handsaw |
It will be more convenient to work with a jigsaw, but if you don’t have one, you can use a standard wood hacksaw with small tooth. Using this tool, blanks for the future shelf will be cut out. |
|
Sanding machine or a set of sandpapers of different grits |
What a sander can do in 5 minutes will take you an hour to do by hand. This tool is used to sand the workpieces and then the entire shelf. |
|
Electric drill |
If shelves are made from chipboard, then you cannot screw screws or confirmations into such parts without first drilling a hole for these fasteners. In wooden parts you also need to drill holes for self-tapping screws. |
|
Screwdriver or screwdrivers |
Only if the shelf is small and uncomplicated can you painlessly tighten several self-tapping screws with a screwdriver. If there are many attachment points, it will be very difficult to do this manually. It is not recommended to use an electric drill for these purposes, since it will be impossible to control the screwing force. |
|
In addition to the fasteners themselves, it is advisable to buy plugs that match the color of the shelf. It is important to know that depending on the chosen fastener, the plugs are selected individually. |
|
|
Wood varnish |
Varnishes for wood come in different varieties. Many people prefer to use alkyd varnishes with urethane group additives, since it dries quickly (up to 12 hours) and is very durable, which is important for a product that will be used frequently. |
|
Medium size brush (40‒80 mm) |
The shelf will need to be varnished. At home, this procedure can be performed using a brush. Since most wood varnishes are toxic and emit a pungent odor, work must be performed in a ventilated non-residential area. |
|
Square |
With its help you can make all corners even. If you don’t already have this tool, you can check the correctness of the angles ceramic tiles. The accuracy won't be perfect, of course, but it's still better than nothing. |
|
Manual frezer |
You can make a wooden shelf more beautiful with a hand router, with which you can create a variety of decorative patterns at the corners, ends and in the middle of the product. |
After purchasing the wood, you need to inspect it to have an idea of how the finished shelf will look. The fact is that untreated boards are not very different from each other, but after applying the stain, the dark areas will show up more than the light areas. If it is not possible to make sidewalls from one board, then select boards whose texture will be similar.
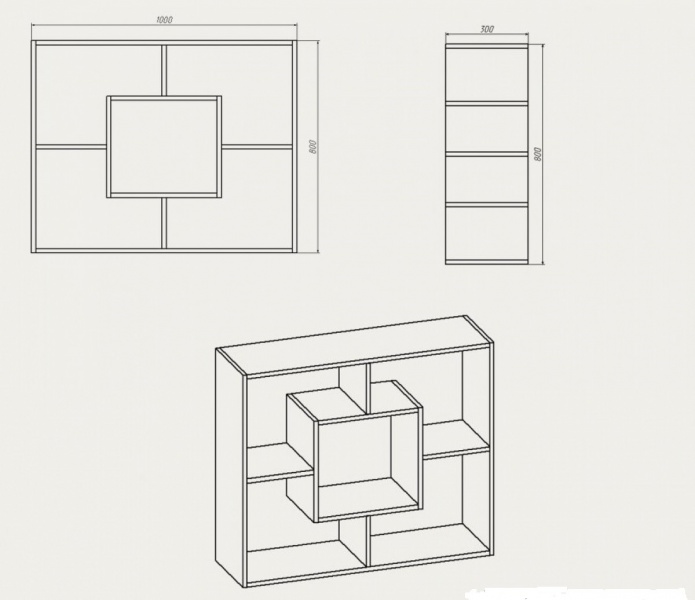
Let's look at making a shelf using an example. Let's say that we need a wooden wall shelf with 3 cells, the dimensions of which will be 100 cm wide and 40 cm high.
For the convenience of calculations, we will not calculate the depth of the product. The thickness of the board is 2 cm. The length of the screws is 40–50 mm.

So, we need to cut blanks of this length from the board:
- 50 cm – 2 pcs.
- 96 cm – 2 pcs.
- 26 cm – 2 pcs.
Now let's explain how we got these dimensions.
If everything is clear with the 50 cm sidewalls, then the length of the remaining parts needs to be calculated. For example, 2 horizontal parts have a length of 96 cm. There is nothing complicated here either. With a shelf width of 100 cm, subtract the thickness of the two boards used as side walls:
100-(2+2)=96 cm.
In a similar way, we obtain the height of the lintels (vertical 2 parts), with a height of the inner part of the shelf of 30 cm:
30-(2+2)=26 cm.
It goes without saying that all paired parts (in our case) must be the same size.
Assembling a wooden wall shelf
Each part needs to be processed with a grinder, only then can it be fastened with other parts into a single structure. Hands must be clean, because untreated wood is very easily soiled.
Let's return to our diagram, in which you can see that the bottom board is slightly raised above the lower level, for which there are 2 explanations: firstly, it makes the shelf more beautiful, and secondly, it protects the lower edge of the sidewalls from cracking when screwing in the screws. Usually this indentation is within 1 cm, but if necessary, it can be made larger. To secure the place where the self-tapping screw is screwed into the lower part of the sidewall, you need to pre-drill holes with a thin drill. In our case, they will be at a height of 2 cm from the bottom edge of the sidewalls (1 cm indentation + 1 cm to the middle of the thickness of the board being screwed on).
Now about the assembly process step by step.
- Raising the bottom shelf by 1 cm, the side parts are screwed to it one by one. You need to make sure that when screwing in the screws they are positioned straight.
- Turning the workpiece upside down, mark the position of the future shelves. If the cell sizes are the same, then divide 96 cm by 3 (in our example, 3 cells). The result will be 32 cm. We retreat from the sides by 32 cm and mark on the board the points into which the screws will be screwed (3 centimeters from the edge of the board). It is better not to draw a line, as it will be visible under the varnish layer, but to apply small marks along the ends of the board.
- In this position, jumpers are screwed to the bottom of the shelf.
- The shelf is turned over and after checking the vertical position of the jumpers, they are screwed.
- Now it’s time to attach the side frames to the top crossbar.
- To ensure that the shelf is level and subsequently does not warp, in the lower part, on the reverse side, you can fix the arrangement of the parts flat window corners. If the back wall is to be attached, then corners are not needed.

- The assembled structure is painted with stain, after which has dried, you can begin varnishing.
- The entire surface of the shelf must be cleaned of dust and dirt. After applying the first layer, you need to check if there are any lint in it. If there are, then you need to sand everything again with abrasive sandpaper to remove them. If the varnish is thick and does not lay down in an even layer, then it can be slightly diluted with the solvent recommended by the manufacturer.
- In total, you need to apply 3 layers of varnish, at intervals of 12 to 48 hours. This interval depends on the type of varnish used and the temperature. environment. In any case, you need to wait for it to dry. Check the surface each time for lumps and grains of sand. If you notice anything, immediately sand with an abrasive sponge until the defect is removed. Then you need to apply varnish again.
- After the varnish has dried, all that remains is to screw the hinges on the back, after which the shelf can be hung on the wall.
Making a corner wooden shelf
Corner shelves can be the most different heights, and have a different number of levels.
Video: Making a corner shelf
Let's consider the sequence of manufacturing a wooden corner shelf from 20x50 mm slats.

- After examining the slats, you need to choose the smoothest ones, with the minimum number of knots - 2 frames will be made from them, measuring 40x70 cm. To make them you will need:
4 parts 70 cm long;
6 parts 30 cm each.
- It is preferable to glue the frame parts together using clamps.
- Now it's time to make the shelves. They can be done:
Stacked, gluing together several slats, from which parts are then cut out the desired shape and the outside is edged with a figured lath;
From a sheet of plywood;
Made from laminated chipboard. In this case, the cut needs to be sanded and pasted over. furniture edge or in some other way, at your discretion;
From a fragment of old furniture, if the front part is flat.
- The shelves are screwed to the frames and varnished.
- All that remains is to fasten the hinges and hang the finished shelf in its place.

For a corner shelf, a set of 2 hinges, as in the illustration, is best suited. If you hang the shelf on a loop with a wide eye, then you can then move the shelf along the wall and put on the second loop.
Photos of wooden shelves


Scheme


DIY book shelf
Despite the fact that electronic devices are replacing printed publications from a person’s life, many people still carefully store books and magazines dear to their hearts, the storage location of which often leaves much to be desired. If this is your situation, it will be useful to learn how to make bookshelves that are functional and fit into the interior.

If you are not a specialist, then you should not immediately take on the manufacture of a complex structure. Next, we'll look at the process of making a simple slatted bookshelf.
Stages of work
To work you will need a tool:
- screwdriver;
- electric drill;
- jigsaw or wood saw;
- roulette;
- construction square.
As for consumables, you will need:
- slats 20x40 cm;
- wood screws 3.5×45 mm (at the rate of 2 pieces per attachment point).
Now you can start making the shelf. The first step is to make “ladders” - side parts (and if the shelves are long, the middle ones too).
The dimensions of the shelf will depend on the size of the books that will be stored on it. If the books are not large, then shelves 20 cm wide are quite enough to accommodate them. The height of the cells is selected so that the book can be conveniently taken from the shelf. Also, the height of the cells at different levels may differ. As for the height of the shelf, this is a matter of personal preference, but it is important to note that although this shelf will be attached to the wall, it is not intended to be suspended, so it will sit on a solid surface.
First, slats are prepared that will be used as racks, and crossbars are already attached to them, for which holes are drilled along the edges of each plank with a thin drill.

Having screwed the cross member with one self-tapping screw, you need to check its position.

Having aligned the rail, it is secured with a second screw.

The assembled “ladders” are laid on the floor, and after checking the correct angle, they begin to be fastened with slats, which are cut according to the length of the structure.

Then the remaining slats are attached.

The structure is lifted and attached to the wall, after which the remaining slats used as shelves are fixed.

This shelf will hold many books.

The assembled shelf is intended for large quantity books, but if you need a smaller design, then you should pay attention to the video instructions and photos of the products you like.
Video: bookshelf on the wall
Shelves for flowers
You can often see people decorate their homes with artificial flowers, but still nothing can replace the freshness of natural flowers. beautiful plant. Many owners, trying to decorate the wall, let climbing plants, hang flowerpots from the ceiling or place them on shelves of their own design. The advantage of this approach is that it is possible to make something of your own, unique and fitting into the interior of the room. Depending on the type of flowers available and their quantity, a shelf is constructed.

Of course, you immediately want to make something voluminous and beautiful, which is quite natural, but first you can try your hand at making a simple but neat shelf.
Manufacturing stages
We will need a 120x25 mm board with a length of at least 130 cm. It will be more convenient to sand the board while it is intact.

After this, one edge needs to be cut so that the corner is straight, and markings must be applied every 20 cm clearly at an angle of 90°. A construction corner will help with this, but if you don’t have one, you can use any solid object whose corners are right, for example, ceramic tiles.

When cutting a part, you need to hold the hacksaw at an angle relative to it. If you hold the hacksaw straight, it will be difficult to make an even cut.
![]()
To make a shelf we will need 6 pieces of 20 cm each.

Each part must be sanded on all sides. The blade used should not be coarse-grained, otherwise the wood may be scratched.

Since the screws will be screwed close to the edge of the board, in order to prevent it from splitting, you need to drill holes in these places with a thin drill.

The entire assembly process consists of fastening the parts with self-tapping screws. If PVA glue is available, then the joints must first be smeared with it, and after allowing a minute for the glue to set, the parts must be fastened. When screwing in the screws, you do not need to use excessive force to prevent the board from splitting. It is enough that the head of the screw is flush with the board.

Since our shelf is wall-mounted, we need to screw fasteners to it.

Since the height of the shelves is small and the structure is not very durable, you can place climbing or low plants in small pots on it.

This product can be used not only for flowers. To prevent the shelf from getting dirty, it is best to open it with varnish.
Video: unusual shelves for flowers
Original shelves
If you want to diversify your interior, then comfortable, original and beautiful shelves can be made from various materials, hanging them in the office or living room. They will help you conveniently arrange a lot of things and can give the rooms a more comfortable look. You can make unusual shelves for the wall from wood, glass, plywood, fiberboard, pieces of tin and even water pipes.
We can confidently say that unusual shelves are the embodiment of originality and exclusivity. However, in everything you need to know when to stop and understand that when designing any product, it is often necessary to maintain the style of the existing style. But now it has become fashionable to divide the room into zones. After looking at the photos that embodied interesting ideas, you will take something as a basis, adding your own twist.
Photos of the original shelves


TV shelf
It often happens that in small room Well, there’s just nowhere to put the TV. For example, a small kitchen is already crammed with furniture, it would seem that what kind of TV we are talking about. However, a shelf located in a corner or on a free wall can be a way out.
In the modern concept, when TVs began to be simply hung on the wall, a TV shelf is a shelf located under the TV on which a DVD player can stand. In one case or another, the shelf can be made at home. We will not dwell on simple shelves that can be placed under the TV, since we have already touched on the manufacture of similar ones in the article, but we will only consider the manufacture of one on which the TV can be placed.
Let's start with the simplest thing - a corner shelf made of plywood attached to the wall. In our case, it will be installed near the window, and so that the curtain does not interfere, we will make a small recess for it on the left side. The corners of the workpiece need to be sanded, then all of it (or just top part) cover with self-adhesive tape with a pattern of your choice.

You need to screw fasteners to the workpiece with self-tapping screws, through which it will be attached to the wall. You need to select self-tapping screws, the length of which will be slightly less than the thickness of the sheet of plywood from which the workpiece was cut. In our case, the front fastening elements are located at the bottom, and the rear ones are at the top, but if nothing interferes with the bottom, then they can also be installed under the shelf.

Now you need to place the shelf at the required height and mark the mounting points on the wall. The shelf is moved to the side and holes are drilled in the marked places.

We insert dowels into the holes so that they do not stick out from the wall.

Now you can attach the shelf.

The shelf should be installed level and the fasteners should be securely tightened.

Now you can install the TV and lead the wires down through the gap left in the corner.

This shelf does not require additional finishing and is immediately ready for its intended use.
In this article, we made a general overview of wall shelves and gave an example of the manufacture of simple structures. If you want to see new ideas or need help, leave a comment at the end of the article.
Wall shelves can harmoniously complement the design of a room. The range of their purposes is very wide. Depending on the location and application options, the material for their manufacture is chosen and the design is thought through. Let’s take a closer look at what features should be taken into account before you start creating a wall shelf with your own hands, and what are the main stages of the process.
Variety of wall designs
The main purpose of a wall shelf is to place many small items, while organically combining the functions of storage and interior decoration. Depending on this, the installation option for the furniture structure is determined. There may be several of them:
- The most common placement method is to make a wall-mounted form, when the product is attached to the wall, below which other pieces of furniture (sofa, bed or table) are often located.
- A do-it-yourself hanging shelf can be a unique highlight among wall structures. The key difference is the method of fastening: instead of traditional brackets and loops, ropes, chains and belts are used.
- Depending on the organization of the living space, it is periodically necessary to make corner shelf. Moreover, in addition to the common way of using internal space, sometimes they harmoniously use external corner rooms.


With a little imagination, you can make a wall shelf structure with your own hands in various variations. The following models are widely used:
- The ease of making it yourself is distinguished by a console - a shelf attached perpendicular to the wall.
- If desired, the structure is supplemented with side walls and the back is covered.
- To create a unique rack with your own hands, it is enough to combine several single consoles together.
- Recently, combined specimens with an unusual arrangement of horizontal and vertical walls have gained wide popularity.
- Numerous decorative models of wall shelves are distinguished by their originality. Their main function is to create an exclusive design element in accordance with the chosen style.

Occasionally, the façade of a do-it-yourself structure is supplemented with glass. This is practical when storing items that do not have a decorative function. A small part of the designs of wall shelves that you can design with your own hands is presented in the drawings below:


Nuances of choosing material when designing
No construction work is complete without a preliminary plan.
Note! Before you start designing a shelf with your own hands, you need to decide on the material for the base.
When choosing it, take into account the place where the furniture structure will be installed and its main functions. The scope of application of wall shelves is as follows:
- Book lovers and students will definitely find bookshelves based on wood and its derivatives useful.
- For storing jars of spices or decorative items(which are original plates or exclusive mugs), use narrow shelves, equipped with low sides. In this case, it is most appropriate to use wood for manufacturing, although depending on the chosen design, glass specimens can also look harmonious.
- The arrangement of a bathroom is not complete without installing glass shelves, complemented by chrome elements. This is due to the basic requirement for the material - it must have high level moisture resistance.
- Universal shelves allow you to be creative with the choice of material when making your own. They are intended for setting flowers or various souvenirs, and the base is selected taking into account general design rooms. It can be classic wood, durable metal, complemented by forged elements, or glass, creating the effect of lightness.

Mounting options
Mounting type plays important role when designing a wall shelf structure. By exploring the fixation options, it will be easier for you to determine the most suitable method.
Classic hinges
The traditional way to fasten wall shelves is to use hinges. They are optimally suited for products made of wood and its derivatives. Important condition– the material must be of sufficient thickness. The whole process takes place in several stages:
- The hinges are fixed to the side of the furniture structure with self-tapping screws.
- After measuring the distance between the holes, the required length is marked on the wall.
Attention ! Maintaining a horizontal line is an important point when fixing a wall shelf.
- At the designated point, holes of the required diameter are drilled for inserting a dowel.
- A self-tapping screw with a neat head is screwed into the hammered dowel, onto which the shelf is hung.

Fastening glass shelves
The use of loops is not suitable for all materials. Installation of wall glass shelves is carried out using special fasteners for fragile products. The fasteners are made of two parts and are often supplemented with elastic gaskets; the glass shelf is inserted between them. The lower part of the device for reliable fixation of the wall structure is equipped with a clamping screw.
A common model of fastening for a glass shelf is a specimen called pelican, capable of holding a wall structure with a thickness of 8 to 34 mm. In addition to glass, it can be used to fasten other materials with similar dimensions.

Concealed mounting and decorative brackets
The hidden installation of a wall shelf is distinguished by its simplicity and originality. In this case, the fasteners are completely disguised. The essence of this method is as follows:
- at the end of the wooden structure, a recess is prepared for the pin and the body of the fastener;
- The mensolo holder is fixed to the wall, after which the shelf is put on it.

Create individual design rooms allow wall shelves with decorative brackets. They can be made in a production way or refer to exclusive specimens. Photos of wall shelves decorated with do-it-yourself brackets are presented below:


Manufacturing process
Depending on the chosen design and material, the process self-made wall shelf has its own characteristics.
Tree
If you want to make an original wooden wall shelf with your own hands, you will need:
- Base material. In addition to natural wood, you can take MDF, chipboard or gypsum fiber board, this will greatly facilitate the surface treatment process.
- A jigsaw that can replace a hacksaw.
- Drill and grinder.
- Ruler with pencil.
- Building level.
- Wood glue or liquid nails.
- Varnish or stain.
- Brackets, dowels and screws.
The entire process of making a wall shelf with your own hands is simple. After drawing up a plan or taking as a basis finished project, the dimensions of the structure are transferred to the material. It is better to saw a wooden base with a jigsaw, which provides a perfectly even cut.
All elements of the wooden shelf are thoroughly sanded; if there are significant defects, I use wood putty. On initial stage You will need sandpaper No. 40 to get a perfectly smooth surface. sanding paper under numbers 80 and 120.

Connect the parts of the wall structure liquid nails or wood glue.

Marks are made on the shelf and wall for fastening. The brackets are connected to the shelf, and a recess is made in the wall using a drill, after which the dowels are inserted.

At the final stage, screws are screwed in and the wall shelf is hung.


Glass
It is better to equip rooms with a small area with glass wall shelves, which create an atmosphere of lightness and visually increase the space. If you don’t have enough experience working with glass, it is better to contact specialists who, while cutting the fragile material, will perform high-quality processing of the sections. The following steps for installing a wall shelf can be done by anyone capable of holding a tool in their hands, and are similar to the procedure for attaching a wooden structure:
- Using a level, mark the mounting points on the wall.
- The Pelican design requires two dowels.
- After removal decorative overlay, you will find holes where you need to screw in fasteners.
- The decorative trim is put in place and the glass is inserted.
- At the final stage, tighten the screw.
This completes the installation of the glass wall structure.


Conclusion
A competent combination of a wall shelf with other furnishings will create harmonious design rooms with individuality.
Among pieces of furniture, shelves have long held their place special place. They serve as both a part of the interior and a device for storing things. In addition, they are quite simple to make. That's why many people do DIY shelves– from beginners to professional builders and designers. Today we will talk about in different ways making shelves.
Properly selected and manufactured shelves will emphasize the overall style of the interior of the room and add the necessary touches to it. And of course, they will provide residents with another convenient storage space. various items- from trinkets to books, shoes and equipment. Any self-respecting craftsman knows how to make shelves from any material, sometimes even from waste materials at hand. Let's look at a few options.
Hallway: DIY shoe shelves
As soon as a person enters any living space, the first thing he needs is a place for shoes. Usually it is used as furniture sets or shelves. Regarding the first option, this is a topic for a separate discussion. Here's how to do it DIY shoe shelves we will tell you. Moreover, of all types of shelves, these are the easiest to manufacture. This is explained by the fact that they are usually floor-standing - after all, no one would think of hanging shoes on... a wall! Although there are such options - in the form of hangers.
Shoe shelves are usually made of wood. The simplest shelf is two, three or four long boards connected by crossbars (stands, sides). For example, as in photo 1.
DIY shoe shelves - photo
The shape and size of such a shelf may vary. It all depends on the size and style of the hallway.
Material – natural wood or sawn blanks from plywood sheets, chipboard.
In the first case ready product It’s better to lightly anneal it with a blowtorch, then cover it with varnish (colored or colorless) or stain. You can, of course, not anneal it - it’s a matter of taste. It is advisable to coat it with varnish: it will give a more beautiful appearance and protect the surface from moisture.
In the case of making a shelf from laminated chipboard, it is necessary to process the edges and ends of the workpieces. For these purposes, a special edging is sold - plastic (melamine) tape different sizes and colors. It is heated with an iron and glued to the desired place.
Hallway: DIY shelves for small items
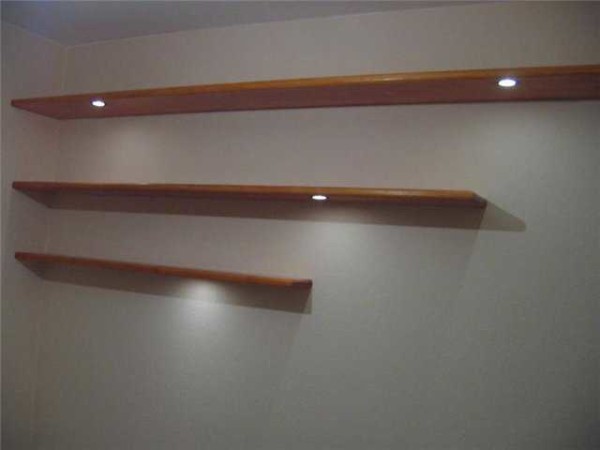
From the same laminated chipboard most often done DIY shelves for the hallway, on which small items and hats are stored. They look especially beautiful with built-in lamps, of which there are many on sale today. Mounting a small LED flashlight is not difficult. And if you place a mirror next to or opposite, it will be very cozy and beautiful!
Another option for wooden shelves is shelves made of bars. Their cross-section varies from 16x40 to 25x50 mm. The dimensions and configuration of the shelf itself can be very diverse. Shelves made of natural wood and bars are perfect for rooms in a simple rustic country or retro style.
If you need to cut figured edges on workpieces from sheet material, then you can’t do without a jigsaw. It is better, of course, to use an electric one. But if you need to make a whole pattern from a natural board, you will need a special jigsaw-burner with nichrome thread. In this case, the edge will be already annealed, dark in color, with many stripes-veins. You will also need various fasteners - screws, bolts, corners. Well, glue, varnish or waterproof paint - depending on the type of shelf and material.
Sometimes shelves are made from metal wire. There are usually no special difficulties here. As a rule, shelves are made in the form of several lattice tiers. In this case, the wire is either welded, braided, or simply inserted into the grooves of the side blanks. The entire structure is beautifully designed. There are many other shelf options from the most different materials– you just need to turn on your imagination.
DIY shelves for the kitchen - a good gift for the hostess of the house
One of the places in apartments and houses where you can’t do without shelves is the kitchen. To make good DIY shelves for the kitchen, it should be borne in mind that they should not only be in harmony with the entire design, but also be ergonomic - comfortable for the housewife.
Moreover, kitchen shelves must be reliable. After all, they can store not only dishes, kitchen utensils, cutlery, but also food supplies - cereals, seasonings, ingredients. Who will be happy if all their weight turns out to be too heavy for the shelves and they end up on the floor?
Before you start making a shelf, you should carefully consider its design so that it fits harmoniously into the interior of the kitchen. For example, photo 2 shows bottle shelves. Those who love a glass of good wine before dinner will definitely appreciate them. The shelves look quite elegant and original.
 Wine shelves
 They themselves are made quite simply. Two blanks - planks of hard wood, well processed, are fastened together. To do this, you can use any bars and screws, or do everything on the grooves. First, holes for the necks are drilled in the main planks at equal intervals - using a jigsaw or drill with a special attachment. The structure is varnished and mounted on the wall. To do this, you can buy beautiful brackets or ordinary profile corners. The main thing is that they do not spoil the finished appearance of the shelf. The number of vertical slats, as well as the distance between them, can be combined.
For a regular kitchen, shelves for 3-5 bottles are suitable. Otherwise, the owner of such shelves may be considered an experienced sommelier. By the way, bottles in such shelves are stored exactly as needed - in a horizontal position. It is better to install bottle shelves in dark places, because real wine is stored in dark wine cellars.
How to make DIY shelves for flowers
Flowers play a big role in the style of a room and in the microclimate of the room itself. They are available almost everywhere - both at home and at work. Usually they stand in designated places: on window sills, shelves, racks, cabinets. Having done DIY shelves for flowers, any owner will please his other half. Moreover, the shelves will be unusual, one might say creative and exclusive.
Photo 3 shows flower shelves made from old... suitcases.
 DIY shelves for flowers - photo
 Yes Yes! As we see, if you have imagination and skillful hands You can give old things a second life. Such shelves are especially suitable for lovers of retro style.
As a rule, old suitcases have a waterproof surface - leather or its substitutes. Therefore, such shelves will not be afraid of water droplets when watering flowers. These shelves are easy to make. First, part of the suitcase is carefully sawed off, then a frame is made from planks inside (so that it does not sag under the weight of the flower pot). Instead of the cut part, a base is made of waterproof plywood, to which the frame is attached. The entire structure is fixed to the wall - inside the resulting shelf or below using corners, dowels or self-tapping screws. Of course, the surface of the suitcase needs to be carefully treated. After which you can decorate your room with a couple more flowers.
Making your own shelves for books
The next shelf in our line is the bookshelf. Sometimes many apartments contain a lot of books. Despite the abundance of modern sources of information, people love to read classic paper books and magazines. Do DIY shelves for books won't be a big deal. For example, a shelf like the one in photo 4.
 DIY bookshelves - photo
 It is done like this: several pieces of plywood of the same width and different heights are cut out, leveled, fastened together, and then painted or covered with stain. And that’s it – the shelf for books of different sizes is ready! All that remains is to mount it on the wall. The second option for such shelves is to select the necessary grooves for the size of books in the part of the wide block and secure the block to the wall. On the remaining flat part of the shelf it is convenient to place various small items or souvenirs.
Unusual DIY shelf for a children's room
There are always a lot of things and toys in the children's room. Therefore, shelves will be very useful there. In addition to classic wood, options for shelves made from other materials are possible. Somehow: pieces of PVC or other lightweight pipes. These are made DIY shelves for the nursery easily. They are especially popular among craftsmen. Photo 5 shows such a shelf in the manufacturing stage.

For a shelf, a pipe with a diameter of at least 100 mm is taken, cut into equal sections up to 300 mm long, after which they are processed and fastened together (with glue, tightening or other methods) in a checkerboard pattern like a honeycomb. Processing consists of grinding the ends, painting or covering individual pipe-cells with self-adhesive films. Naturally, bright colors will prevail in the children's room. Therefore, it is necessary to give individual elements shelves different colors. Such shelves do not have sharp corners, which is important, and children really like them.
Convenient DIY shelves for the bathroom - a note for craftsmen
Usually, various small things are stored in the bathroom: soap dish, toothbrushes, razors, scissors, napkins. For this purpose, hanging racks and cabinets are used. As a rule, they are all similar to each other. Having done DIY bathroom shelves room, you will slightly diversify its interior. About the same as in photo 6.

Of course, you can hang such shelves anywhere. But the fact is that they are not afraid of water! Therefore, the bathroom will be the right place for them. And they are made very simply - plastic window sill It is simply cut evenly into the required lengths, which are mounted on the wall. The side ends are closed with original decorative caps.
The shelf can be fastened in different positions - with the edge down or up. Depending on this, there will be either a flat front surface or with a protective edge. It is better to make the fasteners invisible. Otherwise, you can use various chrome-plated brackets and holders, which are many in hardware and plumbing stores.
Finally, here are some useful tips. Any shelves made of wood materials are characterized by following rules manufacturing.
- You need to choose high-quality dry workpieces (bars, boards) without cracks and knots, and carefully treat them to remove burrs.
- When using self-tapping screws, it is better to pre-drill a hole with a smaller diameter than the screw itself to avoid cracking. Today, instead of ordinary self-tapping screws, special furniture screws - confirmants - are widely used.
- Can be connected wooden parts using figured protrusions - grooves, dowels, recesses. In this case, hard types of wood should be used - birch, oak and the like.
- In order for the self-tapping screw to screw into the wood better, you must first rub it on a hard piece of soap.
To make any shelves you will need a variety of tools and materials: hacksaws, a circular saw, grinder, screwdrivers, set of furniture keys, paints, varnishes, adhesives. Before making a shelf, you need to think carefully about its appearance and place in the room. Then carefully draw the blanks and begin assembly.
When making shelves, don’t be afraid to use your imagination - very often shelves are made from the most unexpected objects and materials! Such solutions as shelves made from old things have long been known: guitars, skateboards, boats, TVs, shipping boxes and pallets. Such products are very original and add unusualness to any home.
Wall shelves - photos for your inspiration
We have selected photos of several wall shelves, the design and photos of which may surprise and inspire you.


For many, wall shelves are a favorite decor. interior decoration Houses. Original form, books with colorful covers, beautiful dishes, souvenirs - almost everything that your imagination tells you can become stylish accent in interior design. In addition, it is not at all necessary to buy them, because making a creative wall shelf with your own hands is not very difficult even for those who are not very good at carpentry.
DIY shelf in the shape of a honeycomb
A cute honeycomb-shaped shelf can be a cool addition to a non-standard interior. The fashionable design is formed from hex modules, creating original geometric compositions. Everyone can arrange the blocks in the optimal way for themselves.

how to make a shelf with your own hands. Photo
Despite their non-standard appearance, hexagonal blocks are quite convenient and functional, and they are also the strongest and most stable.
To make such a shelf with your own hands, you will need a standard set of tools and simple blanks from rectangular boards. You can assemble a structure from ready-made honeycombs in different ways:

DIY wall shelf. Photo
The second option is undoubtedly more practical, since dust will not accumulate between the individual elements.
Let's see how to make a shelf in the form of a honeycomb in practice
To get the correct hexagon, boards for future construction pruned at an angle of 30°.

Check again if they are the same size and proceed to assembly. hexagons. It's better to do this on the floor.
The elements of the block fit perfectly one to another and begin glue boards using wood glue.

Mounting points for reliability strengthen using L-shaped holders or screws. You can hide the brackets by painting them the same color as the shelf.
The rest of the honeycombs are made in the same way.

Finished modules carefully polished, then covered with stain and special varnish or painted. The shelf will look unusual if the honeycombs are painted in different colors.
All that remains is to stack the finished blocks side by side and drill one or two holes at the joints and screw them together.
DIY shelf. Video instruction
DIY round shelf
The round shape of the shelf is unusual and stylish solution for those who don’t particularly care about how to place more things on it and thus save space. It’s easy to make such a shelf with your own hands. Success will be predetermined if you choose the right source material for the shelf and correctly calculate the dimensions of the parts.

Most available material, which is both strong enough and easy to bend - this is fiberboard sheet. Two strips of estimated length (l) are cut out of it. At the same time, a board of the desired length is also prepared as a central shelf. Obviously, all these parts must have the same width. Now about the length of the strips.

DIY book shelf. Photo
From a geometric point of view, the central shelf is the diameter (d) of the outer contour of the future circle, and the stripes are, accordingly, half the length of the contour, therefore they depend on each other and are related to each other by the formula - l=3.14 x d/2.
Let's say the dimensions of the board are 150 by 700 mm, then the length of the semicircle will be equal to 3.14x700/2, that is, 1100 mm. Now let’s calculate the length of the fiberboard strips, taking into account their overlap, say, 70 mm: 1100 + 2x70 = 1240 mm.

Now let's look at how to make a shelf with your own hands using a sheet of fiberboard.
Stepping back from the end sides by the amount of overlap, apply to the strips marking. Then they begin to form a circle.
The edges of the strips are aligned with each other according to the markings and fixed using clamps. Careful so that the material does not burst, the strips are slowly bent, overlapping the free edges over each other.

Before finally fixing all the parts with screws, you need to make sure that they are correctly adjusted:

The DIY shelf is almost ready. All that remains is to finish it: cover by paint, varnish or other decorative composition. They hang it through furniture eyelets on screws screwed into the wall.


DIY hanging shelves
When choosing an interior for a small apartment, many people wonder whether it is possible to make a compact bookshelf with your own hands so that it does not take up much space. One of possible options- suspended structure.

First you need

The work is carried out in two stages: shelves and fastenings.
Prepare shelves, sawn to size.
Along their edges it is necessary to provide holes of the same size.

DIY hanging shelves. Photo instructions


The template is pressed to the board from the edge, say, using clamps, and make two holes, but not all the way - approximately to the middle of the thickness of the shelf.


The shelves are being processed sandpaper and finish. For example, you can paint it in a color that suits your design.
The shelves are completely ready, all that remains is to hang them. Reliability in this case, given the impressive weight of books, is no less important than aesthetics, so it is best suited for hanging a structure cable.
It is cut into pieces to size and a loop is made at one end using clamping clips.
They are suspended and fixed along the entire length with the required pitch. kegs.


Hooks with screws are attached strictly perpendicular to the wall, on which the cables are hung, and then hanging shelves are attached to them.


DIY hanging shelf-shelf

A charming hanging shelf for the kitchen with your own hands will allow you to rationally use the space. It will look great in a colonial living room, in a children's room in nautical style or a Mediterranean bath. Anyone can handle this kind of work, since you can make a shelf with your own hands in just a few simple steps.

how to make a shelf with your own hands. Master Class
Blanks made of wood are aligned both in shape and size.
Mark the places under holes and make them with a drill with feather drill. To avoid problems in the future, the diameter of the drill is chosen larger than the diameter of the rope by which the bookcase will be suspended.


It is easier to markup using template in the form of a 4x4 square cut out of paper. The template needs to be placed on the corner of the board and marked at the point of intersection of the diagonals of the square.
Color planks.

There are many options on how to make a shelf more interesting. You just need to show a little imagination, for example, paint it only from the ends.
Now the design can be gather. The rope is folded in half and, retreating approximately 30 cm, a knot is tied on each half. The ends are pulled through the holes on one side of the board and secured with another knot. The board thus becomes motionlessly fixed between two nodes. The process is repeated with each shelf, positioned in the required increments.


Do the same with the other side. The main thing that nodes on both sides are located at the same distance from each other.

The remaining free ends of the ropes are cut and unraveled to form tassels.

All that remains is to hang the finished bookcase on the wall.

This DIY shelf has several advantages:

DIY hanging shelves for photos
Is it possible and, most importantly, how to make a shelf on the wall so that it takes up very little space, and you can store a sufficient number of photos, albums, record collections and more there? Well, let's figure out how to make a shelf with your own hands so that it has a minimum depth

This shelf is actually several slats tied together with a rope. They have a bar attached to them that prevents photos, books, etc. from sliding off the shelf. In principle, there can be as many slats as you need, so first you need to decide on their location and quantity. This will make it much easier to calculate the width of the shelves and cut blanks.

After the preparations are sanded, the planks are attached to the slats: they can be nailed or glued. The nail heads are carefully hidden under a layer of special putty, and the plank is sanded again.

Stepping back from the edges by 2 cm, drill two holes in the shelf with a diameter slightly larger than that of the rope.

From each end of the first shelf they stretch rope, tightening the ends in a knot.

It will be much easier to do this if you wrap the threaded edge of the rope with tape or, say, electrical tape.


Put on the second shelf.
The process is repeated until all are installed.

The free ends of the ropes are tied to screws with hooks, screwed onto required height. This is perhaps the most crucial moment, since the bottom shelf should be positioned strictly horizontally, and all the others will be aligned along it.
Horizontalness is checked by level, but it’s still a good idea
 there will be someone’s help, because even if you know exactly how to make a shelf, you can do it alone final stage it will be a little difficult.

Book shelf in the form of a Christmas tree
A creative DIY bookshelf will help you linger in the incomparable New Year’s mood longer. Instead of garlands and toys, it is decorated with books and various cute little things. Children especially like these Christmas tree shelves.

This shelf can be made from ordinary sheet of plywood.

First you need to prepare a small layout plan all parts on a sheet of paper on a scale corresponding to the size of the plywood, indicating their dimensions.

Then you need to transfer everything to the plywood in its original size and after carefully checking the location and dimensions of the parts cut them with a saw or jigsaw.


The tree is assembled using wood glue and secured with nails.


When the workpiece dries, it is coated paint and give it time to dry completely.


The Christmas tree shelf is ready for use. On New Year's Eve you can decorate it to your liking and even put gifts on the branches and shelves.

Here's how a DIY shelf can help bring joy to your loved ones.
DIY shelf-rack
Functional and minimalist industrial style is very popular today. A DIY shelf assembled on pipes will bring into your home that very industrial chic that you may be striving for

Since the number of shelves, as well as the total length of the pipes, is easily adjustable, we will dwell on the general scheme for manufacturing this designer furniture.


Work begins with preparing shelves from wood. Special oil or wax is applied to them to obtain a smooth textured surface.

It would be nice if the shelves initially had an interesting texture.
If you cover the shelves also polyurethane varnish on water based they will acquire an even more magnificent shine.
After allowing the structure to dry, round ones are installed in each corner of the bottom shelf. flanges approximately 2 cm from the edge.

The location of the connecting parts is marked with a pencil.

The shelves are stacked and clamped using clamps.

A pilot hole is drilled through the center of the flange through the first and second flanges. For the next boards in order, the drill size needs to be changed to a larger one, since pipes will pass through them in the future.

Start assembly.
Each flange is placed on the lower shelf above the guide hole and secured to the surface.

Insert into the holes galvanized pipes the required length with threads at both ends and tighten into the flange wrench. A coupling is installed at the top.

When all the parts are mounted, flanges are screwed to the tops of the pipes and fixed to the top shelf.


The finished shelf can be made mobile if you install wheels on the bottom board.

The set will be more stable if you attach it to the wall using special studs or install an L-shaped bracket.

DIY kitchen shelf

Men will probably never understand why housewives never have enough shelves in the kitchen, but few will deny themselves the pleasure of surprising her with a simple but functional kitchen shelf with their own hands.

Making it is not difficult at all. You need to prepare two boards, preferably from hard rocks of the same length. One of them will be installed horizontally for various utensils, and the other - vertically. It will have wooden pegs, on which you can hang cups, potholders and more. The width of the boards may vary slightly.

On a board for cups mark places for perches. It is better to apply the markings symmetrically, then the outermost ones will be at an equal distance from the edges of the board.
Following the markings, drill holes, corresponding to the diameter of the pole.

Using a jig, a special drilling device, you can make several holes to connect both planks. In extreme cases, you can use a countersink, then the recesses under the screw heads will need to be hidden with plugs.

Wooden pole polished sandpaper and cut into equal parts.

The holes for the perches are greased from the inside with wood glue and inserted pegs. They must perform equally. Excess adhesive is wiped off with a napkin.

If the pegs are very tight, you can use with a hammer.
Glued to their end part circles either plywood or wood. Do the same with excess glue.

The shelf is generally ready, it remains polish fine sandpaper and start appearance: handle stain and varnish or paint.
Two holes are drilled in the vertical board of the shelf, through which the shelf will be fixed to the wall with screws. The places for the screw heads are countersunk, and they themselves are covered with decorative plugs.

When installing shelves, use a level.


DIY plexiglass shelf
This shelf looks very light, without loading the interior with anything. Do-it-yourself transparent shelf is made from strips plexiglass of a given size, which is installed on original bead supports.


It is more convenient to cut it from a sheet if you buy it directly in the store.
The screws are selected on the basis that the diameter of its head should exceed the hole of the bead. If you have problems with this, you can use a washer.

Before installation, beads need to be paint gold spray paint.
Paint the wooden beads with gold spray paint.
In the wall drill pilot holes.
Six beads are put on a screw, screwed into the wall and leveled. The same is repeated with the second one. For a concrete wall, dowels are used; for a frame wall, the screws must fit into the wooden studs.


The plexiglass plate is placed on the resulting supports.

The shelf's thickness of 1.2 cm provides sufficient rigidity, but not so much that heavy objects can be placed on it.


DIY hanging shelf with straps

Making such a design is extremely simple.


Need to prepare board convenient size and sand the surfaces of all edges with sandpaper.


If the wood texture is not expressive enough and you would like to hide it, you can paint.

From two identical belts Buckles are removed from leather (textile), as well as all other metal parts.

The ends of each of them are drilled holes small diameter.

The belts are folded in half so as to form a loop. They are fixed on the wall, positioned from each other at a distance not much less than the length of the board.
The board is inserted into the hinges and aligned so that it is parallel to the floor.

If you want to secure the board more securely, you can additionally secure the belt with several screws on the bottom side.

Shelf made from construction pallets
Times change, tastes change. Today, many are trying to use industrial decor in their homes, replacing elegant pieces of furniture with deliberately rough ones. You can make individual elements yourself, for example, a do-it-yourself shelf from wooden construction pallets.


For one shelf you need to disassemble two pallets. The result is:

The following parts are sawn from this material and sanded either with sandpaper or using a special attachment on a drill:
Boards: Quantity - Dimensions (mm)
- 4 - 640x145
- 2 - 680x145
- 2 - 840x145
- 2 - 290x145
- 2 - 640x100
- 2 - 840x100
- 2 - 290x50
Checkers: quantity - dimensions (mm)

The shelf is assembled in the following order:
For the base take two narrow boards 640x100 each and attach the checkers along the edges. Wide 290x145 boards are attached to the checkers perpendicular to the narrow boards, aligning them on equal sides.

To the end part grounds Two boards are fastened vertically with self-tapping screws: narrow (840x100) and wide (840x145). Repeat the same operation with the opposite end of the base.

They are finishing construction box future bookcase, securing two on top wide boards(680x145). To avoid cracking the wood, you can use a thin drill to pre-make holes in them.

Then two wide boards (640x145) are attached to the base. The bottom shelf is ready.

For the remaining shelves you will need support strips. To do this, the narrowest boards (290x50) are fixed at the required height.

The remaining boards measuring 640x145 are attached to the installed planks. It is advisable to secure them with self-tapping screws at the ends. This will give the structure durability and greater reliability.

The resulting bookcase can be used both as a rack for your favorite things, and as a shelf for your own shoes.


DIY picture shelf
You won’t believe it, but you can make an unusual original shelf on the wall for your favorite painting yourself, and from a simple kit that you can buy in any supermarket.

Creating this masterpiece will greatly simplify Dremel 300- multifunctional tool with big amount high quality attachments and milling machine Dremel 231. The point is this: in order for the painting to slide off the shelf, you need to make a groove on its surface.
The boards are laid on milling table and turn it upside down, mark the cutting line for groove and using guides on milling table set the desired depth for it.

A groove is made.

Wooden wall shelf paint to the desired color and let it dry.

They screw it to her holders and strictly horizontally attached to the wall. The direction is adjusted using a building level.

DIY children's shelf in the shape of a horse
Using a few wooden planks, you can create a fun bookshelf where your little one will happily put his books.


For work you will need sample pony horses. You can draw it yourself or using special computer programs. The template is printed and a stencil of the main parts of the future pony shelf is cut out: legs, head and tail.

DIY children's shelf. Photo
The stencils are placed on separate boards, traced along the contour and sawed out parts with the appropriate tool.


Cleaning up surfaces of parts and edges with sandpaper.

The “legs” are attached to the “body” with furniture screws, then the head and tail are glued.

You can go over the product with sandpaper again.

"Horse" coloring.

In just a few hours the miracle shelf will be ready for use.

Shelf-shelf
We present to your attention two ideas for shelving shelves that you can easily implement yourself.

First of edged boards 40 mm is extremely simple. The bookcase is assembled:

The height and width of the structure are arbitrary and selected locally. If desired, the bookcase can be fixed in the upper part, and rubber heels can be placed along the bottom of the boards.

Second - S-shaped. For manufacturing, you can use scrap boards, plywood or chipboard. 16 blanks are required for one section of the structure rectangular shape, for example, 300x150 mm.

Blanks installed in a certain order, three at each stage.


The first blank is placed on the floor. A second one is attached to it at a right angle, joining them widthwise on the left. The third in width is joined to the first in its length, starting from the far right corner.

The fourth, fifth, sixth - are assembled symmetrically, exactly the opposite.

It is very simple to check how correctly the figure has formed: the second, third and fourth boards should form the letter S.
Experienced craftsmen advise first assembling the structure roughly on wooden pins and fit the workpieces, and when disassembling them, number the parts at the end.
Every detail then sand sandpaper and begin to collect them, according to the numbering. PVA glue is applied to the joint lines and grooves and clamped tightly, holding it in this state for some time.
The assembled shelf is varnished or painted.
DIY shoe rack
The main problem for the hallway at all times remains shoes. How to deal with the perpetrators of the unrest, and do it as economically as possible? The optimal solution is to make a shoe rack with your own hands.

Let's share some interesting ideas.
From plywood. More often they make a modular shelf that is attached to the wall and saves space. Using a jigsaw, the plywood is cut into identical rectangular planks, then carefully sanded. U-shaped structures are assembled from the parts and “nested” one into the other, forming a structure resembling a labyrinth.

From tree. From wooden board blanks are cut out with a width of 250-350 mm and a thickness of about 20 mm. The next steps are as follows:

The side walls are cut out to a length of approximately 800-900 mm.
Cut out four shelves of 600-700 mm each.
Everyone's cooking additional details: crossbars and support rails.
All workpieces are sanded.
The support bars are fixed to the side walls with self-tapping screws.
Shelves are laid on them.
Metal corners are attached to the rear end part.
The finished product can be varnished or painted.
From profile. Galvanized or regular profile plus tempered glass - everything you need to build a shoe rack with your own hands in a modern high-tech style.
A section of the profile of the required length is applied to the wall and fixed with one screw for now.
Check the level of the horizontal profile line.
Screw in the remaining screws.
Assembling the frame.
Install prepared glass shelves.

From boxes. This is the most economical option for a DIY shoe rack, both in terms of cost and size.
The outlines of the parts are drawn on the cardboard of the box.
They are cut out using special knife for cardboard.

Then the rectangles are made into boxes, which are placed on top of each other. This is how recesses for shoes are formed.
Fastening is done with staples.
The shelf is assembled on the wall, then covered with decorative film.
Photo of unusual shelves on the wall
An interesting composition on the wall of the living room, which combines several unusual shelving, made in the same style and color scheme, but different in configuration and size.

Not only books can be stored on wall shelves; there is also room for albums, glass and porcelain figurines, cute trinkets, and flower pots.

Bright and eye-catching, whimsical branches of the Flex Shelf tree shelf will give extra space, where books and magazines will be compactly placed.

These shelves are a real art object on the wall, far from the traditional way of interior decoration. A combination of classic and modern forms shelves scattered along the wall instantly attracts attention.

The TV in this composition looks like a “modern painting” in a frame, inside of which open shelves are located asymmetrically. You can place them on decorative elements, photographs and more.

A bright and creative shelf in the shape of a bat looks incredibly original. It will equally stylishly decorate a living room, bedroom or nursery for those who love original solutions. 


