DIY soap (stearic) candles
Stearine (French stearine, from Greek stear - fat) is an organic product obtained from fats. It consists of stearic acid with an admixture of palmitic, oleic and other saturated and unsaturated fatty acids. Used in soap making, paper, rubber, textile industries, and for making candles. A mixture of kerosene and stearin is used as a lubricant during molding work. As a component it is part of wax used in the foundry industry.
Try making your own stearin candle using a bar of laundry soap.
Use a knife to cut about half a piece of laundry soap and place it in a clean tin can or an old saucepan. Pour enough water to cover the soap shavings and place the mixture in a water bath. Stir the contents of the saucepan from time to time wooden stick so that the soap dissolves in the water as quickly as possible.
When this happens, remove the vessel from the heat and pour vinegar into it. Under the action of acid, a thick white mass will separate from the solution and float to the surface. This is stearin - a translucent mixture of several substances, mainly stearic C17H35COOH and palmitic C15H31COOH acids.
It is impossible to name the exact composition; it is different and depends on the substances that went into making the soap.
 As you know, candles are made from stearin. Or rather, they did it before, because now candles are mostly not stearic, but paraffin - paraffin obtained from oil is cheaper and more accessible. But since we have stearin at our disposal, let’s make a candle out of it.
When the jar has cooled completely, scoop the stearin from the surface with a spoon and transfer it to a clean container. Rinse the stearin with water two or three times and wrap it in a clean white cloth or filter paper to absorb excess moisture.
When the stearin is completely dry, let's start making the candle. The simplest technique is probably this: dip a thick twisted thread, for example from a kerosene wick, into slightly heated molten stearin several times, each time allowing the stearin to harden on the wick. Do this until the candle grows to a sufficient thickness on the wick. This good way, although somewhat tedious; in any case, in ancient times candles were often prepared this way.
There is an even simpler way: immediately coat the wick with stearin heated until softened (you can even just prepare it, not yet cooled down). True, in this case the wick will be less saturated with the fusible mass, and the candle will not turn out very good, although it will burn.
 For beautiful shaped candles, the manufacturing methods are not easy. First of all, you need to make a mold - wooden, plaster, metal. In this case, it is advisable to first soak the wick with one or two layers of stearin; it is then secured in the mold so that it runs exactly down the middle. It is advisable that the wick be slightly stretched. And after that, hot stearin is poured into the mold.
In this way you can make candles from paraffin, i.e. from store-bought candles, melting them and giving them the shape you like.
***
You can do exactly the opposite - make soap from a stearin candle:
 Making soap from stearin
You cannot make soap from a paraffin candle. Only a stearin candle is suitable; natural beeswax will also work.
Heat a certain amount of stearin in a water bath, hot enough, but not brought to a boil. When the stearin is completely melted, add a concentrated solution of washing (soda ash) to it. The resulting white viscous mass is soap. Keep it in a water bath for a few more minutes, and then pour the still hot mass into some form.
Soap has been obtained, but we do not know how pure the substances that were part of the candle were, so this soap is used as a last resort, or for washing.
***
Vintage stearin candles - how to make
 Production of stearin candles without the use of presses and other expensive machines
Heat 10-12% of good lard in clean boiled water. When it melts, turn off the fire and let the lard stand until a thin film forms on the surface. Then add 2% soda solution 30° Baumé and stir until the mixture acquires the consistency of cold process soap. Light the fire again and bring the mixture to the boiling point. When boiled, the soap decomposes again and a precipitate is formed in the form of flakes, containing impurities contained in the lard. If you let the lard sit for some time, it becomes transparent and almost colorless. In this state, it can be successfully used for lubricating machines, but for making candles it requires further processing, since it still contains traces of soap. It is placed in a copper cauldron and cleaned with acidified water 1-2% B. As long as the lard contains traces of soap, foam appears on the surface and does not dissolve.
Acidified water is added until the foam completely disappears. But it is better to make a test to be sure that the soap has decomposed. For this purpose, take a small amount of liquid from the bottom of the boiler and make a test using litmus paper. If it does not turn red, then boiling should continue with further addition of acidified water. If the litmus paper turns red, then the lard is allowed to settle, after which the acidic water is drained and the fat is boiled again with fresh water.
Then olein and stearin are separated as follows: take a boiler with a double bottom, which is placed at a distance of 10 cm from the real bottom of the boiler. The double bottom is equipped with holes 1.25 cm in diameter, and there is a tap between the bottoms.
Place equal parts of lard and boiling water into the cauldron and cover the cauldron with a lid to prevent too much cooling. The mass is allowed to stand for two or three days, depending on the quantity, until a thermometer immersed in the top layer of lard shows a temperature of 22-25 ° C. Then the tap opens and first water flows out from the lower room, then olein, while the crystallized stearin remains on the double bottom and is ready for molding candles from it. This is done in the same way as making tallow candles, but at a higher temperature. The mass, which looks like milk, must be stirred all the time.
When we talked about why soap washes, we mentioned the special structure of its molecule: a “head” and a long “tail”, and the “head” tends towards the water, and the “tail”, on the contrary, repels from the water... Let's take a closer look hydrophobic"tail" - long hydrocarbon chain. These types of connections are very common and extremely important for industry. They are an indispensable component of many fats, oils, lubricants and other beneficial substances. One of them is the so-called stearin- we will now get it, taking as a basis laundry soap.
Using a knife, cut out half a piece of laundry soap and place it in a clean tin can (or in a used saucepan). Pour in enough water to cover the soap shavings and place the mixture in a water bath. Stir the contents of the saucepan with a wooden stick from time to time so that the soap dissolves in the water as quickly as possible. When this finally happens, remove the vessel from the heat (of course, do not bare hand) and pour vinegar into it.
Under the action of acid, a thick white mass will separate from the solution and float to the surface. This is it stearin- a translucent mixture of several substances, mainly stearic C 17 H 35 COOH and palmitic C 15 H 31 COOH acids. It is impossible to say the exact composition; it depends on the substances that went into making the soap.
From stearin, as you know, make candles. Or rather, they did it before, because now candles are mostly not stearic, A paraffin- derived from petroleum paraffin cheaper and more accessible. But, since we have stearin at our disposal, we will make a candle from it. This, by the way, is a fun activity in itself!
When the jar has cooled completely, scoop the stearin from the surface with a spoon and transfer it to a clean container. Rinse the stearin two or three times with water and wrap it in a clean white rag or filter paper to absorb excess moisture. When the stearin is completely dry, let's start making the candle.
Here is perhaps the simplest technique: dip a thick twisted thread, for example, from a kerosene wick, into slightly heated molten stearin several times, each time allowing the stearin to harden on the wick. Do this until the candle grows to a sufficient thickness on the wick. This is a good method, although somewhat tedious; in any case, in ancient times candles were often prepared this way.
There is a simpler way: immediately coat the wick with stearin heated until soft (you can even just prepare it, not yet cooled down). But in this case, the wick will be less saturated with the fusible mass and the candle will not turn out very good, although it will burn.
For beautiful, shaped candles, the manufacturing methods are not easy. And first of all, you need to make a mold - wooden, plaster, metal. In this case, it is advisable to first soak the wick with one or two layers of stearin; it is then secured in the mold so that it runs exactly down the middle. It is advisable that the wick be slightly stretched. And after that, hot stearin is poured into the mold.
By the way, in this way you can make candles from paraffin, i.e., actually, from purchased candles, melting them and giving them the shape you like. However, we warn you - you will have to tinker...
Having received a candle from soap, let's conduct the experiment in the opposite direction: prepare candle soap. But not from paraffin soap; soap cannot be made from it at all, because paraffin molecules do not have “heads.” But if you are sure that the candle is stearic, then you can safely make laundry soap from it. Natural is also suitable beeswax.
Several fragments of a stearin candle heat in a water bath, hot enough, but not brought to a boil. When the stearin is completely melted, add a concentrated solution to it washing(calcified) soda. The resulting white viscous mass is soap. Hold it for a few more minutes in a water bath, and then, putting on a mitten or wrapping your hand in a towel so as not to get burned, pour the still hot mass into some form - at least into a matchbox. When the soap has hardened, remove it from the box.
Making sure that it is soap and that it cleans is not difficult. Just please don’t use it to wash your hands - we don’t know how pure the substances that made up the candle were.
Moisten a piece of natural chalk CaCO 3 with a drop hydrochloric acid HCl (you can take pharmaceutical acid). Where the drop fell, energetic boiling is noticeable. Place a piece of chalk with a “boiling” drop into the flame of a candle or dry alcohol. The flame will turn a beautiful red color.
This is a well-known phenomenon: calcium, which is part of chalk, makes the flame red. But why acid? Reacting with chalk, it forms soluble calcium chloride CaCl 2, its splashes are carried away by gases and fall directly into the flame - this makes the experience more effective.
Unfortunately, such an experiment with pressed school chalk does not work - it contains an admixture soda(sodium salts), and the flame is colored V orange . The best experience is obtained with a piece of white marble soaked in the same acid.
And make sure that sodium salts color the flame intensely yellow, you can by adding a grain of NaCl salt to the flame (or just lightly “salting” the fire).
For the next experiment with chalk, you will need a candle. Strengthen it on a non-flammable stand and add a piece of chalk (marble, shells, eggshells). The chalk becomes covered with soot, which means the flame temperature is low. We are going to burn chalk, and for this we need a temperature of 700-800 o C. What should we do? It is necessary to increase the temperature by blowing air through the flame.
Remove the rubber cap from the medicine pipette and replace it with a rubber or plastic tube. Blow into the tube so that air enters the flame just above the wick through the drawn end of the pipette. The flame will deviate to the side, its temperature will increase.
Point the tongue at the sharpest part of the crayon. This area will become white hot, chalk will turn into burnt(quicklime) lime CaO, and at the same time it will stand out carbon dioxide.
Do this operation several times with the pieces chalk, marble, eggshell. Place the burned pieces in a clean tin. While they are cooling, place the largest piece in a saucer and drop some water on the place that was heated. There will be a hissing sound, all the water will be absorbed, and the baked area will crumble into powder. This powder is slaked lime Ca(OH) 2.
Add more water and drop the solution phenolphthalein. The water in the saucer will turn red; This means that slaked lime forms an alkaline solution.
When the burned pieces have cooled, place them in glass jar or bottle, fill it with water, close the lid and shake - the water will become cloudy. You already know that we will now get lime water. Let the liquid settle and pour the clear solution into a clean bottle. Pour some limewater into a test tube - and you can use it to perform the previously described experiments with gases. And other tricks are possible.
Make your own candle!
Complexity:
Danger:
Reagents
Safety
Wear gloves before starting the experiment.
Conduct the experiment on a tray.
Remove gloves before lighting a candle.
General safety rules
- Do not allow chemicals to come into contact with your eyes or mouth.
- Keep people away from the experiment site without protective glasses, as well as small children and animals.
- Keep the experimental kit out of the reach of children under 12 years of age.
- Wash or clean all equipment and fixtures after use.
- Ensure that all reagent containers are tightly closed and stored properly after use.
- Make sure all disposable containers are disposed of correctly.
- Use only the equipment and reagents provided in the kit or recommended by current instructions.
- If you have used a food container or glassware for experiments, throw it away immediately. They are no longer suitable for storing food.
First aid information
- If reagents come into contact with your eyes, rinse thoroughly with water, keeping the eye open if necessary. Contact your doctor immediately.
- If swallowed, rinse mouth with water and drink a little clean water. Do not induce vomiting. Contact your doctor immediately.
- If reagents are inhaled, remove the victim to fresh air.
- In case of skin contact or burns, wash the affected area a large number water for 10 minutes or longer.
- If in doubt, consult a doctor immediately. Take the chemical reagent and its container with you.
- In case of injury, always seek medical attention.
- Improper use of chemicals can cause injury and damage to health. Carry out only the experiments specified in the instructions.
- This set of experiences is intended for children 12 years and older only.
- Children's abilities vary significantly even within age groups. Therefore, parents conducting experiments with their children should use their own discretion to decide which experiments are appropriate and safe for their children.
- Parents should discuss safety rules with their child or children before experimenting. Particular attention should be paid to the safe handling of acids, alkalis and flammable liquids.
- Before starting experiments, clear the experiment site of objects that may interfere with you. Storage should be avoided food products near the testing site. The testing area should be well ventilated and close to a tap or other water source. To conduct experiments, you will need a stable table.
- Substances in disposable packaging must be used completely or disposed of after one experiment, i.e. after opening the package.
Other experiments
Step by step instructions
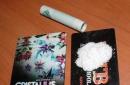
Take regular laundry soap (a medium-sized bar weighs about 200 g). Toilet soap is also suitable for the experiment. However, the fewer additives and fragrances in the soap you use, the better. Make notches on a piece of soap, dividing it into 6-8 equal parts. Grind about 30 grams of soap (one part) with a knife or grater.
Pour soap shavings into a beaker up to the 75 mark. If you don't have enough soap shavings, grind a little more.
Pour water into the glass up to the “75” mark. It is better to use warm water.
Now you need to get the soap to dissolve in water. As a result, you will get a homogeneous thick soap mass. To do this, place a glass with soap shavings and water in a heated water bath. Mix the soap using a plastic stick.
It is easy to make a water bath from a deep plate or small saucepan. To do this, just place them on a heat-resistant surface and pour boiling water over them so that when you put a glass of soap in the container, the water level outside is slightly below the “75” mark.
If water bath has cooled down and the soap has not yet dissolved, remove the beaker from the bath (only hold it by the top part, which was not immersed in water!). Carefully drain the cooled water from the bath and pour in fresh boiling water.
You will need 30-40 minutes for the soap to completely dissolve.
Attention! Take precautions when working with boiling water.
Once the soap has dissolved, wipe the plastic stick with a paper towel, which will be useful in the next steps.
Take a plastic cup from starter kit. Pour the contents of a jar of anhydrous water into it. citric acid C6H8O7 (10 g).
Fill the glass with citric acid halfway with water.
Stir the contents of the glass with a plastic stick for 1-2 minutes until the citric acid is completely dissolved.
Pour out the contents plastic cup into a glass beaker with dissolved soap.
Stir the mixture for 2-3 minutes using a plastic stick.
Leave the mixture for 10 minutes. Then carefully drain the water from the glass. If the mixture does not separate, wait another 10–15 minutes, then drain the water.
Use a plastic skewer to pour the contents of the glass onto paper towels. Leave the workpiece to dry for 1 day.
Make sure the workpiece is dry. First treat the wick with the resulting substance: apply a small amount of the mixture to the wick. Fill the candle mold with the resulting substance, inserting the wick as shown in the picture. Compact the substance in the mold.
Attention! Remove protective gloves before lighting a candle.
Light the candle.

Expected result
Having highlighted stearic acid from soap, you got a homemade candle.
Disposal
Dispose of experiment waste with household waste.
What happened
What is soap and what does it consist of?
Soap is a well-known solid or liquid detergent. What does it consist of and why does it help cleanse the skin of dirt? No matter how strange it may sound, soap is a mixture of quite complex molecules. One such molecule contains the already well-known positively charged sodium ion Na + (potassium K + in the case of liquid soap) and a large negatively charged organic fragment (anion).
These anions are structured almost like tadpoles: at one end they have negative charge, and the rest of them is a long chain of carbon atoms (15-20 atoms), a kind of tail. When soap is dissolved in water, the charged tips of these anions are easily immersed in water and take on the same “water coat” as, for example, some Cl - .
But the long tail of the molecule feels very uncomfortable in the water and tries to slip out of it. It turns out that most of the dirt is structured in much the same way as this tail, and therefore is so difficult to wash off with water. When dirt gets into a soap solution, like is attracted to like: the anions from the soap turn their tails towards small pieces of dirt, and leave the charged “head” in the water. Thanks to this mediation, dirt is washed off much better with a soap solution than with ordinary water.
Molecules similar to those described above, along with the familiar copper sulfate CuSO 4 or ammonium chloride NH 4 Cl, are called salts by chemists. Salts usually easily break down in solution into positively and negatively charged fragments:
NH 4 Cl → NH 4 + + Cl -
CuSO 4 → Cu 2+ + SO 4 2-
NaCl → Na + + Cl -
It's funny how ordinary table salt, the very substance that we are used to calling salt (and not some copper sulfate!) is sodium chloride NaCl, which also belongs to the class of salts. It's not easy not to get confused!
And the complex molecules that make up soap are called salts of fatty acids. But more on that a little later.
What is stearin?
In our case, stearin is the base for the candle. If you replace sodium ions Na + with H + protons, then the mixture of those very complex organic molecules from the previous question will turn into ... stearin - a mixture of so-called fatty acids! They are arranged as follows: at the end of the molecule of such an acid there is a group of carbon, oxygen and hydrogen atoms, which, in fact, makes it an acid. And the rest of the molecule is a long chain of carbon atoms, similar to a tail. By changing just one atom in each of the large molecules, we got two very different substances: one is capable of washing away dirt, and the second, after a little processing, turned into a candle!
Why do we use citric acid?
Soap is salts of fatty acids, and the candle should consist of stearin, that is, of these acids themselves. This means that to create a candle we need to act on the soap solution with some kind of acid. In this case, the following reaction occurs: citric acid takes Na + from fatty acid salts and gives them H + in return, converting their fatty acids (in other words, into stearin). It dissolves very poorly in water and forms a thick sticky mass. After the stearin is dried, you can make a candle out of it.
Why is it important to dissolve the soap before adding citric acid?
In order for citric acid to turn into salt, and salts of fatty acids into these acids themselves, it is necessary that nothing prevents them from reaching each other. If the soap is poorly dissolved, then part of it in large pieces will not be able to come into contact with citric acid and will remain unchanged. After all, stearin forms on the surface of such pieces. And it is insoluble in water and isolates the remaining soap, stopping the reaction. This is why it is so important to dissolve all the soap before adding the citric acid solution.
By the way, the heating and stirring carried out in the experiment are precisely necessary to ensure that the soap dissolves in water faster.
Soap for constipation - the most effective and quick remedy from traditional medicine, which has been popular for many years.
The problem of constipation is relevant in modern world. Almost every adult and child has experienced a situation where it is difficult to go to the toilet. There are many ways to treat this pathology.
Despite the fact that there are many medications for constipation in pharmacies, folk remedies do not lose their relevance.
Causes of constipation
Constipation is also called constipation. In this case, a violation of the act of defecation occurs, in which the feces become dense (sometimes stone-hard) and dry. There can be many reasons:
- Dehydration of the body.
- Intestinal hypotension.
- Disease of the large intestine, especially the rectum (anal fissures, hemorrhoids).
- Hormonal imbalances.
- Use of medications.
- Pregnancy.
- Absence of constipation for more than three days.
- Increased gas formation and more.

If you have been bothered by constipation for a long time, be sure to consult your doctor, who will accurately determine the cause and prescribe the correct treatment.
How does soap work?
A soap suppository is an irritant to the colon, and as a result, it is freed from established feces. Using soap to treat constipation has its pros and cons.
Pros: Soap is much safer than those medicines who have a lot side effects and can even be addictive. If a small piece of soap remains in the rectum, it will quickly dissolve on its own and be eliminated from the body naturally.
Cons: Some experts argue that alkalis contained in any soap can cause a strong change in the pH of the intestinal environment, which will affect the functional state of the body. Colon ulcers and burns are also possible.
Therefore, soap enema must be used very carefully. Before use, you should familiarize yourself with the contraindications and weigh the pros and cons.
Contraindications for use
Contraindications are frequent problems with defecation, trophic and ulcerative changes in the intestines, if, along with constipation, fever and dyspeptic disorders occur, in case of intestinal diseases.
 With the uncontrolled use of soap for constipation as a laxative, the development of tenesmus is inevitable - a false painful urge to defecate. This is due to the fact that alkali corrodes the intestinal mucosa, the intramural nerve plexuses remain unprotected and are damaged, which leads to malfunctions in its functioning.
Irritation of the nerve plexus occurs especially often when using toilet soap, which contains fragrances and other synthetic additives.
Which soap to choose?
To relieve constipation, choose laundry or baby soap which have a moisturizing effect. You should avoid using regular cosmetic or tar soap. They contain substances that dry out the mucous membranes of the intestine and can cause the appearance of anal fissures.
 Some soaps irritate the nerve endings in the membrane and cause false urges.
 This is accompanied by irritability and nervousness. For children, choose only hypoallergenic soap. When choosing soap to eliminate intestinal dysfunction, you should carefully study its composition. Preference should be given exclusively to soaps with natural composition.
How to use soap for constipation
Methods for using soap for constipation differ depending on age, concomitant diseases, and others.
Application for adults:
Making a rectal suppository from soap. Laundry soap is often used for this purpose. Take no more than 15 grams of soap shavings and wool thread about 5 centimeters long. We roll a cone-shaped candle around the thread so that the latter sticks out of it. The candle turns out to be quite small and will not cause discomfort. By appearance it will look like a feminine sanitary tampon.
 The candle must be inserted into the anus for 6-7 minutes, no more, and then removed with a thread.
 During this time, the soap will have time to dissolve a little and provide additional lubrication. The urge to defecate will appear after about 25 minutes.
Cleansing soap enema. The soap is rubbed into shavings, which will require 25 grams. Add 55 grams of warm water. Pour the resulting solution into a syringe and perform an enema, pouring the liquid into the rectum.
This product stimulates peristalsis well and for a short time there is a urge to defecate.
 You will need soap shavings, mint, nettle, and chamomile leaves. Add the above components to half a liter of water and cook over low heat, at the end add a small amount of flax oil. We strain the solution, get rid of small particles, and pour in the liquid using. How long does it take for it to work? Immediately after use.
How to use during pregnancy?
It is not advisable to resort to these methods often, no more than 3 times during the entire pregnancy period and in case of complete health of the expectant mother. Substances contained in soap can lead to increased muscle tone of the uterus, which can lead to premature birth and miscarriage.
Use in children
The candle can be made from baby soap, which is more gentle. To do this, we make soap shavings and roll them into a thin tube, no thicker than a match.
 To insert the suppository into the butt, place the baby on his side and slightly bend his legs at the knee and hip joint.
 You can use soap for constipation several times. Single constipation occurs due to temporary digestive disorders, but if constipation occurs too often, then you need to think about the cause. In such cases, there may be a serious disease with a hidden clinical picture that requires complex treatment.
Video
Make your own candle!
Complexity:
Danger:
Reagents
Safety
Wear gloves before starting the experiment.
Conduct the experiment on a tray.
Remove gloves before lighting a candle.
General safety rules
- Do not allow chemicals to come into contact with your eyes or mouth.
- Keep people away from the experiment site without protective glasses, as well as small children and animals.
- Keep the experimental kit out of the reach of children under 12 years of age.
- Wash or clean all equipment and fixtures after use.
- Ensure that all reagent containers are tightly closed and stored properly after use.
- Make sure all disposable containers are disposed of correctly.
- Use only the equipment and reagents provided in the kit or recommended by current instructions.
- If you have used a food container or glassware for experiments, throw it away immediately. They are no longer suitable for storing food.
First aid information
- If reagents come into contact with your eyes, rinse thoroughly with water, keeping the eye open if necessary. Contact your doctor immediately.
- If swallowed, rinse mouth with water and drink some clean water. Do not induce vomiting. Contact your doctor immediately.
- If reagents are inhaled, remove the victim to fresh air.
- In case of skin contact or burns, flush the affected area with plenty of water for 10 minutes or longer.
- If in doubt, consult a doctor immediately. Take the chemical reagent and its container with you.
- In case of injury, always seek medical attention.
- Improper use of chemicals can cause injury and damage to health. Carry out only the experiments specified in the instructions.
- This set of experiences is intended for children 12 years and older only.
- Children's abilities vary significantly even within age groups. Therefore, parents conducting experiments with their children should use their own discretion to decide which experiments are appropriate and safe for their children.
- Parents should discuss safety rules with their child or children before experimenting. Particular attention should be paid to the safe handling of acids, alkalis and flammable liquids.
- Before starting experiments, clear the experiment site of objects that may interfere with you. Avoid storing food near the test site. The testing area should be well ventilated and close to a tap or other water source. To conduct experiments, you will need a stable table.
- Substances in disposable packaging must be used completely or disposed of after one experiment, i.e. after opening the package.
Other experiments
Step by step instructions
Take regular laundry soap (a medium-sized bar weighs about 200 g). Toilet soap is also suitable for the experiment. However, the fewer additives and fragrances in the soap you use, the better. Make notches on a piece of soap, dividing it into 6-8 equal parts. Grind about 30 grams of soap (one part) with a knife or grater.
Pour soap shavings into a beaker up to the 75 mark. If you don't have enough soap shavings, grind a little more.
Pour water into the glass up to the “75” mark. It is better to use warm water.
Now you need to get the soap to dissolve in water. As a result, you will get a homogeneous thick soap mass. To do this, place a glass with soap shavings and water in a heated water bath. Mix the soap using a plastic stick.
It is easy to make a water bath from a deep plate or small saucepan. To do this, just place them on a heat-resistant surface and pour boiling water over them so that when you put a glass of soap in the container, the water level outside is slightly below the “75” mark.
If the water bath has cooled down and the soap has not yet dissolved, remove the beaker from the bath (only hold it by the top part, which was not immersed in water!). Carefully drain the cooled water from the bath and pour in fresh boiling water.
You will need 30-40 minutes for the soap to completely dissolve.
Attention! Take precautions when working with boiling water.
Once the soap has dissolved, wipe the plastic stick with a paper towel, which will be useful in the next steps.
Take the plastic cup from the starter kit. Pour the contents of a jar of anhydrous citric acid C 6 H 8 O 7 (10 g) into it.
Fill the glass with citric acid halfway with water.
Stir the contents of the glass with a plastic stick for 1-2 minutes until the citric acid is completely dissolved.
Pour the contents of the plastic cup into a glass glass with dissolved soap.
Stir the mixture for 2-3 minutes using a plastic stick.
Leave the mixture for 10 minutes. Then carefully drain the water from the glass. If the mixture does not separate, wait another 10–15 minutes, then drain the water.
Use a plastic skewer to drain the contents of the glass onto paper towels. Leave the workpiece to dry for 1 day.
Make sure the workpiece is dry. First treat the wick with the resulting substance: apply a small amount of the mixture to the wick. Fill the candle mold with the resulting substance, inserting the wick as shown in the picture. Compact the substance in the mold.
Attention! Remove protective gloves before lighting a candle.
Light the candle.
Expected result
By isolating stearic acid from soap, you have a homemade candle.
Disposal
Dispose of experiment waste with household waste.
What happened
What is soap and what does it consist of?
Soap is a well-known solid or liquid detergent. What does it consist of and why does it help cleanse the skin of dirt? No matter how strange it may sound, soap is a mixture of quite complex molecules. One such molecule contains the already well-known positively charged sodium ion Na + (potassium K + in the case of liquid soap) and a large negatively charged organic fragment (anion).
These anions are structured almost like tadpoles: at one end they have a negative charge, and the rest is a long chain of carbon atoms (15-20 atoms), a kind of tail. When soap is dissolved in water, the charged tips of these anions are easily immersed in water and take on the same “water coat” as, for example, some Cl - .
But the long tail of the molecule feels very uncomfortable in the water and tries to slip out of it. It turns out that most of the dirt is structured in much the same way as this tail, and therefore is so difficult to wash off with water. When dirt gets into a soap solution, like is attracted to like: the anions from the soap turn their tails towards small pieces of dirt, and leave the charged “head” in the water. Thanks to this mediation, dirt is washed off much better with a soap solution than with ordinary water.
Molecules similar to those described above, along with the familiar copper sulfate CuSO 4 or ammonium chloride NH 4 Cl, are called salts by chemists. Salts usually easily break down in solution into positively and negatively charged fragments:
NH 4 Cl → NH 4 + + Cl -
CuSO 4 → Cu 2+ + SO 4 2-
NaCl → Na + + Cl -
It's funny that ordinary table salt, the very substance that we used to call salt (and not some copper sulfate!) is sodium chloride NaCl, which also belongs to the class of salts. It's not easy not to get confused!
And the complex molecules that make up soap are called salts of fatty acids. But more on that a little later.
What is stearin?
In our case, stearin is the base for the candle. If you replace sodium ions Na + with H + protons, then the mixture of those very complex organic molecules from the previous question will turn into ... stearin - a mixture of so-called fatty acids! They are arranged as follows: at the end of the molecule of such an acid there is a group of carbon, oxygen and hydrogen atoms, which, in fact, makes it an acid. And the rest of the molecule is a long chain of carbon atoms, similar to a tail. By changing just one atom in each of the large molecules, we got two very different substances: one is capable of washing away dirt, and the second, after a little processing, turned into a candle!
Why do we use citric acid?
Soap is salts of fatty acids, and the candle should consist of stearin, that is, of these acids themselves. This means that to create a candle we need to act on the soap solution with some kind of acid. In this case, the following reaction occurs: citric acid takes Na + from fatty acid salts and gives them H + in return, converting their fatty acids (in other words, into stearin). It dissolves very poorly in water and forms a thick sticky mass. After the stearin is dried, you can make a candle out of it.
Why is it important to dissolve the soap before adding citric acid?
In order for citric acid to turn into salt, and salts of fatty acids into these acids themselves, it is necessary that nothing prevents them from reaching each other. If the soap is poorly dissolved, then part of it in large pieces will not be able to come into contact with citric acid and will remain unchanged. After all, stearin forms on the surface of such pieces. And it is insoluble in water and isolates the remaining soap, stopping the reaction. This is why it is so important to dissolve all the soap before adding the citric acid solution.
By the way, the heating and stirring carried out in the experiment are precisely necessary to ensure that the soap dissolves in water faster.