It is important to think about making a fencing structure, as well as installing a gate with a wicket. There are several options for implementing the latter. For example, you can make a gate separately from the gate or built into the “body” of the gate frame. Regardless of the option you choose, the gate must be strong enough and reliable. If we talk about quality and reliability, then a metal gate has no equal. Making a metal gate allows you to show your imagination, as there are many interesting methods for designing it. You can even include forging elements in the design of a metal gate, which will give it a special charm.
Getting ready for work
So, if you want to make a high-quality, beautiful and reliable gate, then it is important to good preparation. If you want to include forging elements for a metal fence and gate, it is best to order them from a specialized company.
In general, it is quite possible to make an iron gate yourself. For this you can successfully use profile pipe or metal profile. However, in your case it will be possible if you have skills in working with welding equipment. If you don’t have such skills, much less suitable equipment, then you can invite a friend and help him. So, you can save a lot if you had to contact a specialized company.

So, to perform the work, you need to have the following equipment:
- Welding machine.
- Special protective suit for welding work.
- Welder protective mask.
- Grinder with cutting and grinding wheels.
- Hammer.
This is perhaps the main set of tools and materials.
Reminder! Don't neglect your protective equipment. Working with welding equipment involves high temperatures. Therefore, there is always a risk of injury.
We make a project
A do-it-yourself metal gate must first of all be properly designed. The basis of any metal gate is the frame. Therefore, it is important to prepare everything necessary for it. Moreover, you should decide in advance on the dimensions of the future metal door. It is worth noting that it should not be higher than the entire fence; from the outside it does not look very nice. Although there are no strict requirements in this matter, everyone has their own vision.
So, making a reliable metal gate requires preparing the following:
- Material for posts. A metal profile pipe or a durable metal corner is preferably used.
- You will also need to purchase material for covering it. Often metal gates are sheathed with metal profiles. Alternatively, you can cover it with wooden boards.
- Anti-corrosion liquid. All structural elements should be treated to significantly extend its service life.
- Good quality primer for metal.
- Also prepare reliable metal hinges to install the door.
- The necessary material for making a gate, it can be a profile pipe of rectangular or square cross-section.
- You will also need additional accessories such as a lock, handle and other elements.
Installation of support posts
The main load-bearing part of gates and doors are support pillars. With this in mind, they must be reliable and durable. They must cope with the load from the weight of the wicket. Installation of support pillars is very simple. Carry out markings according to a pre-prepared project. Holes in the ground can be made with a garden drill, up to 1 m deep.
The bottom of the trench must be filled with crushed stone, which is carefully compacted. Before installing metal support poles, they should be treated with an anti-corrosion compound. After this, lower the pillars into the dug hole and align them strictly according to the level. You can also use a plumb line.
Advice! For greater efficiency, you can install temporary spacers that will fix the pole in a perfectly level position. This will allow you not to deviate from the vertical during the concreting process.
Once the support posts are in position, it is time to pour the concreting. Prepare the concrete mixture and fill the support pillars with it. After this, the pillars should be left for several days so that the concrete can set.
We make a metal frame
Next, you can begin making the frame. It can be made from a corner with a thickness of 3 mm or a profile. Lay the workpieces on a flat horizontal surface and weld them together in the corners. You should end up with a rectangular frame.
Advice! Take your time to weld everything thoroughly. First, apply the potholders, check the diagonals, and then you can finally scald everything. This will avoid distortion.
Additionally, it is recommended to weld diagonals or cross members to strengthen the entire frame. The metal gate is adjusted to the size you have designed. After welding is completed, all welded seams are processed with a grinding wheel on a grinder. This way, you will make the corners nice and smooth. Also, additionally check the “body” of the frame to ensure that there are no burrs, etc.
At the next stage, the canopies are welded. They consist of two parts. One of them is welded directly onto the support post, and the second onto the metal gate. For convenience, it is first recommended to weld the canopies to the gate. Then attach the gate to the support posts and put marks on them. Next, the canopies are welded onto the pole. The metal door can be hung.
While the gate does not yet weigh, it will be convenient to paint it. Apply primer as the first layer, and then, if necessary, one or two coats of paint. Only after the paint has completely dried can one of the final stages be carried out - covering the frame.
Metal frame cladding

Today there are many ideas on how and with what you can sheathe a gate. For example, in this article, you will be able to view ready-made options metal gates made of metal in the photo. Metal profiles are predominantly used. This material is resistant to corrosion, as it has a special anti-corrosion coating.
The metal profile is attached to the metal frame using special rivets or self-tapping screws. To do this, the profile sheet is cut to size and then applied to the frame. Holes are drilled in the marked places, and then the self-tapping screw is tightened. The self-tapping screw head can be selected according to the color of the metal profile.
Conclusion
So, as you can see, it is quite possible to make metal gates from metal with your own hands. The most important condition is to know the sequence of all work. Additionally, we invite you to watch the video, which will clearly show how to do all the work yourself. Plus, you can see metal gates in this article in the photo. Perhaps you can take one of the ideas for your case. We hope that this material will help you make a beautiful and reliable metal gate.
Many owners country houses They prefer to make the gate separately from the gate. Moreover, you can build it yourself from different materials, but most often they use wood or metal. Such a product will decorate any area, but before you begin its construction, you need to select the installation location. You also need to take measurements and draw up a diagram.
Finding the installation location
The gate should be installed so that there is a clear passage to the house. In addition, there should not be any holes near it, otherwise dirt and water will accumulate in the recesses all the time.
You can make several gates with your own hands, for example, one will be the entrance and the other will be the rear to reduce distances covered. Moreover, additional doors can be built from wood.
Design features of the gate
To make metal gates with your own hands you will need the following elements:
- The frame that serves as the base of the door in the fence;
- Sheathing;
- Canopies for fixing the product;
- Latches.
Particular attention should be paid to the sheathing, since a variety of materials can be used to construct a metal gate: profiled sheet, galvanized, chain-link mesh or reinforcement. When choosing a covering, it is better to first look at a photo of how the product will look with it, since there are many of them on the Internet today.
Installation of side posts
A metal gate is mounted on posts that are driven one meter into the ground to prevent the product from sagging under own weight. Then markings are made and the installation location is marked.
Using a grinder, you need to cut the length of the post from the workpiece, adding one meter to it. Then the surface treatment is carried out: remove traces of rust with anti-corrosion liquid and Bulgarian. When everything dries, it will appear white coating, which should also be removed with a rag.
To fill the holes you will need a liquid solution. To prepare it you need cement mix with sand in a ratio of approximately 1:3. You should get a homogeneous mixture. Add a little water to it and bring the mass to a liquid state.
The next step is to install the pillars. You need to fill the drilled holes with crushed stone or any stones - compact everything. Then the supports are poured, but be careful about their alignment. The perpendicularity of the installation should be checked with a plumb line.
Making a gate frame with your own hands
 To make the frame, as a rule, a metal corner is used. It gives the product durability and strength. Before proceeding with the construction of a door in the fence, you need to decide in advance on its dimensions. By the way, the bottom of the gate should be slightly higher than its posts You can see the photo to see what it looks like.
The basis of the frame will be several metal profiles, one of which will be additional. The length of the last product should be similar to the width of the metal. This profile will create additional rigidity, as it will be placed in the center. This frame will last for many years.
Sheathing of the product
For such purposes, any suitable material. In addition, the door in the fence can be made open with a pattern of bent reinforcement. But, if they make a blind gate, then use:
- Edged board. It will go perfectly with the corner base. The boards are fixed to the additional profile and frame with screws.
- Fence mesh. Most often, country gates are built from it. It is secured with wire ends or screws with a wide head.
- Solid sheet metal. It is cut to the size of the frame, applied and secured by welding. It is also advisable to use it for fixing rivets. There is no need to use too thick sheets - 2-3 mm will be enough.
It is better to sheathe the front side of the metal gate with a galvanized sheet, since without galvanization the material will quickly turn black.
Attaching awnings and latches
 Canopies consist of different parts. So, one side is attached to the door, the second should be fixed to the supporting posts of the gate, and the third should serve as a fastening part. True, such a gate will weigh a lot. Simple fasteners may not be enough to install it. The canopy must be fixed using a weld seam However, if the gate is not heavy, then you can use rivets, because with them the appearance of the product is more aesthetic.
The latch can serve metal plate. It will extend beyond the gate, thereby holding the entire structure. Some people also use a chain or hook as a latch, but it’s better to look at the photo, which looks prettier.
Decorating a metal gate
 To this metal product It turned out not just beautiful, but also stylish, it is necessary to decorate it with forged parts. They need to be welded immediately after assembling the gate. This way you can paint it carefully. Decorative elements sold at any hardware store. In order to save money, you can make similar products with your own hands using a photo from rebar or a thin profile.
If planted next to the gate climbing plants, then it will be possible to create shading of the space. You can also decorate the gate with original handles, but they will have to be combined with other decorative elements.
After creating the gate with your own hands, you need to clean all welds and metal surfaces from traces of corrosion. Open everything with a rust converter, and after the product has dried, remove the film that appears with a piece of cloth. Metal elements must be well primed. On top of the primer layer, all that remains is to apply paint in several layers. The metal gate is ready!
Neat fence with beautiful gates and a gate - a memorable business card of the owner.
Their appearance characterizes the owner, shows his wealth and thriftiness, because the fence and gate are the first thing that guests and passers-by see.
A good gate, and if it also has decorative elements, is not cheap. The price depends on the chosen material and the price for the work; usually the work comes out as material.
To save on work you need to know how to make a metal one.
Material selection
If the fence is brick, then the material from which the gate will be made is not important; if it is a fence, then it is better to make the gate from it.
The gate should stand out against the background of the fence, but at the same time be in harmony in color and material. In order to immediately know how much material will be needed, you can first sketch out drawings of the future gate.
Wicket material:
- The blanks are metal, the metal must be high-carbon, this will prevent rapid corrosion.
- For pillars, pipes or profiles with a diameter of at least 100 mm are suitable.
- Profile pipe or angle for the gate frame.
- A sheet of metal with a thickness of 1.5 mm or a sheet of metal profile for cladding.
- Metal curtains, preferably with a bearing mechanism.
- Lock.
- Primer.
- Dye.
- Liquid for anti-corrosion treatment.
Tools for work:
- For marking you will need a thread, a plumb line and a tape measure.
- Semi-automatic welding machine with a power of 220 W.
- A hand drill, if available, or a shovel.
- A sledgehammer for hammering in pillars.
- Screwdriver and drill for fastening the sheathing to the frame.
- Grinder for cutting metal and cleaning weld seams.

Installation of poles
The pillars are the load-bearing part that holds the entire structure of the gate or wicket. The length of the pillars must exceed the height of the overall structure by 1 meter so that they can be buried in the ground for reliable stability.
Using a drill, you need to make two holes in the ground at a distance of about 1 m, approximately 50-70 cm deep. Posts are inserted into these holes and driven in an additional 30 cm with a sledgehammer.
Afterwards, the pillars are leveled vertically and filled with concrete at the base. To give additional rigidity to the pillars, they are welded with a transverse profile in the upper part.

Frame assembly
The size of the frame of the future gate must be made smaller than the width of the opening of the pillars by 5-8 cm for comfortable rotation of the sash. The distance from the ground to the gate leaf should be from 15 to 20 cm, this is necessary in case of snowfall.
The metal frame is welded from a profile or angle metal with a thickness of 3 mm. The profiles are welded together at the corners of the frame. To make the frame rigid, an additional transverse bar is welded in the middle.
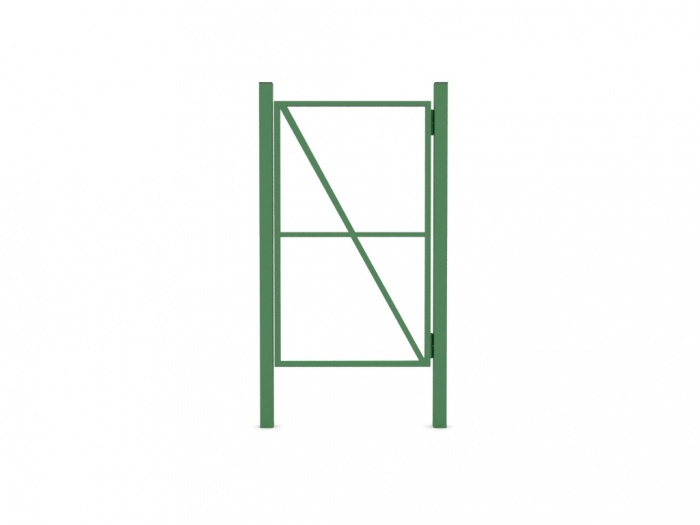
In the resulting halves of the frame, one additional profile is welded obliquely so that they resemble each other Latin letter"Z". Afterwards, metal or iron sheathing will be attached to all the posts of the finished frame and additional stiffening ribs.

Preparatory work is a very important part. Before you start welding the frame, you need to cut the workpiece to size using a grinder, remove burrs from the cut areas, and degrease the cuts with gasoline or a special solution. And then start cooking on a flat, pre-prepared surface.
The surface on which you are going to assemble the frame with your own hands must be flat; if this is not the case, you may get a bend at one of the corners, and the frame will take the shape of a propeller.
After the frame is ready, the curtains are welded to it. They consist of two parts, one part is welded to the door frame, the second to the pillars. It is desirable that the curtains have a bearing mechanism.
Frame covering
For cladding, it is best to take a sheet of galvanized metal or a painted sheet of metal profile; it does not corrode and will last a long time.
From a sheet of metal that was prepared in advance, a whole piece is cut to the size of the welded frame of the gate. If you don’t have such a large piece of metal and you can’t cut out a whole piece, then try to cut it so that the seam connecting the pieces of metal falls on the middle transverse bar of the frame.
Next, with your own hands, pressing the sheet of metal tightly to the frame, grab it around the perimeter. If you choose a metal profile sheet or galvanized metal, then attach it with rivets or self-tapping screws using a drill and screwdriver.

Lock and handle mortise
After you have finished with the casing, you need to embed the lock. For gates, it is best suited for three bolts that extend into the locking part of the frame. The handle can be selected complete with a lock or separately, all at the discretion of the owner.
Decoration
To decorate the resulting gate, on outside Various forged products can be welded. Such products are available in various construction stores and supermarkets. large assortment. You can choose what you like and make any pattern or composition with your own hands.

Final stage
When the new gate is in place, all the parts are screwed in, the decorative forging pattern is welded, it is necessary to clean all metal surfaces and welds from traces of rust, and open it all with a rust converter. After the converter is covered with white film, it must be wiped off with a rag, and all metal parts must be primed. When the primer dries, apply paint on top in two layers.
That's all, our gate is ready!
The method described above for assembling a gate with your own hands is also suitable for gates. The assembly principle is the same for almost all materials.
Wood and metal look very attractive. If you decide to make a gate or wicket from wood, then you need to provide tools for processing wood in advance and at the end take the necessary measures to protect it from pests and the influence of natural factors.
For more than a thousand years, artistic forging has been considered a real art. Forged gates, gates and fences are especially valued. Modern forging combines sophisticated style, incredible product strength and long service life. In addition, it is often used in architecture to emphasize the uniqueness of the building.
 As is known in ancient times, forged gates were used to enter the castle territory. They served not only as decoration, but also as reliable protection. private territory. Today you can also create a unique medieval atmosphere in your country “castle”. It is enough to install a forged gate, fence or gate. Some even complement the outdoor interior of the house with wrought iron bars on the windows, elegant railings at the entrance, or benches for relaxing in the garden. All this indicates the refined taste of the owner country house.
Artistic forging is a rather labor-intensive and complex process. Therefore, the master must not only be physically strong, but also have great creative potential. After all, forged gates often indicate the social status of the owner of a country estate.
The undeniable advantages of forged fencing
 Forged gates are often considered business card country house. After all, before they get into the house, guests encounter them. Original forged products create a pleasant impression of the taste of the owner of a summer cottage and his preferences. In addition, fencing items made using artistic forging, are reliable protection against “uninvited” visitors.
 The forged gates shown in the photo completely convince of the truth of these words. Powerful metal rods, made in the form of various patterns, amaze with their magnificence and style. Each piece is truly individual and unique. Is there something that can easily destroy them? With bare hands this is impossible.
Mainly forged products have a number of advantages:

Live examples of photos of forged gates and gates show the main advantages of such products. In general, their strength, variety of options and harmonious combination against the background of the main fence.  The image helps you choose the most suitable option for the dacha.
Forged entrance fences can be easily installed with electric or mechanical lock. In addition, installation is possible automated system opening a wicket or gate. And hidden video surveillance will help to record unfriendly visitors.
Suitable material for making forged products
 Most often, when creating beautiful forged wickets or gates, ordinary steel is used. To extend its service life, use protective covering which is performed using primer or nitro paint. After thermal spraying is applied to the surface, the original material takes on a vintage look.
To create an original pattern, the joints of the forged elements are coated with nitro paint. The finished product is treated with a special anti-corrosion solution. Thus, the product will serve as a kind of calling card for its owner for a long time. 
Since the process of creating a forged gate with your own hands is quite complicated, you should give credit to the craftsmen. Each operation is performed manually, so the overall result depends on his talent, creativity and skill. Before you begin, you should decide on the choice of design, pattern and shape of the product. They help a lot with this various photos sketches of forged gates. Having examined the image, you can imagine in detail what the product will be like in reality. Original patterns and laces made in a sketch are much easier to recreate than to keep them in your head.
Sketches of future gates: 


To make a forged gate look especially beautiful, metal lace is placed on corrugated sheets or a metal sheet. This design looks rich and stylish.
When such a gate adorns the entrance to the abode of peace of a country house, you involuntarily want to return there constantly. Especially in summer, if climbing plants grow nearby and gracefully entwine the structure.
Stunning tandem - gates with internal wicket
Of course, the desire to beautiful design entrance to country cottage area- This is good. But it is important to remember the main purpose of gates and gates. Interestingly, there are different types of gates:

Various pictures of forged gates and photos of gates show the practicality of the product and its beauty. As you can see, they look quite solid and unique. They effectively decorate a summer cottage at any time of the year. And they serve as a reliable wall from ill-wishers. Behind such a fence, you feel completely safe. 
As you know, artistic forging products are harmoniously combined with wood, stone, concrete, metal and brickwork. The wrought iron gate shown in the photo with a wicket inside the gate is classic version for a country house.  This design has a wonderful pattern that breaks when it moves. Thanks to wide field For drawing, it is possible to create unique compositions.
We make forged gates and wickets ourselves - video
Mistakes in the manufacture of forged gates and wickets - video
A metal gate, like a gate, is a necessary part of any fence. Moreover, the rest of the fence can be built from a different material. And adding forging elements will make the gate more attractive, without disturbing the external aesthetic appearance.
They are intended for passage or travel beyond the perimeter of the fenced area. In this article we will tell you how they are built.
Preparing for work
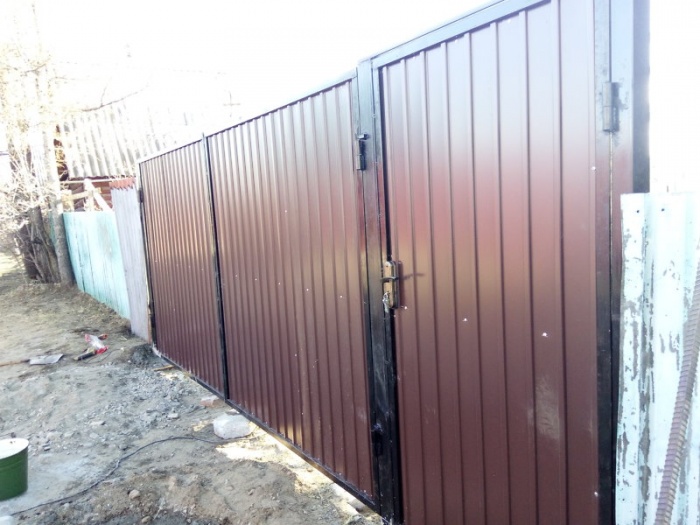
Before you start manufacturing, you need to decide what kind of gate you want to install on your site. Beautiful gates made of metal with forging elements. It is better to order them from a company that deals with such work, giving the dimensions of the future structure and deciding on the choice from the proposed sketches - place an order. Samples of metal gates and gates with forging elements can be seen in the photo:

If you want a profile pipe, you can make it yourself. Instructions or step by step actions The entire process is given below.
In order to, you need the ability to use welding machine. If you don’t have such a skill, then invite a knowledgeable person to help.
So, for work we need:
- welding machine or converter;
- welder's mask and canvas suit (it will protect against sparks during welding);
- grinder with discs for cutting and stripping metal;
- plumber's hammer;
- personal protective equipment (goggles, gloves, respirator).
Advice! Do not neglect the safety rules of using protective equipment, this will protect you from injuries, burns and maintain your health.
Construction process
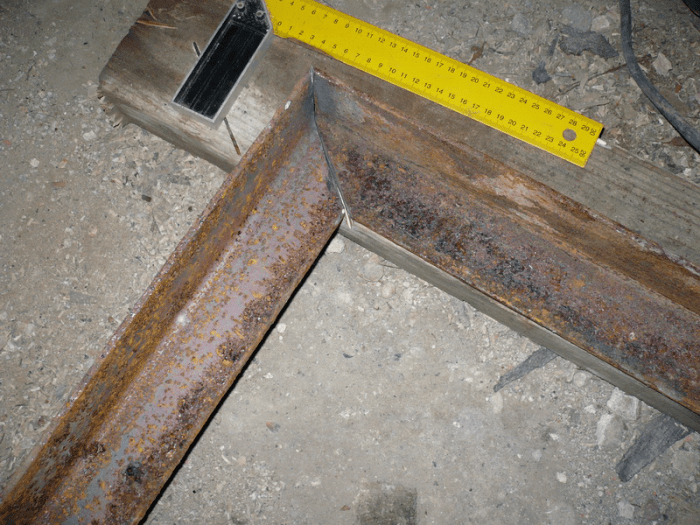
First, let's talk about how to install posts for the future gate. If you have brick ones, then metal inserts are made in the masonry to weld hinges to them, as shown in the photo:

For metal pillars, either each pillar is poured with concrete separately. Moreover, for metal gates and gates, installation is carried out with more careful compaction under the posts, so that later there is no tilting of the pillars and your disappointment from the work done.
We weld the gate
- A metal gate is usually the same height as the fence itself. In some cases, fifty centimeters are retreated from the top of the fence - this distance depends on the height of the fence. We choose the width taking into account that it is possible to walk with a wheelbarrow or carry a walk-behind tractor; we will take ninety-eight centimeters, as shown in the photo:

- Then use a grinder to cut two pieces of profile pipe of the required width. They will go to the upper and lower parts of the future structure. You will need another piece of pipe equal to ninety centimeters. Let's weld it in the middle.
- Next, we cut off two more pieces of pipe with a grinder, equal to one meter and forty-two centimeters. They will go to the side parts of the structure.
- Let's start the welding process. Place the profile pipe on flat surface and weld them together using electric welding (photo below).

After we welded all the parts, we got a rectangle with a crossbar in the middle measuring ninety-eight by one and a half meters.
The next stage is to weld the hinges to the resulting frame. Hinges are easier to buy, their price is not high, and this will make the work easier, which is important.
We will use garage door hinges. Installation:
- separate them into two halves;
- weld the part with the pin to metal gate;
- the second to the fence post;
Note! Don't get confused, hinges without a pin are welded to the gate.
- during welding, make sure that the hinges are flush with the profile pipe and strictly parallel to the gate;
- beat off the slag from the weld with a hammer to a clean seam;
- We clean the welded seams with a grinder with a grinding disc;
- We paint the gate with anti-corrosion primer.
Now we begin to install our gate in the fence opening.
- First you need to weld the second parts of the hinges to the post, making sure that they are located at the same distance as on the gate itself.
- We connect the loops together and align the gate in the opening.
So we installed a gate. All that remains now is to attach the profiled sheet or weld a profile pipe, depending on what your fence is made of.
Today at low-rise construction Garage garages are becoming increasingly popular sectional doors with a gate, they have an aesthetic appearance. And they also don’t affect local area when working, which gives you the opportunity to use it for a flower bed or lawn.
The figure clearly shows the principle of operation:
![]()


