A stapler is one of the assistants both at home and at work. With this tool you can reduce your effort in working with papers, while repair work ah in everyday life, to improve working conditions in solving production issues.
Types of staplers
Staplers vary:
- by design:
— mechanical;
— electric;
— pneumatic;
- type:
— staplers;
— nailers;
- universal;
- by purpose:
— assembly (stationery, stitching, packaging, etc.);
— construction (furniture, cable, tackers, etc.);
— on management:
— manual (using the hand - squeezing/unclamping);
- with foot pedal;
- semi-automatic;
- automatic.
When choosing a stapler, you should take into account the type and nature of the work.
The main elements that ensure the operation of any stapler are the magazine and the impact-return  device. The magazine contains a holder with U-shaped guides into which a cassette with consumables (staples, nails) is inserted. The magazine is equipped with a consumable supply mechanism and is made in the form of a spring-loaded pusher, on one side having a thrust plate, on the other - a clamp for fastening in the shop. The impact-return device is a striker made in the form of a plate with dimensions corresponding to the dimensions of the staples or pin used, the diameter and length of which correspond to the length and diameter of the nail head. The firing pin is mounted on a firing pin, which has a shape depending on the design of the stapler and, on the other hand, rests against a spring, the force of which is regulated by a screw. To exclude shock loads the device is provided with a buffer (shock absorber), which is made in the form of a polyurethane gasket installed in the device body.
The device is controlled:
- in a mechanical stapler - with a lever hinged on the stapler body and, on the other hand, having a movable rocker arm that fits into the groove of the striker;
- V electric stapler- the function of the striker is performed by the electromagnet solenoid. When the button is pressed, the contacts close. The current passes through the elements of the control unit, made in the form of a circuit board, to the electromagnet coil, as a result of which the device operates;
— in a pneumatic stapler, the piston of the pneumatic cylinder performs the hammer function. When the trigger is pressed, acting on the pneumatic distributor, compressed air enters the cavity of the pneumatic cylinder, resulting in a shock action.
Types of faults and repairs
Absence of a fastening element (staple/nail) in the materials being fastened. Most often it occurs when consumables leave the store. The stapler should be rendered inoperative. The cartridge with consumables is removed from the holder. If possible, remove the pusher. The clip folds into  side, since it is hinged. The jammed part (staple/nail) is removed with tweezers or a narrow flat screwdriver. Next, the stapler is prepared for further work in the reverse order.
Hammering of fastened materials with two or more elements (staple/nail). This can happen due to two reasons. The first is due to wear (bevel) in any direction of the end surface of the striker. The impact device cover must be removed. Disconnect and remove the firing pin. Bring the end surface of the striker to correct form fine file or sandpaper. The main condition is that the end surface should not have a convex appearance. Otherwise, the edges of the staples will protrude when slaughtered. To maintain the action distance of the striker, grind off the supporting surface of the buffer/shock absorber (polyurethane gasket), adjacent to the body of the impact device, to a size corresponding to the size of the striker being ground.
The second is the deformation of the guide surface of the impact device body. For mechanical staplers, this is deformation of the surface of the casing adjacent to the firing pin.
Removed with a hammer or pliers.
The drummer works “idle”.
In mechanical staplers, it occurs as a result of early dismounting of the rocker arm from the supporting surface of the striker groove. IN in this case in this place a bevel is produced, which is removed strictly perpendicular to the surface of the striker with a file.
For other staplers, if the body is overheated, this indicates an unsatisfactory condition of the rubbing surfaces or breakage of individual elements (for example, springs). Bringing the stapler into working condition is possible by replacing faulty elements.
When the lever/button is pressed, there is complete absence of action from the impact device.
In mechanical staplers, there is a violation of the interaction of the striker with the return spring (for example, a break in the support plate under the spring). In this case, instead of one upper rivet securing the striker to the striker, you can install a screw with two nuts and shorten the spring by the size from the screw to the support plate. For other staplers, there is no power supply to the electromagnet coil or compressed air into the cavity of the pneumatic cylinder.
It should be remembered : carry out all repairs and maintenance during a power outage
tool and rendering it inoperative.
Until recently, a wide variety of upholstery work was performed with nails and a hammer. This applies most of all to furniture production. If you turn it over soft sofa or a chair, then there are no longer nail heads on the back surface, special ties or staples catch the eye.
These latest devices have conquered construction market. There are even staplers that can do the job using small nails. The hammer and nails are a thing of the past. No broken fingers, no need for small nails. The result is high productivity. However, this design sometimes fails, but it is a pity to part with such a device. The question arises how to fix it construction stapler, is it possible to do this yourself?
Working with such a tool is much more convenient than driving nails with a hammer. The speed of work increases several times.
Before you begin repairing a stapler, you need to familiarize yourself with its design, types and basic operating criteria.
Main types of models

The manual stapler does not require careful maintenance. You just need to lubricate it periodically.
- Manual staplers. This group includes mechanical staplers equipped with a manual drive. They are divided into several types, based on the task that needs to be completed.
- Stapling hammer. This stapler hammers the staple into place with a strong blow. The speed of this model is much higher than its manual counterparts, but the accuracy of driving staples leaves much to be desired. In most cases, such staple hammers are used for:
- insulation fastenings;
- laying roofing felt.
In other words, the stapler is used where speed of work comes first, and not its accuracy.
Cable construction stapler. This tool is specially designed for installing cables that can withstand a load of 50 V. The cable diameter for operation must be no more than 7.5 mm. When choosing such a stapler, the diameter of the wire you will have to work with is taken into account. Most often, cable devices are used for large volumes of work, when the following is required:
- fix the cable;
- lay an electrical network;
- install communication lines.
Regular models. This instrument has already become a classic among such devices. It has a manual drive, which is pressed against the surface, and after pressing the release lever, the staple is driven into the material.

Electric staplers are considered one of the most powerful because... have reinforced springs.
Combined models. This construction stapler simultaneously combines operations that perform different kinds staplers equipped with manual drive.
In addition to the models presented above, there are also other varieties of this tool. They are divided into:
- professional;
- household
Professional models are distinguished by their positive characteristics:
- great resource;
- ergonomics;
- no plastic parts.
TO negative side The high cost of the stapler can be attributed to this.
Electric staplers. This variety is widely used for domestic needs. The electric stapler is very easy to operate, just connect the electricity. However, the cost of such a stapler is much higher than its manual counterpart. To simply repair furniture, it is not economical to buy such a model. A manual stapler is more suitable for this job. But if we are talking about constant furniture repair, then it is better to use the electric option.
Pneumatic models. Mostly professionals use such tools in their work. This type of construction stapler is not used for household needs. The staple is driven in by a pneumatic shock. This air method is used in production where an air compressor operates.
In case of special need, you can install your own compressor, but it is better to purchase a compact model, the dimensions of which correspond to the size of a small suitcase. To carry out the work, you only need an electrical network.
The price of such devices is incredibly high. This device is used by professionals who repair furniture. This type of pneumatic stapler is also available from private manufacturers.
Return to contents
Materials required to operate the stapler

A pneumatic stapler operates using a compressed air compressor.
Usually when the term “type of staple” is used, they mean its thickness. It has different sizes and staple width. In European countries, staples are most often used:
- thickness - 0.75 mm;
- width - 11.4 mm.
Basically, there are many types of staples with different dimensions. The choice of consumables depends entirely on the task at hand. For example, long staples are best suited to create high loads. To fasten not very durable material, for example, polyethylene film, it is better to use thick staples. When fixing a cable, the choice of bracket depends on its diameter.
If you work with a branded stapler, you must definitely purchase branded staples. They differ in many ways from their regular counterparts. They have a lot positive qualities, no corrosion.
These brackets are made of stainless material and have a galvanized surface. Besides:
- superbly sharpened;
- they correspond to all drawing data;
- the slipway is characterized by absolute accuracy;
- have a warranty period.
The presence of a guarantee indicates the originality and quality of such material.
Return to contents
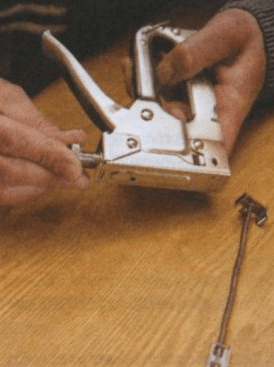
It is always a pleasure to use such a device. I installed the staples in the magazine, pressed the stapler, pressed the lever, and that’s it - the material was securely fastened. But there are times when the staples do not fly out due to the charger. All that remains is the trace of the striker. There is only one conclusion - it needs to be repaired. To do this, you need to disassemble the stapler in a certain sequence:
- remove the adjusting screw;
- remove the spring;
- remove the protective cover.
- remove the pins;
- remove the lock washers.

To carry out repair work you will need:
- pliers;
- screwdriver;
- hammer;
- vice;
- file.
After this work has been done, it will be possible to examine the striker. The main failure of the tool is the wearing out of the thrust pad of the firing pin body. With its help, the joint operation of the trigger lever and the impact mechanism is ensured.
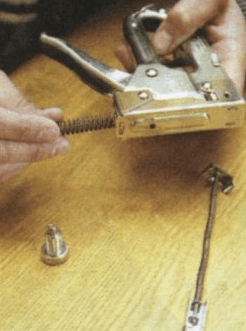
The drummer is the main executive part of the stapler. It is pressed by a powerful spring, the force of which can be adjusted with a special screw.
The charging carabiner is fixed at an angle of 90° relative to the striking device. It contains brackets that constantly perceive the influence of the spring. When not in use, the brackets are closed by a special plate attached to the body.
The trigger system is responsible for the joint operation of the firing pin combined with the charging device. It contains:
- cocking lever;
- powerful spring;
- rocker.
To hammer in the staple, you need to press the lever. The rocker arm bracket will lift the hammer. The spring will stop compressing when the staple enters the firing pin mechanism. WITH great strength the striker hits the bracket, it hits the base.
In fact, the main criterion for the normal operation of a construction stapler is the compliance of several operations:
- drummer platoon;
- supply of staples.
https://youtu.be/mSQ9Oqg45vA
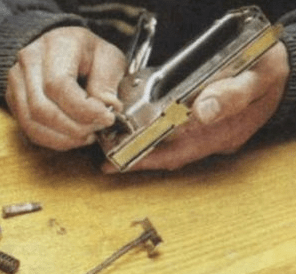
The work of the drummer must be synchronous with the rocker arm. If this does not happen, it means that the shot was fired “dry”. In other words, the trigger device was cocked and triggered, but the striker at this time was unable to capture the clamp. This is exactly what happens when the thrust pad of the firing pin protrusion wears out greatly.
The repair will take a little time. You need to clamp the drummer in a vice. Use a regular file to sharpen the protrusion and give it its original shape.
Similar actions can significantly extend the life of the stapler. You just need to do this repair operation immediately after the gun starts working “idle”. During repairs, the striker plate will be shortened, since it will need to be sharpened all the time.
Furniture stapler successfully replaced the usual hammer and nails in many areas of activity. Its use allows you to connect materials of the same or different hardness to each other, for example, wood, plywood, plastic, plastic film, textile. With regular use, the tool may begin to work poorly or even break down, but many breakdowns can be easily fixed with my own hands. To do this, you need to familiarize yourself with the design of the staple gun, its frequent malfunctions and how to eliminate them, and also stock up on plumbing tools. Only in fairly rare cases will repairs require the involvement of service center specialists.
Staple guns, based on the type of energy with which fasteners are driven into the surface of the material, are divided into the following types:
- mechanical;
- pneumatic;
- electric.
In everyday life, mechanical and electrical models of tackers are mainly used. Pneumatic tools belong to the professional category.
Mechanical models
Any furniture stapler has in its design store for fasteners, inside of which there is a clip with guides. Consumables are inserted into it when performing work operations.
The magazines of some models have a transparent insert. This is convenient during work because it allows you to control the remaining amount of fasteners.
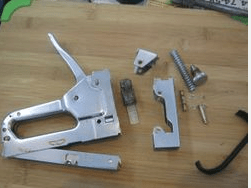
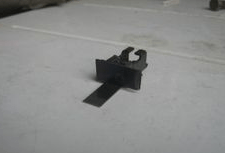
Staple shooting device mechanical type Shown in detail in the photo below.
Impact-return mechanism(the striker) is a plate. Its size corresponds to the geometric parameters of the consumables used. The firing pin is attached to the striker - its shape is determined by the design of the taker. In this case, the other side of the hammer comes into contact with the spring, the compression of which is adjusted using a screw. Shock absorption is provided by a polyurethane shock absorber, which is located inside the body.
Manual staplers can be equipped with two types of springs:
- twisted (shown in the photo above), installed on inexpensive models;
- plate (spring type, photo below), more powerful and expensive compared to the first.

Mechanical staple gun controlled by lever(handle). He cocks the impact-recoil mechanism. During transportation or storage, a safety clip protects against accidental operation.
Electric and pneumatic models
The device of an electric tacker connected to a 220 V network is shown in the photo below.

The numbers indicate the following structural elements:
- trigger;
- fuse;
- handle for holding the tool;
- power cable;
- on/off button;
- mechanism for regulating the force of the shot;
- magazine pusher;
- magazine lock.
Inside the instrument body there are also:
- an electric motor that charges the spring;
- electric motor control board;
- impact mechanism.

Battery products do not have a power cord. The power tool receives power from batteries.
Individual design elements of pneumatic staple guns are shown in the photograph below.

Inside the pneumatic tool there is cylinder with piston, as well as an air distribution unit. Compressed air for the operation of a construction stapler is supplied through a hose that can withstand high pressure, from a compressor unit or cylinder. Therefore, if problems arise with the operation of a pneumatic tacker, you first need to check the serviceability of the compressor with the air duct.
Common malfunctions of construction staplers and their causes
A construction stapler of any kind may begin to malfunction. At the same time, the common malfunctions for the types of staple guns considered are the same. Only the reasons why the breakdown occurred may differ greatly - this is due to design differences different types takers. Let's look at what to do in each case.
The tool does not work - the staples do not fly out
So, if an electric or mechanical staple gun does not fire staples or nails, then the reasons may be the following:
- the spring is broken;
- problems with the drummer.
In mechanical devices, the mechanism for engaging the cocking lever with the spring may also wear out.
U power tools there are others like that possible reasons that is why the fasteners do not fire:
- the instrument is not included in the 220 V network;
- the cord is defective (its integrity is compromised);
- the electric motor burned out;
- The board that controls the operation of the electric motor has failed.

Electric stapler board Novus J-165-EAD
Pneumatic tools The consumable does not fire in the following cases:
- the compressor is broken or not connected to the mains;
- the hose is broken;
- the compressed air in the cylinder has run out;
- problems with the cylinder, piston or air distribution system.
The fastener gets stuck
Consumables in all models get stuck for common reasons:
- when it does not correspond in size to the tacker being used;
- the fasteners or the magazine are dirty from the inside;
- used consumable with defects, for example, bent.
The staples are not driven in completely or, conversely, too deeply
Any staple gun will not drive staples, nails or pins completely unless depth regulator is not set correctly. In such cases, it is enough to adjust it correctly. For manual and electric devices, the problem is also often associated with spring wear, and for pneumatic devices, with the clamping mechanism or insufficient operating pressure.

If the fastener is driven in too deeply, the cause may be compressed spring or high pressure compressed air.
Important! When using a pneumatic tool, the compressed air pressure can be increased no more than to the value specified in the operating instructions.
When fired, 2 staples fly out
When the stapler knocks out two staples during a shot, the simplest reason The problem is the use of dirty consumables or staples that do not match in size. For pneumatic staple guns, the problem may be due to a lack of compressed air supply. For electrical and mechanical models, the problem is often also caused by wear on the striker or deformation of the striker (or its guides).
It also happens that the equipment bends the staples. This also occurs due to their low quality or the consumables’ strength mismatch with the material of the elements being connected.
Algorithm for disassembling the stapler and troubleshooting problems
To independently repair a broken stapler for mechanical furniture, you will need the following tools:
- screwdrivers;
- vice;
- needle file or small file for metal;
- hammer;
- pliers.
In some cases it may also be necessary hand saw for metal or a grinder, when repairing power tools - a multimeter and a soldering iron with a soldering kit.
To check the freedom of movement of consumables inside the magazine, simply open it or pull out the pusher.
Replacing the spring or repair of worn impact mechanism performed in the following sequence:
- take out the remaining consumables from the store;
- unscrew the screw that regulates the impact force;
- remove the spring;
- disassemble the tool body, to do this, remove the washers and pull out the pins;

- take out the impact mechanism;
- if the malfunction is related to the spring, then replace it;
- when the firing pin is worn out (there is wear in the striker or at the point of contact with the rocker arm of the starting lever), it is clamped in a vice and the parts are given their original shape using a file or needle file;

- Reassemble the tool in reverse order, lubricating the impact mechanism.
The spring stop on the impact mechanism may also be broken (photo below), and because of this, the staple gun does not work well. In this case, to troubleshoot the problem, you will need weld the stop using welding.
Repairs do not take much time and often do not require financial costs, but they extend the service life of the staple gun.
How to disassemble and repair a pneumatic staple gun is shown in the video below.
Disassembly and preventative Maintenance electric model The staple gun is shown in the video below.
To maximize its service life, it is necessary to store the construction stapler under the following conditions:
- relative air humidity not exceeding 70%;
- the temperature must be above +5 degrees Celsius;
- The air in the storage area should not contain alkali or acid vapors, as well as dust and abrasive inclusions.
In order to repair a stapler, in many cases you only need to correctly adjust the depth of the shots, adjusting it to specific material, and also use high-quality, suitable-sized fasteners. When a staple gun doesn't work at all, more extensive repairs will need to be made, often involving replacing broken or worn parts. When performing repair operations, be sure to remember about personal safety: remove consumables, put the device on fuse and turn off the power for electric and pneumatic models.
- with foot pedal;
When choosing a stapler, you should take into account the type and nature of the work.
Stapler device
The main elements that ensure the operation of any stapler are the magazine and the impact-return device. The magazine contains a holder with U-shaped guides into which a cassette with consumables (staples, nails) is inserted. The magazine is equipped with a mechanism for supplying consumables and is made in the form of a spring-loaded pusher, on one side having a thrust plate, on the other - a clamp for fastening in the shop. The impact-return device is a striker made in the form of a plate with dimensions corresponding to the dimensions of the staples or pin used, the diameter and length of which correspond to the length and diameter of the nail head. The firing pin is mounted on a firing pin, which has a shape depending on the design of the stapler and, on the other hand, rests against a spring, the force of which is regulated by a screw. To eliminate shock loads, the device is provided with a buffer (shock absorber), which is made in the form of a polyurethane gasket installed in the device body.
The device is controlled:
- in a mechanical stapler - with a lever hinged on the stapler body and, on the other hand, having a movable rocker arm that fits into the groove of the striker;
— in an electric stapler, the function of the striker is performed by the electromagnet solenoid. When the button is pressed, the contacts close. The current passes through the elements of the control unit, made in the form of a circuit board, to the electromagnet coil, as a result of which the device operates;
— in a pneumatic stapler, the piston of the pneumatic cylinder performs the hammer function. When the trigger is pressed, acting on the pneumatic distributor, compressed air enters the cavity of the pneumatic cylinder, resulting in a shock action.
Types of faults and repairs
Absence of a fastening element (staple/nail) in the materials being fastened. Most often it occurs when consumables leave the store. The stapler should be rendered inoperative. The cartridge with consumables is removed from the holder. If possible, remove the pusher. The clip folds into  side, since it is hinged. The jammed part (staple/nail) is removed with tweezers or a narrow flat screwdriver. Next, the stapler is prepared for further work in the reverse order.
Hammering of fastened materials with two or more elements (staple/nail). This can happen due to two reasons. The first is due to wear (bevel) in any direction of the end surface of the striker. The impact device cover must be removed. Disconnect and remove the firing pin. Bring the end surface of the striker to the correct shape with a fine file or sandpaper. The main condition is that the end surface should not have a convex appearance. Otherwise, the edges of the staples will protrude when slaughtered. To maintain the action distance of the striker, grind off the supporting surface of the buffer/shock absorber (polyurethane gasket), adjacent to the body of the impact device, to a size corresponding to the size of the striker being ground.
The second is the deformation of the guide surface of the impact device body. For mechanical staplers, this is deformation of the surface of the casing adjacent to the firing pin.
Removed with a hammer or pliers.
The drummer works “idle”.
In mechanical staplers, it occurs as a result of early dismounting of the rocker arm from the supporting surface of the striker groove. In this case, a bevel is produced in this place, which is removed strictly perpendicular to the surface of the striker with a file.
For other staplers, if the body is overheated, this indicates an unsatisfactory condition of the rubbing surfaces or breakage of individual elements (for example, springs). Bringing the stapler into working condition is possible by replacing faulty elements.
When the lever/button is pressed, there is complete absence of action from the impact device.
In mechanical staplers, there is a violation of the interaction of the striker with the return spring (for example, a break in the support plate under the spring). In this case, instead of one upper rivet securing the striker to the striker, you can install a screw with two nuts and shorten the spring by the size from the screw to the support plate. For other staplers, there is no power supply to the electromagnet coil or compressed air to the cavity of the pneumatic cylinder.
It should be remembered . All repairs and maintenance must be carried out when the power is off.
tool and rendering it inoperative.
Electronic scales Today they are used both for measuring body weight and for preparing a variety of dishes. Kitchen scales especially convenient for precise and picky housewives. But even the smartest electronics tend to break down.

- — Replaceable batteries
- - Paper towels
- — Can of canned food
Try changing the batteries in your kitchen scale. Perhaps the cause of the malfunction is precisely that the charge in the previous batteries has run out.
Wipe scales paper towels. To do this, they can even be disassembled. True, you shouldn’t do this if you’re not sure that you’ll be able to return it later. scales to its original condition. There is a possibility that during operation, food particles got into the mechanism of the kitchen scale and because of this a malfunction occurred. By the way, it should be noted that some scales may not show accurate weight if the dimensions of the product being weighed are larger than the scales themselves.
Turn on the scale calibration button. Hold it down for at least 30 seconds until the word “CAL” appears on the scale display. The display will then show information about the weight that needs to be placed on the scales for calibration. As a weight standard, you can use a can of canned food, or another container on which the weight is accurately indicated. After 3-5 seconds, the word “PASS” will appear on the display. Delete the received weight value and turn off scales— calibration is completed. If the calibration was unsuccessful, you will see the message “FAIL”.
If the scale breaks down immediately after purchase, then according to the Law “On Protection of Consumer Rights” you have the right to exchange the faulty product for a similar one, or return the money.
Be prepared to take your scale to service center. Professionals will quickly and efficiently fix the breakdown.
Steeringmechanism(RM) of the vehicle performs important function– provides movement in a given direction. This becomes possible when the driver, through the steering gear and the steering wheel located inside the car, transmits force to the PM. Due to the complex articulation, the mechanism often fails.

- - set of tools;
- - lubricant;
- — spare bolts for hinges;
- - RM details.
There are two types of steering mechanisms - worm and rack and pinion. The worm gear consists of a steering wheel. steering wheel shaft, worm pair (worm, roller), worm pair housing and steering bipod. The rack and pinion design is somewhat simpler. It has only two tie rods, which are designed to transfer the driver's force to the steering arms.
To increase the efficiency of steering (RS), almost every car is equipped with a hydraulic booster. Unfortunately, in the RM of a car, like in any other, malfunctions can occur, which can be determined by characteristic features. So, if a whistling noise occurs, its causes should be sought in the weakening of the connecting hinges of the control unit or in improper contact of the power steering hoses with other parts. To eliminate this problem, tighten the connecting joints and correctly position the power steering hoses in the clamps.
Look for the causes of rattling noise in the PM in poor contact of the power steering tubes with the body, lack of lubrication, loose fastening of the mechanism or improperly installed tie rod ends. To solve these problems, secure the power steering pipes, lubricate the steering mechanism, tighten the bracket mounting bolts and steering rod joints, and if necessary, replace the ends.
A situation may arise when, in order to return the wheels to the straight-ahead position, it is necessary to exert too much force to turn the steering wheel. Here, most likely, the connection between the steering wheel and the turn switch mount is loose, or the steering wheel connections are loose. This may also be due to a stuck flow control valve, loose tie rods and ball joints, or poor PM adjustment. Depending on the cause of the malfunction. You may need to replace the intermediate shaft or power steering pump, tighten the tie rods and ball joints, and, if necessary, replace them completely. After completing the repair, be sure to check the neutral position.
Remember, proper operation is the key to long-term operation. Therefore, do not overload the stapler with staples and use only those that correspond to this stapler model.
Most problems associated with the operation of the stapler arise as a result of careless handling. For example, sharp blows to the body, frequent falling to the floor. In most cases, the stapler can be repaired right at the workplace, without the help of a specialist. And only in rare cases is it better to immediately replace it with a new one.
Probably each of us in childhood was very interested in internal device toys, especially mechanical ones. Adults often behave no better. They look everywhere: the car breaks down - we open the hood, although we know in advance that we cannot do without a car service; The computer has malfunctioned - using the folk method we are trying to bring the capricious piece of hardware back to life. Curiosity is human, so let's together try to figure out how the far from complicated devices - office staplers - work. At the same time, we will try to draw conclusions about which of them can be called quality, and which should take their rightful place on your desktop.
Actually, nothing prevents you from looking inside your faithful assistant, especially since you don’t need any tools for this. Manufacturers of staplers do not strive to reinvent the wheel and limit themselves to two standard designs of the internal mechanism. Most of the internal space of the stapler is occupied by a “clip” of staples, which, as they are used up, moves towards the nose of the device under the influence of a spring or metal plate.
Staplers with a plate are more durable and work more consistently. This mechanism ensures smooth movement of the staples along the guides towards the “anvil”, which means the quality of the filing will be consistently high. The “anvil” of good staplers always rotates, which allows the device to be used in two modes: standard and temporary fastening. In the first case, the legs of the paper clip are wrapped inward - towards each other, and in the second, on the contrary - outward.
The quality of the staple that will be loaded into the breech of the stapler may well affect the operation of the entire device. Most manufacturers wisely orient their staplers to the staples standard sizes, which saves the end user from unnecessary searches for a suitable product. However, expensive staplers from reputable manufacturers can also use non-standard staples, which are designed to protect the devices from the use of nameless consumables.
The smallest brackets No. 21 have a size of 0.7 mm, and they differ little in appearance from the same ones, but with number 10. An attempt to replace bracket No. 21 with a ten will most likely end in failure: a difference of even 0.2 mm, although It is hardly noticeable to the eye, but in practice it can cause the stapler to jam. The No. 21 staple has an excellent quality - it is almost invisible on paper. If we talk about the quality of such a bracket, it largely depends on the material from which the bracket is made. The wire used to make staples must have a smooth surface and uniform thickness.
Choosing colored staples makes sense. Such hardware will be easy to notice on the desktop; the special coating should be regarded as protection against corrosion, especially if documents with significant shelf life will be stapled with such staples. Galvanized metal brackets or copper plated must have sharp ends, which ensures easy piercing of even thick sheets of paper. Sharpening can be done both externally and internally. inside. The staples are fastened into strip clips with a special adhesive, which is usually applied only on one side in a thin, inconspicuous layer.
Now about the stapler body. High-quality, durable, reliable products have a metal body. It's practical and stylish. Plastic also has its advantages: it is light and warm. Most stapler manufacturers like to combine metal, plastic and rubber. We have already talked about the backing - it protects the table from scratches, and rubber inserts in the stapler body allow the user to securely hold this wonderful device in his hand. Products made entirely of stainless steel are rare, but they can become a completely organic addition to the interior of a stylish clerk’s desk.
Modern staplers can not only have an elaborate, stylish appearance, but sometimes look a little frivolous or cute. The range of some manufacturers includes staplers with animal-shaped bodies; most products are combined into series with common stylistic and design features. These could be product lines aimed at schoolchildren, students, office workers, managers of firms and companies.
Staplers can be included in stationery sets, in which all products are made in the same style. When studying the packaging of the stapler, you should pay attention to the depth of the firmware and the punching power. The stitching depth should be understood as the distance from the edge of the paper to the place where the paperclip will be located. Pocket staplers have a stitching depth of up to 40 mm; for a desktop copy, this parameter is much higher.
Few people know that sticky notes owe their existence to a failed experiment. At the end of the 60s. in the laboratory of the 3M company, where they worked on improving the quality of adhesive tape, they obtained a dense consistency of glue that was not absorbed by the surfaces being glued and turned out to be unnecessary. This type of glue was remembered a few years later, when a laboratory employee needed to secure many lost bookmarks in a church songbook without damaging the pages. And in 1980, Post-it Notes were first released for sale.
© 2007 “Everything for the Office” Copying all components of the site in any form is prohibited without the permission of the copyright owners.

The world first saw a stapler back in the 18th century. The first of them was created by order of Louis XV. The device had a different form than the modern mechanism. Moreover, the French staples, made by the hands of craftsmen, were stamped with a coat of arms. Only the United States was able to launch mass production of staplers.
Speciation.

Pocket staplers. This is the simplest stationery product with a paper binding function. Its size is about the size of a palm. The main part of the device is plastic. Productivity – a small number of A4 sheets. This mechanism is characterized by low price, ease of operation and storage, and convenient transportation. You can buy such staplers in an online stationery store in Ukraine.

Tabletop view. To fasten paper with such a mechanism, you need a table or any other surface that is flat. This stapler is equipped with an anti-slip coating, which is why any movement from side to side is excluded. The mechanism includes a lever that must be pressed to hold the sheets together. Features of the type: adjustable bonding depth, high power and performance (you can staple up to 300 sheets!).
What types of paper binding are there?
Staplers are divided into types depending on the method of stitching paper sheets. The most common is the office type of fastening, known to employees of offices and organizations. This type is called closed. The main difference is that the staples are bent inwards, making stitching better and more reliable. It is not surprising that closed stitching is so common throughout the world. The other type, as you might guess, is open, that is, with an external bend of the staples. This method is rarely used and mainly when temporary fastening is required. If necessary, the sheets can be divided. The fastening leaves almost no marks.
There is another method of fastening, which is called rare. It consists in the fact that the papers are sewn together with staples that have a straight shape. This stapler is used for attaching notices to hard surfaces.
What do you need to know before purchasing?
Having decided to purchase a stapler, you need to clearly understand for what purposes it will be used: to fasten papers or to attach advertisements to dacha boards. For frequent office use, it is best to choose a high-quality desktop stapler whose parts are made of metal. But plastic stationery is suitable for rare use - 1-2 times a day. It is also necessary to take into account the power of the devices. If the power of the stapler is low, then it is unlikely to be able to staple 200 sheets at once - such a product can only handle 5-6 sheets.
It is equally important to pay attention to the manufacturer, including the staples - they can wrinkle, break and even get stuck, deforming the paper. Another important point concerns additional functionality of the stationery product. It is advisable that the purchase have rubberized legs that look like pieces of material. These feet help protect the surface on which the device stands from scratches and cracks. When you come to the store, you should pay attention to the presence of a destapler, whose function is to unbend the staples if they are not installed correctly.
How does a stapler work?
The main part of the device is called the gutter. As a rule, it is made of metal - staples are inserted there to hold the paper together. Inside the gutter there is a plate that moves the staples. When you need to install staples, the stapler opens. For the device to function foldingly, you will need one plate of new staples - you can buy them at an office supply store. Modern models equipped with a front hole for installing staples. To open it, just press the button. If the buyer works with papers constantly, then it is best for him to pay attention to professional stapler models. Such mechanisms are suitable for loading several plates at once. At the same time, you can control how deep the sheets are attached.
The points described above will be useful when choosing a stationery stapler and will help you understand its structure.
These convenient and ergonomic devices have won well-deserved appreciation from both professional furniture makers and home craftsmen. There are even models of staplers on sale that can work with small studs. Using a hammer, with almost inevitable injuries, is gradually becoming a thing of the past. In addition, the speed of work increases significantly. However, this design sometimes becomes unusable. Frankly speaking, I don’t want to throw away my old stapler. Let's talk about how to repair a furniture stapler yourself.
Classification
There are different types of furniture staplers.
Manual
Stapling hammers
These devices hammer the staples in with forceful blows. Compared to manual analogues, the performance of this model is much higher. This tool is convenient for performing the following work:
- Fastening insulating material.
- Installation of roofing felt.
Important! In a word, a staple hammer is indispensable where, first of all, fast rather than delicately precise work is required.
Construction cable staplers
This tool is used for installing cables with a voltage load of 50 V. The maximum cable diameter is 7.5 mm. These staplers are used when performing the following work:
- Cable fixation.
- Laying an electrical network.
- Installation of communication lines.
Classic model
This hand-operated tool has become a true classic. After the trigger lever is pressed, the staple is driven into the material. A special category is hybrid models, with which you can perform several types of described operations.
Important! You can also classify all modifications into professional and household. Professional models are distinguished by:
- Convenience.
- Long service life.
- No plastic parts.
They have only one drawback: a relatively high price.
Operating principle
Depending on the type of drive, tools are divided into electric and pneumatic.
Electrical
These devices are widely used in everyday life. Working with an electric stapler is a pleasure; you just need to connect the device to the power supply. However, an electrical device, in comparison with its manual counterpart, is much more expensive. It is profitable to buy it for professional craftsmen who are constantly repairing furniture. Naturally, it is not profitable to buy such a model for a one-time repair. Manual models are suitable for household use.
Pneumatic
These models are not used in everyday life, since their use requires a compressor unit. You can buy your own compact compressor, but how quickly such a purchase will pay off is the question. Therefore, buying a pneumatic device is beneficial for companies producing and professionally repairing furniture.
Sometimes it happens that the stapler refuses to work. Namely, the staples do not fly out of the charger. Before starting repairs, disassemble the device in the following sequence:
- Remove the adjuster screw.
- Remove the spring.
- Remove the protective cover.
- Remove the pins and lock washers.
To successfully repair a furniture stapler, you will need:
- Hammer.
- Vise.
- Flat blade screwdriver.
- Pliers.
- File.
Drummer
Carefully inspect the striker and assess its condition. The most common reason for incorrect operation of the device is wear of the thrust pad on the firing pin body. With the help of a thrust pad, the impact mechanism and the trigger lever work together.
Important! The drummer is the executive part. A spring presses on the hammer. The spring force can be adjusted using a special screw.
Carbine
The charging carbine is located at right angles to the impact device. The striker contains brackets that are acted upon by a spring. When not in use, the brackets are covered by a plate attached to the device body.

Trigger system
The trigger system includes the following components:
- Spring.
- Cocking lever.
- Rocker.
How to use a furniture stapler? To drive the staple, you need to press the lever. The hammer lifts the rocker. After the staple enters the striker mechanism, the spring is released. The striker strikes the bracket with force, and it enters the base.
The rocker arm and the striker work synchronously. Otherwise, there is a “blank shot”. The furniture stapler needs to be adjusted. The trigger worked, but the firing pin did not engage the staple. When the thrust pad of the striker protrusion is severely worn, this is exactly what happens.
It won't take much time to complete the repair:
- Clamp the firing pin in a vise.
- Sharpen the protrusion with a file, giving it its original shape. This will significantly extend the life of the stapler.
Important! You just need to perform this simple manipulation after the device has started working “idle”. At the same time, the drummer plate becomes shorter and needs to be sharpened.


