The canopy over the porch gives the building's exterior a complete, harmonious look. In addition, the canopy also performs a purely practical function, protecting the space in front of the front door from rain and snow. Modern buildings are usually complemented by canopies made of corrugated sheets, wood or polycarbonate. The frame itself can be wooden or welded metal. The forged one looks very rich.
We’ll talk about the advantages and disadvantages of the main types of canopies and how to make a canopy over the porch with your own hands in this article.
Features of visors made of different materials
Usually on wooden houses mount canopies made of wood or corrugated sheets. A metal canopy is also suitable for a brick or concrete building. In this case, the porch of a private house with a polycarbonate canopy of various shapes also looks good. The frame for the canopy of a log or cobblestone house is best made of wood. For a concrete building, a metal one is more suitable. The most important thing is to harmoniously combine the design of the canopy with the exterior design of the building itself. Perhaps these photos will help you make your choice:


Canopies made of corrugated sheets
A canopy over a porch made of metal (corrugated sheets or metal tiles) is characterized primarily by strength and durability. In addition, this material is very easy to install. Such a canopy will be inexpensive and will give the building a modern aesthetic appearance.

Original canopy over the porch made of metal tiles
Polycarbonate visors
Very often nowadays, canopies made of polycarbonate are used over the porch. They are somewhat more expensive than profiled ones. However, they also look more attractive. Translucent polycarbonate can have different shades and gives the porch lightness and airiness.

Canopy over the porch. Photo of the polycarbonate curved version
On a note: Canopies of complex shapes with rounded elements are best made from polycarbonate. The fact is that this material bends very easily.Wooden awnings
A canopy over a wooden porch is also often used. This type of canopy is even simpler to install than the first two types. Wooden canopies can have the most different shapes. In terms of durability, such structures are somewhat inferior to the first two types.

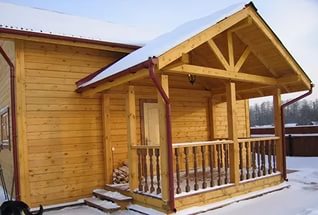
Wooden awnings over the porch. Photo of the dome and tent structure
Canopy frame
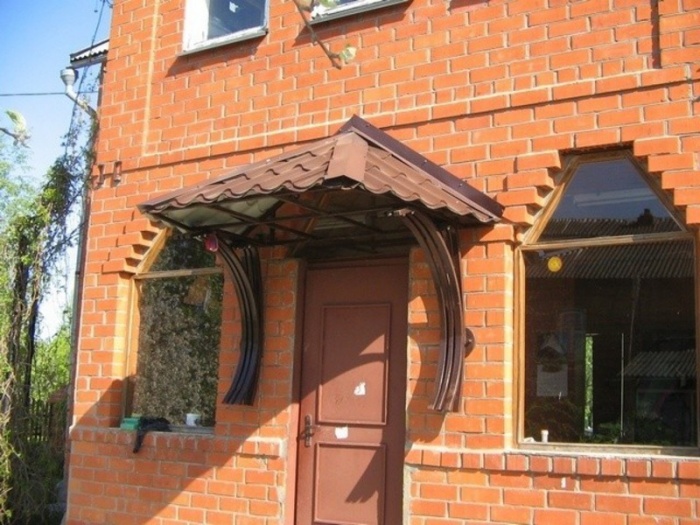
A metal canopy frame will cost slightly more than a wooden one and will last longer. However, it is more difficult to assemble. A wrought-iron canopy over the porch can add prestige to the building. But you can make such beautiful visors with your own hands only if you have blacksmithing skills. Usually when self-assembly simpler designs are used.

Forged canopies over the porch look very prestigious. Photo of an openwork aesthetic design
How to choose the size and shape of a visor
When designing a porch, it is very important to choose the right size and shape of its roof:


Canopy size
Before we start figuring out how to build a canopy over a porch, let's see how to choose the right width, depth and height. The size of the canopy should be such that the upper platform of the porch and part of the steps are reliably protected from precipitation and the rays of the sun. The standard visor has a depth of 120cm and a height of 40cm. It can be installed above the front door at any height. The most reliable in terms of protecting the porch and door is considered to be a canopy that protrudes beyond the porch by at least half a meter on all sides.
On a note: Sometimes in private houses canopies are installed, which also protect the area in front of the porch. In this case, they have a width, length and depth that is 1.5-2.5 m greater than the same march parameters.
Interesting design of a porch with a canopy. Photo of a very wide visor
Design form
The choice of canopy shape depends largely on the exterior features of the building itself. The roof over the porch can be:
- Single-pitch. Such designs are the easiest to manufacture;
- Gable. This type of canopy better protects the porch from slanting rain. In addition, it is easier to clear it of snow. But in construction, such a structure is somewhat more complicated than a lean-to;

Canopies over the porch. Photo (diagram) of a single-pitch and gable structure
- Dome closed. This type of canopy looks very elegant. Snow practically does not linger on such a structure. This is perhaps the most reliable protection for the porch;
- Arched semicircular. It is simpler to construct than a dome and looks very original. However, the porch in the front plane protects worse;

Arched and dome designs
- Straight with valance. Traditional type of visor. Most often used in private homes;
- An awning canopy is also used. It is a visor made in a semicircle forward;
- Concave.

Canopy over the porch. Photo (diagram) of straight, awning, concave canopies
On a note: It is best if the roof of the porch follows the shape of the roof of the building itself. So, a lean-to canopy should be installed if the roof of the house is single-pitch. In this case, the “awning” or concave options are also suitable, for a gable one - gable or arched, respectively, for a hipped or multi-gable - domed. A straight visor looks good with all types of roofs.How to make a polycarbonate visor
Canopies over porches made of polycarbonate have recently become incredibly popular. They are somewhat more difficult to install than wooden ones. Next, we will consider the manufacturing technology of this particular type of canopy.
Material selection
Types of modern polycarbonate:
- Monolithic. This option can be transparent or matte. In terms of its characteristics, it is very similar to plexiglass. However, it is lighter in weight and does not break;
- Cell phone. This polycarbonate consists of two thin sheets connected by many jumpers, that is, it has a chamber structure.

Cellular polycarbonate can have a variety of shades
For visors, the second option is usually chosen. It bends easily and can have a variety of shades. Standard width sheet of cellular polycarbonate – 2.1 m. Usually on sale you can find material from 6 to 12 m long.
Important: You should not choose too thin polycarbonate for the canopy over the porch. The best option for visors is considered to be a material with a thickness of 6-8mm.Sketch of a visor
The canopy over the porch with your own hands will certainly turn out to be more accurate if its diagram is first drawn in compliance with all proportions. The drawings will allow you to make it without errors and additional material costs.

You definitely need to draw up a diagram of the visor
Frame making
So, how to make a canopy over the porch? Work begins by assembling the frame. It can be metal or wood. The latter option is less durable and therefore used less often. The metal frame is most often made of steel tubes.
The construction of a polycarbonate canopy frame includes several stages:
- Pipe being cut required length. It is better to cut with a margin. The excess can be removed later;
- Next, the pipe is bent. This operation is performed using a grinder. On the underside of the pipe, cuts are made every 15-30cm, depending on the bending radius. If the pipe does not bend too evenly, additional cuts are made;

If you have a pipe bender on your farm, you can bend the pipe with its help
- The places of the cuts are secured by welding;
- The second pipe is bent in the same way;
- The finished arcs are connected by two longitudinal jumpers;
- Install the sheathing by installing thin metal tubes or rods along the width of the resulting arched structure. Their number depends on its area;
- Welding areas are cleaned with a grinder;
- The finished frame is coated with a primer and painted in two layers.

It is best to paint the finished frame with alkyd enamel
Sheathing
Next, the question of how to make a canopy over the porch comes down to covering the frame. Polycarbonate Sheet required size bend and screw to the frame with self-tapping screws. You should choose fasteners with wide heads and thermal washers. The holes for them are drilled in advance.
Important: The diameter of the holes should be slightly larger than the diameter of the self-tapping screws. The fact is that polycarbonate may shrink slightly when the air temperature drops. For the same reason, you should not press the sheet too tightly against the frame. There should be a gap of 2mm between the head of the screw and its surface.
The sheathing is fastened to the frame using thermal washers
Installation of racks
The manufacture of the canopy continues with the installation of the racks. To install them, holes about one and a half meters deep are dug in the ground. They are usually located in front of the porch. For racks you can use galvanized or regular steel pipe with a diameter of up to 50mm.
Important: Before installation, non-galvanized poles must be primed and painted in the same color as the canopy frame.The racks are installed strictly vertically in level. Next, the holes are filled with crushed stone and compacted. You can also fill them with concrete.

The pillar can be filled with concrete for reliability
Canopy installation
You need to have an assistant to install the canopy, since even the polycarbonate structure is quite heavy. Holes for fasteners are first drilled in the rear arch of the frame. They also drill holes in the wall itself. Next, the visor is raised to the required height. One person holds the structure, and the second attaches it to the wall. You can use dowels as fasteners, but it will be more reliable to fix the canopy with anchor bolts.

The canopy can be fixed directly to the wall without using stands
If the canopy is installed on four poles, two of them are secured to the wall with clamps or anchors, then two front supports are installed and the prepared canopy is secured to the poles by welding. At this point, the construction of the canopy can be considered complete.
As you can see, the question of how to assemble a canopy over a porch with your own hands is no particularly difficult. The main thing is to do everything carefully, following the installation order.
Residents of private houses often have to think about how to protect their porch from precipitation, which will erode the steps and platform. The easiest way is to place a canopy or canopy over the porch. It will not only protect the front door and porch, but also perform a decorative function.
Thanks to the variety of materials for manufacturing, as well as your own imagination, you can make a canopy that would fit perfectly into the interior of the house and even complement it. In this article we will look at options for canopies over the porch, which you can make yourself or order from specialists.
Requirements for a canopy over a porch
What should it be like? According to one publication, a canopy is a roof-like structure located outside the house. In order for it to perform its functions and serve for many years, it is important to consider some requirements that must be met.

Below is a list of basic requirements for the construction:
- The canopy, like the materials, must be durable. It is important that the structure can withstand not only its own weight, but also the weight of precipitation. In winter, snow will fall from the roof, accumulating on the canopy. In addition, the weight of decorative elements and vegetation is taken into account.
- Due to the fact that sediment will drain from the product, a drainage system must be provided to collect it in a specific place or container.
- It is important to choose the size of the canopy so that the porch is completely protected.
- The building should fit into the overall picture, and not be an alien spot.

In order for the design and external indicators to be in order, it is important to choose the material that would ideally suit the house or cottage. The visor should be combined with the exterior, but it does not have to be made of the same materials. You need to choose the right color, size, shape and additional elements. Choosing the design of a future product is an important stage. There is no need to waste time making a list of points that you should focus on. Let's look at the options for canopies and canopies over the porch of the house and their photos.
What types of awnings are there?
You should know that a canopy is a structure consisting of supports (frame) and a roof. Depending on the shape of the roof, products can be divided into the following types:
- single-pitched;
- gable;
- arched and semi-arched;
- flat;
- dome;
- concave.

Each type has its own advantages and can decorate the porch. However, the difference is the complexity of the work. It's much easier to do flat roof than domed. Accordingly, prices for products will be different.

As for the supports, some can be attached to the wall with anchors or brackets (if the canopy is small), while others can be dug into the ground, which will be their foundation. That is why there are two types of ready-made canopies: suspended and supporting.

Speaking about the material for supports, they are made of wood, steel, aluminum or forged products. By combining the shape, frame material and roof material, you can get a unique canopy that performs its functions.
Polycarbonate canopy
One of the popular materials for making canopies is polycarbonate. It is head and shoulders above its competitors due to its characteristics and properties.

Products made from this material have a number of positive qualities, among which:
- Practicality.
- Durability.
- Not heavy weight.
- Waterproof.
- Elasticity.
- Harmlessness.
- External attractiveness.
- Easy to care for.
- Resistance to temperature fluctuations.
- Fire safety.

Polycarbonate is easy to process, so you can make a visor yourself. The only thing that is important to consider is that a polycarbonate canopy has high light transmission. Therefore, if you want to protect the porch not only from precipitation, but also from the sun’s rays, you should think about a different material.

Advice ! The visor, made of monolithic polycarbonate, can be supplemented flower pots with plants. The canopy will protect them from rain, wind and direct sunlight.
A nice thing is the variety of colors finished products. You can choose the color that would be ideal for your design decisions and fit into the overall picture.


Consider also what material the canopy supports are made of. It can be wood, steel or aluminum. Polycarbonate looks especially noble together with a forged frame. With proper processing and the right combination, the canopy will highlight the beauty of your home.
Canopy made of corrugated sheets
In second place among common materials is corrugated sheeting. You can often see visors made from it. Unlike polycarbonate, this material does not allow sunlight, forming a cool shade in hot weather. It is worth noting the fire safety of the material. It does not burn, so your shed will be protected from arson. Thanks to their strength, reliability, flexibility and resistance to temperature changes, the visors will serve you for many years. The color range of the material is no less than that of polycarbonate. You can choose any color, texture and pattern. And the coating can not fade in the sun for many years, maintaining its original appearance. This is an environmentally friendly material that does not emit substances harmful to humans.

But, corrugated sheeting has one main drawback - under strong mechanical stress, its surface can be deformed. It is clear that a person will not directly impact the canopy, but hail, falling icicles or snow can cause damage to the material. To avoid this, choose thick corrugated board. It will cost more, but the purpose is quite justified. And you don’t need a lot of material to make a canopy. You can see what the finished ones look like in the photo.
Canopy made of bituminous shingles or metal tiles
Covers made from these materials have excellent characteristics. It is not for nothing that they are used as roofing for building houses. Metal tiles have a presentable appearance, are resistant to mechanical damage, do not require constant maintenance, and their original appearance will not change over time.

A canopy made of metal tiles will be resistant to ultraviolet rays and precipitation. In combination with wood or metal, the finished cover looks great. It is worth noting that it is rational to use these materials in the case when the roof is also made of them. Agree, it will hurt your eyes. When the house is covered with slate and the canopy is made of tiles, it looks the same as a man in an expensive suit who drives an old Cossack. In addition, if you make a canopy at the roof construction stage, you can save money by using leftover material for the canopy.

Please note that these types of tiles are different: metal tiles are heavy, and bituminous shingles are light. Nevertheless, products made from one or another material will look attractive. Please note that metal tiles have one drawback - noise. When it rains, the sounds will be quite loud and may be annoying. The same applies to corrugated sheets. But bituminous shingles, flexible, are able to absorb the noise of falling rain.
Classic - wooden canopy
Wood is the most environmentally friendly material. It has a number positive properties. For centuries it has been used by all humanity for their own purposes, and for good reason. It is easy to process and fits perfectly with almost any interior. Skilled craftsmen can turn a cover into a work of art by framing it with sharp edges. If your house is located outside the city, surrounded by a garden, this perfect choice for you. The supports made from logs look especially beautiful.

It is worth mentioning the disadvantages of the material: wood absorbs moisture and rots, insects can grow in it and destroy the integrity of the structure. In addition, wood burns well. Therefore, all material should be well processed by special means against fire, rot and insects. It is also important to ensure waterproofing, because the canopy will be constantly exposed to precipitation. It is better to use hard woods such as walnut or oak.

These are not all the options for awnings over the porch. They can be made from metal, glass, fabric and much more. The same goes for shapes and design. It is not limited to standards. There are original canopies that amaze with their appearance. You can see some of them in the video.
The entrance door to a private house/dacha is exposed to aggressive influences environment. The visor will partially protect the door from destruction. There are many options for installing these structures. From this article you will learn how to make a canopy over the porch so that it is a beautiful and reliable decoration of the house that properly performs its main functions.
The main functional purpose of the visors:
- Protect the front door from precipitation and scorching sun.
- Provide comfort to the homeowner. For example, it is more pleasant to open a lock under a canopy, especially in bad weather.
- Decorate the exterior of the house.

Most often, owners of private houses make visors to order. If you also do not have time to make this design, then you can do the same. But save if necessary family budget, you can make a visor with your own hands. Be that as it may, so that your visor is of high quality and meets your needs, we suggest that you familiarize yourself with the types of visors and their features.

If you decide to purchase this particular covering option for arranging a canopy, then buy corrugated sheets for more High Quality and thicker. It is much easier to work with than metal tiles and metal.

If you decide to make a canopy from, then remember that its color and structure must match the roofing material of the roof. The difference in color and texture, even the slightest, will be very noticeable.
It is best to make a canopy from metal tiles at the stage of covering a house or other building, on front door to which you decided to make a visor. In this case, you will be able to make a canopy from the remnants of metal tiles from the roof.
The roofing material for the canopy can also be bitumen shingles or other similar roofing material, even roofing felt from a domestic manufacturer.

This involves making a wooden frame. The same polycarbonate, metal tiles, sheet metal, slate, etc. For old-type houses, this canopy is best suited. In addition, among the buildings for which the exterior is suitable wooden structure visor - log houses, restored mud huts and structures made in the half-timbered style.

The best design solution there will be a visor, the frame of which is made of forging. It will serve as a worthy decoration for your home. However, this design will cost you a pretty penny. A forged visor can be combined with roofing materials such as polycarbonate, tiles and even plastic.
The forged visor is quite heavy, so in order for it to last really long, you need to install it correctly.
Forging is suitable for almost any design, as it can consist of both rough and refined elements. If the garden plot already has forged elements, then the visor should be made in the same style as them.

To make such a design, you will need a list of materials:
- Cornice strip.
- Gutter.
- Metal corners.
- Junction strip.
- Pipe.
- Bars.
- Corrugated sheeting/flexible tiles.
- Anchors, screws and self-tapping screws.
The following tools will be useful to you:
- Welding machine.
- Yardstick.
- Hacksaw/grinder.
Before starting to make the visor, you need to sketch its sketch. To build a very specific canopy, you need to make certain measurements, such as the width and length of the porch. Add another 60 cm to the resulting figure. This will be the width of your structure. To obtain the length of the canopy, you need to measure the distance from the front door to the end of the porch, adding about 15–20 cm to this figure. The height of the canopy is calculated depending on the architecture of the house.
The tilt of the visor should be about 20º.
Using this data, you can draw a sketch on paper or in a special program on a computer to scale.

Cut the metal corners according to the project. The length of the rafters from the corners is equal to the height of the slope. You also need to make struts and wall beams from the corners. The frame parts are connected to each other using a welding machine. The frame is fixed above the porch.
Fix the wall beam. This is done using stainless steel screws, and anchors are used to secure the struts. Make a sheathing from the bars, installing it on the rafters. If corrugated sheeting is used as a roofing material, then there should be a distance of 30 cm between the slats. For flexible tiles, you need to prepare a continuous sheathing. Roofing material will subsequently be laid on it.

Flexible tiles can be secured using self-tapping screws. Flexible tiles laid overlapping, not end-to-end.
Now you need to fix the metal strip connecting to the top of the slope. You need to attach the eaves strip to its lower side, and then connect and install the gutter and pipe.

Making such a structure will not be difficult even for someone inexperienced in construction. You can purchase a ready-made frame at a hardware store or build it yourself.
As in the previous case, before starting work on the manufacture of the arched canopy, it is necessary to take measurements and draw a sketch.
- Make a frame from a 12–16 mm square pipe or aluminum pipe. Bend the pipe along the radius of the arched canopy. You will need to make 2 identical arcs.
- Connect the arcs with straight pieces of pipe at both ends. To make the frame of the arched canopy more rigid, weld it with inside connecting beam.
- Then weld the canopies to the rear arch. With their help, the canopy will be attached to the wall of the house.
- Now clean the frame from rust and scale. Prime it and paint it.
- Install the arched structure over the porch using screws.
- Secure the polycarbonate with self-tapping screws.

If you are making a canopy over the porch one-story house, then make it so that the edges of the overhangs protrude 20–30 cm above the porch. This will eliminate the possibility of water/snow getting into the place where the canopy is attached to the wall, which will extend its service life.

A gable canopy is more difficult to make. But he provides the best protection from slanting rain. And if you need to clear it of snow, this will be easier to do. The gable visor is stiffer than its analogues, therefore it is different high level wind protection.
First you need to take measurements and make a sketch. Then you should calculate the dimensions of the triangular brackets and sheathing.
The final result of making a visor depends entirely on the accuracy of the measurements. Therefore, this stage of work should not be taken lightly.

- Make 2 brackets. They can be metal or wood. To do this, connect two perpendicular beams to each other and secure them with a brace at an angle of 45–60º.
- Secure the brackets at a distance equal to the width of the canopy. Place the vertical beams of the resulting bracket against the wall, level it and secure it with 3-4 stainless steel screws.
- If the canopy must be supporting, then there is no need to make brackets. Instead, you need to install metal/wooden poles. Dig holes for the posts at the required distance from each other. Make a sand cushion in the hole and compact it. To make the sand shrink, lightly wet it with water. Install the post and fill it with concrete. The upper ends of the pillars are connected by supporting beams.
- Make rafters from wooden blocks/edging boards. If the canopy is small, then two pairs of rafters will be enough for you. Fasten the rafter legs together with crossbars. Then secure the rafters to the upper beams of the brackets and install the ridge beam.
- Make the sheathing. It can be made from boards/timbers/plywood. The choice of material is optional.
- Install hooks for installing gutters.
- Install roofing material according to the manufacturer's instructions. Now you need to install the strip adjacent to the wall and the wind strips to the front of the gable canopy. They, among other things, will protect the structure from moisture and snow.
- Now you need to install the gutter and eaves strip. Remember that the bottom edge of the strip must be down into the gutter. Secure the drainpipe.
Before installation wooden elements structures, each of them must be treated with antiseptics, which will significantly increase their service life.
So, depending on the type of visor and your skills in working with the tools listed in the article, you can make a visor yourself. If, after reading the instructions, you realized that this work is beyond your capabilities, then it is better to order a ready-made visor. Do you have any questions on the topic? Ask them to our expert. You can share your experience in the comments to the article.
Video
In the video provided, you can clearly learn about the intricacies of making a canopy over the porch:
;
Photo
In this photo gallery, you will see many interesting ideas for making a visor:


Scheme
If you decide to make your own visor, then the diagrams below will help you design your own visor model:


The entrance to a residential building begins with a porch and a canopy above it. The canopy is unique business card home, gives the building a complete harmonious look, complements the overall style of the building, and performs a purely practical function, protecting the space in front of the front door from adverse weather factors.
How to build a canopy out of wood with your own hands
Visor over entrance group can be made of polycarbonate, corrugated sheet, bitumen shingles, metal. The wooden canopy over the porch looks especially impressive and original, which, if desired, if you have the skills to carry out construction and repair work, you can make it yourself. You can see photos of visors and choose the most successful option in this article.

Wooden canopy - advantages
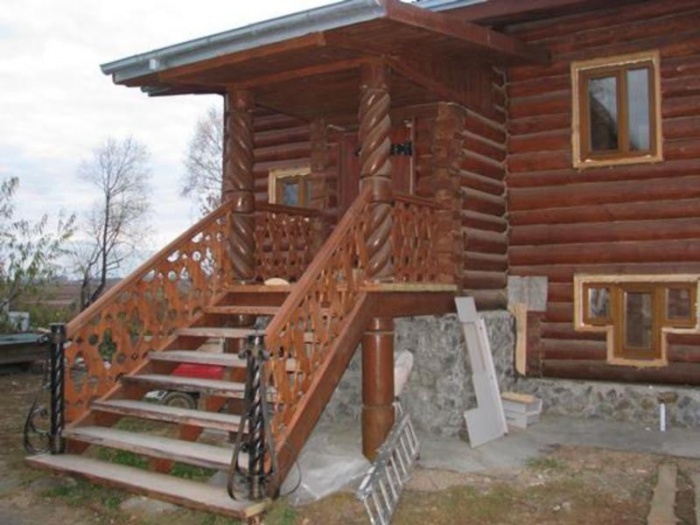
Many owners of country buildings and craftsmen, planning to create a canopy over the porch with their own hands, prefer wood. The wooden canopy is ideal for log houses, buildings made entirely of wood, houses in the ensemble of which there are decorative elements made of wood.

No other building material can compare with the beauty of wood, and the technological capabilities of cutting allow you to create unique openwork elements with your own hands. Popularity natural material due to high practical, aesthetic and performance characteristics.
The advantages of environmentally friendly, safe natural building materials include: ease of installation and operation, versatility, high degree of reliability, ease of working with wooden structures, aesthetic appearance.
Important ! To protect wooden structures from unfavorable climatic and weather conditions, bark beetles and rotting, special protective antiseptic impregnations and paint compositions are used

The finishing layer should be moisture resistant, but vapor permeable. For this reason, it is best to use paint products or colored oil. In order for the wooden structure to last for a long period of time, when choosing wood, pay attention to the quality parameters of the material chosen for the construction of the canopy.
Choosing the design of the canopy over the porch

The design of a wooden canopy over the porch should combine functionality and style, organically fit into the overall appearance and exterior of the house, harmoniously complementing the ensemble of general elements of the construction project. When choosing a design, consider the roofing material, drainage direction, size and shape of the structure, and budget.
Depending on the type of supporting structure, a wooden canopy can be:
- cantilever-supported;
- suspension;
- cantilever-beam;
- extensions on separate supports.
The design of wooden canopies largely depends on the method of their installation. Large, massive structures require additional reinforcement from metal supports, wooden beams. A lighter option is hanging visors of compact, small sizes, fixed on the outer wall surface of the house.
Free-standing structures of canopies and canopies made of wood, which are erected away from the building, are one of the most popular options for arranging summer verandas, large open areas.
Wooden canopies have the most different shape and styling. The following photos will help you decide on the style, design and shape. A wooden canopy can be:
- Flat.
- Gable.
- Codfish.
- In the shape of an arch (arched, semi-arched).
- Tent (dome, spherical).
- Polygonal.

The design of the canopy over the porch made of natural wood can be open, without side walls, or closed, fenced with blank walls. The latter option provides reliable protection entrance area in front of the house from strong gusts of wind, precipitation, scorching sun rays.

Complex designs give the house a certain charm, uniqueness and originality. It is best if the canopy over the porch follows the shape of the roof structure and is made in the same style, as evidenced by the following photos.
Important ! When planning to build a canopy over the porch of a house from natural wood with your own hands, give preference to single- or double-pitch structures.

If desired, you can build a semicircular, hipped, or polygonal canopy from wood.
What should the visor be like?
If the shape and design of the wooden canopy can be selected by looking at the photo in the photo gallery, when planning to build a canopy with your own hands, you need not only to choose quality material, but also take into account the following aspects:
- A wooden structure must withstand not only its own weight, but also a lot of precipitation (rain, snow). When choosing a design, the weather characteristics of the region, the thickness of the snow cover, the strength of wind gusts, and the amount of precipitation are taken into account.
- It is equally important to provide a system for collecting water into a storage tank or draining it into a storm sewer system.
- Ideally, the design should provide protection for the front door and porch.
- Waterproofing needs to be considered. As waterproofing material They use roofing felt, slate, polycarbonate, plastic, sheet metal.
- The canopy over the porch should be in harmony with the overall style concept of the construction project.

The width of natural wood canopies should be 60-65 cm greater than the width of the doorway over which it will be installed. To prevent water from lingering above the surface, the slope should be at least twenty degrees.
How to build a wooden canopy yourself
You can build a wooden canopy over the porch with your own hands, thereby saving on the services of professional teams of craftsmen. The main thing is to prepare the necessary equipment and tools, correctly calculate and purchase the required amount of building materials. In order for the structure to be as strong and reliable as possible, it is very important to adhere to the established installation technology and sequence of work. The detailed process of creating a wooden canopy will be described in the photo and video in this article.

On initial stage it is necessary to draw up a plan diagram, a drawing of the future structure. When drafting a canopy, take into account information about the foundation, load-bearing wall construction site, wind load. Think in advance about decorative elements, types and sizes of roofing building materials.
The canopy over the porch can be built from any type of wood, but it is preferable to choose coniferous species, for example, pine. It has high performance and quality parameters, a long service life, fits harmoniously into any home exterior, and is light weight, which in turn will reduce the load on the foundation of the construction site.
To create a strong, reliable design you will need boards with a section of 5x5 cm and 2x1.5 cm, wooden beam(75*75). The beams must be smooth, without bark or other visible defects on the surface.
The amount of material depends on the shape and size of the visor. Before work, the selected type of wood is treated with hydrophobic, antiseptic impregnations, which will protect the building material from rotting, insect pests, and adverse external factors.
Wooden gable canopy

Before carrying out work, it is necessary to prepare equipment and tools, purchase required amount building materials, based on a previously drawn up diagram and estimate.
Gable canopies over the porch are the most common option, which can be easily built with your own hands, strictly adhering to the technology and the instructions provided. This option perfectly protects from slanting rain and sun, has a greater degree of rigidity, and promotes rapid snow drainage. Before starting design, measure the length and width of the doorway. If necessary, additional supports are constructed for structures of large width.

Sequence of work:
- Based on the measurements obtained, the dimensions of the frame - triangular brackets, sheathing - are calculated. The length of the rafters is determined based on the length and width of the future structure.
- Make two brackets with an angle of 45-60 degrees and fix them to the wall surface. The distance between them is determined by the width of the canopy.
- Stands are installed for the support canopies. Mark the places where the supports will be installed. Make indentations to a depth of half a meter. The bottom of the wells is lined with waterproofing material.
- Wooden beams with a cross section of 75*75 are inserted into the prepared holes. The space is filled with crushed stone and fine gravel. Fill with cement-concrete mortar. It is best to screw the load-bearing supports to the finished columnar foundation. The tops of the support pillars are cut down at the desired angle if necessary.
- Rafters are made from wooden beams with a cross section of 150*150 mm. For small wooden canopies over the porch, two pairs of rafters are sufficient. The rafter legs are fixed with crossbars.
- Mount the ridge beam.
- They carry out the sheathing. A sheathing made of plywood, timber, and edged boards is laid on top of the rafters.
- Fix hooks for drainage gutters.
- The roof is laid on the sheathing using any selected roofing material, which is fixed using self-tapping screws. The best option- metal tiles.
- For additional protection against strong winds The side strips are additionally fixed.
- The drains for the gutters are installed, and the eaves strip is installed. Fixes the drainpipe well.

More simple option is a lean-to structure over the entrance group, which does not clutter up the façade and looks no less impressive than variants of complex shapes and elaborate design. In addition, they are very easy to build with your own hands.

The given option for arranging a wooden canopy over the entrance of the house is described in general terms. If desired, you can carry out the work on arranging and installing a canopy over the porch of the house yourself. It is important that each element is well thought out and correctly installed, taking into account the sequence of work. Moreover, even the most simple design Over time, it can be improved and supplemented with new decorative elements.
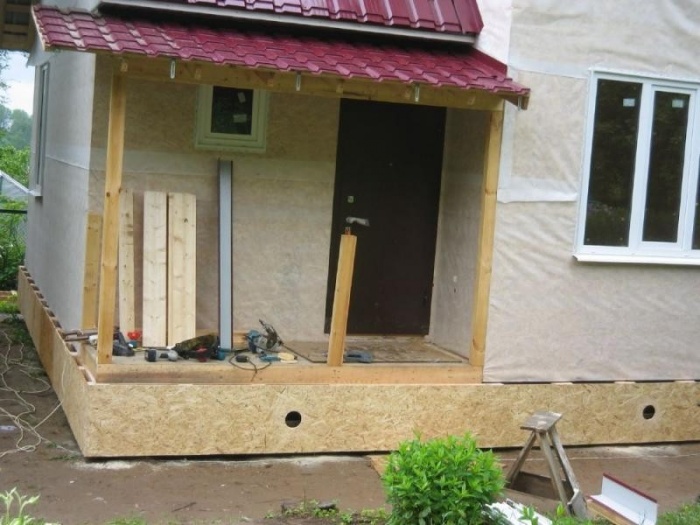
Owners of private houses often face the need to build a canopy over the porch. There are many types and modifications of this architectural detail - from elegant canopies over the entrance to the house to a spacious covered terrace along the entire facade. Even a novice builder can build a simple structure on his own. The main thing is to choose the right materials and design, as well as securely attach the structure to the house so that it does not collapse under the weight of snow in winter.
The canopy protects the porch from snow and rain and serves as a harmonious decoration of the facade
What to give preference - a canopy or a canopy
Although these two designs are very similar, there are still some technical differences. If vertical support beams are usually installed for a canopy, then the canopy is attached directly to the wall of the house. Therefore, you need to pay attention not only to the shape and materials of the extension itself, but also to what the main building is built from and whether it will be possible to securely attach the frame to the wall or whether additional supports will be needed.

Canopy over the front door
It is worth considering where you plan to place the extension, and what is more important to you – aesthetics or functionality. After all, a beautiful and elegant forged canopy may look out of place over the entrance to the utility room, and a bulky wooden canopy will spoil the exterior of the front entrance to the house. Also, when planning in advance, check whether the selected dimensions of the structure are appropriate and whether there is available space for construction.

Canopy supports become a harmonious detail of the house’s exterior
Selection of reliable materials for construction
In the question of how to make a canopy over the porch, the first thing you have to decide is what material the frame will be made of and what to use for the roof. In home construction, wooden beams are most often used for the frame and metal pipes or profile, but each option has its pros and cons:
- Wooden frame it is easy to manufacture, it is easy to attach to the wall of the house, and the cost is relatively low. But wood is a short-lived material, and even after special treatment, such a structure will have to be regularly repaired or replaced.
- Metal structures are strong and durable. But to work with metal you need: optional equipment (welding machine), special fastenings and skills to work with such material.

Drawing of a metal canopy with a polycarbonate roof
Suitable for roofing are polycarbonate, roofing iron, metal tiles, corrugated sheets, ondulin, slate, glass - almost any available material. Often in home construction, remnants of the material used to cover the roof are used for a canopy over the porch. It is worth considering that the weight of the entire structure, and therefore the method of fastening, depends on the roofing material.
How to build a wooden canopy with supports over a porch
Wood is one of the most affordable building materials. In addition, it is easy to use, and if properly processed, a structure made of wooden beams can become a real decoration of the house. Therefore, it is not surprising that many owners who decide to install a canopy over the porch themselves choose wood for construction.

Wood is an affordable material for construction
Drawing and calculations for a wooden canopy
Before you make a canopy over a wooden porch with your own hands, you need to prepare a drawing and correctly calculate all the dimensions of the parts. It is very important to check all the angles and lengths of the beams in advance, since during the construction process even a slight error will lead to severe distortion.
The dimensions of the extension are calculated individually. The height of the building must be sufficient for an adult to stand on the porch without bending. The roof slope angle should be within 25-35°. When calculating the length and width of the structure, you should focus on the dimensions of the porch - you can add 50-60 cm to the original dimensions on the sides and free edge.
Advice. To clarify the dimensions of the canopy, you can lay slate or corrugated sheets on the ground, taking into account overlaps, and measure the resulting rectangle. These will be the dimensions of the roof of the extension.

Approximate drawing of a canopy with supports
Materials and tools for construction
To build a canopy over the porch, you need to prepare the following materials:
- processed wooden beam 15x15 cm for supports and rafters;
- wooden beam 75x75 mm and board 25 mm for sheathing;
- roofing material (slate, corrugated sheeting, galvanized iron);
- anchor bolts, brackets and screws for installing the sheathing;
- self-tapping screws and slate nails;
- shovel, hacksaw, screwdriver, hammer, paint, tape measure and plumb line.
Before attaching the canopy to the house, you need to clear the area for construction, mark the installation locations for the supports and treat them with bitumen or other compound wooden parts to protect against moisture and rot.
Step-by-step instructions for building a wooden canopy over a porch
Installation of the support beam on the wall above the porch:
- The location for attaching the support beam is marked on the wall.
- Using a plumb line and tape measure, draw an even horizontal line.
- A 10 cm beam is secured to the wall with anchor bolts. You can pre-cut grooves in it for attaching the rafters, or you can attach the sheathing on top of the support beam or with staples.
- If the width of the porch along the facade exceeds 2 meters, then it is necessary to install additional vertical supports along the edges of the horizontal beam.
Installation of vertical supports:
- Wooden supports dig into the ground to a depth of 40-50 cm.
- The holes with supports are concreted.
- After the mortar has hardened, cut the pillars to the required height and lay the second support beam on them.
Advice. To ensure that snow does not linger on the roof of the canopy, experts recommend calculating the height of the free edge using the formula - 10 cm for each meter of length. That is, if the length of the porch is 2 m, then along the wall the height of the structure should be 20 cm higher than along the free edge.

Support beam with rafter brackets
Lathing installation:
- Rafters (beam 75x75 mm) are attached to the support beams.
- The distance between the rafters should be no more than 80 cm, since with a larger step in winter, under the weight of snow, the roof can be severely deformed.
- The rafters are attached to the support beams in grooves or with brackets.
- Sheathing boards are laid perpendicular to the rafters.
- The distance between the boards should be such that each sheet of slate or corrugated sheet rests on the board in 3 places - the top of the sheet, the bottom and the middle.

The rafters are attached with U-shaped brackets
Laying roofing material:
- After the frame of the sheathing is ready, it is recommended to paint it or treat it with an anti-rotting compound.
- The slate is laid from the free edge. The roofing material is secured with slate nails.
- The finished canopy can be “ennobled”: install decorative railings or cover the sides with clapboard.

Finished wooden canopy with supports
Wooden canopy over the porch
Another option for making a canopy over the porch with your own hands is to build a wooden canopy. The small structure can be easily assembled by yourself and then mounted above the porch on the wall. Such canopies can be of a wide variety of shapes - single-pitch, arched, gable, curly. But for a novice craftsman, it is better to opt for a simple lean-to frame.

Single-pitch wooden canopy
Before starting construction, it is necessary to calculate the dimensions of all parts according to the drawing. The width along the façade should be 50 cm greater than the width of the porch, and the length along the slope should be at least 70 cm. For consoles and crossbars, you will need a wooden beam with a cross-section of 75x75 mm; for lathing, thinner slats - 40-50 mm - are suitable. It is better to make the inclination angle of the visor approximately 30°. All parts must be treated with drying oil or painted before assembly.
The console of such a frame consists of three bars:
- the vertical one is attached to the wall and is the basis for fixing the strut and horizontal crossbar;
- the front support beam of the sheathing is attached to the horizontal crossbar;
- The strut serves as a support for the entire visor.

Wooden canopy structure
The rear support beam is attached to the ends of the vertical bars. To attach the sheathing, you can select grooves in the rafters or simply cut off the ends of the slats at the desired angle and screw them onto the rafters with self-tapping screws. You can cover such a canopy with slate, galvanized iron, corrugated sheeting or ondulin. To reduce noise from rain, it is recommended to lay roofing felt or roofing material under the roofing material. mineral wool.
Anchor bolts are used to attach the wooden canopy to the wall. It is worth considering that the fasteners must fit into the wall at least 2/3 of their length - then the canopy will not move away from the wall and will be securely fastened to the facade. For a strong fixation, it is better to attach not only the consoles to the wall, but also the upper support cross member of the sheathing.
Polycarbonate canopy - how to make it yourself
Polycarbonate structures stand out not only for their beauty. These are strong, reliable and durable structures that are easy to assemble even for inexperienced builders. Therefore, it is not surprising that many owners of private houses want to install a polycarbonate canopy over their porch instead of the old wooden canopy.

Polycarbonate is well suited for making canopies and awnings
What you need for a polycarbonate visor
To install a polycarbonate canopy with your own hands, you will need the following materials and equipment:
- frame drawing (calculate the dimensions of the parts in advance using your measurements);
- metal pipes or corners for making a frame;
- polycarbonate for roofing;
- welding machine, grinder, drill;
- screws, brackets, anchor bolts.

A simple diagram of a cantilever-type direct visor
The dimensions of the polycarbonate canopy should not be very large; it is enough if the roof protrudes from each side of the porch by 25-30 cm. It is better to take cellular polycarbonate for an arched canopy, with a thickness of 6 mm. Monolithic polycarbonate is more suitable for straight structures. The size of the polycarbonate sheet is calculated according to the dimensions of the frame - the roofing material should protrude from the sides by 10-15 cm, along the free edge - by 20 cm.
Stages of installation of an arched polycarbonate canopy
It’s not difficult to make your own polycarbonate canopy on a metal frame. The main thing is to have the necessary equipment and experience with welding. The frame is assembled on the ground and only then attached above the porch.

Approximate drawing for an arched canopy under polycarbonate
- According to the prepared drawing, it is necessary to cut out the parts for the frame and mark them.
- To make arches on pipes, use a grinder to make deep notches of ¾ of the diameter at regular intervals, then bend the parts with an arc.
- Connect the arcs together with crossbars. In total, you will need 4-5 crossbars - two connect the edges of the arches, the rest are evenly distributed along the length.
- Two long pipes are welded along the length for rigidity; along the free edge of the arch, instead of a pipe, a forged patterned element can be installed.
- Vertical consoles are attached to the wall edge of the arch by welding or connecting corners.
- To give strength to the frame, struts must be installed from the free edge of the arch to the console supports.

Ready metal carcass for canopy
Before sheathing the frame roofing material, you need to decide how to attach the canopy to the wall of the house. If you plan to use anchors, then you need to drill holes for bolts on the console supports and the wall arch, attach the frame to the facade, mark the mounting points on the wall, and then drill the wall according to the marks.
To fasten with brackets, mark the location of the canopy on the facade, install the brackets and fix the frame on them.
The final touch remains - polycarbonate sheathing. This material bends well and is easy to attach yourself. The polycarbonate is secured to the outer and central crossbars with screws and a thermal washer. Experts recommend making holes for screws 5 mm larger than the diameter of the fastener - this will avoid distortions and deformation of the visor.

Polycarbonate fastening scheme
Options for attaching canopies to the wall
Information on how to build a canopy over a porch will be incomplete if you do not consider the issue of mounting the structure to the wall of the house. From correct fastening the frame to the wall depends on the reliability of the extension itself and its service life. There are several options:
- welding to built-in fittings;
- mounting on brackets;
- fixing the support beam to the wall with anchor bolts.

Scheme of attaching a wooden canopy to the wall before facing work
With built-in fittings everything is simple - segments steel pipe or rods are laid in the wall during the construction of the house, and the frame is welded to them. But other options need to be considered in more detail, since they are the ones most often used for light awnings over the porch. The pictures below show how to screw awnings directly to the wall of an already built house.

Fastening the canopy rafters with brackets and on the beam
Figure (c) shows how to attach the rafters with staples to a support beam fixed to the wall with long anchor bolts. In Fig. (a) shows a U-shaped bracket, such as is used for light awnings. Figure (b) is a diagram of fastening the rafters in the grooves of the support beam (1 – support beam, 2 – canopy rafters, 3 – anchor bolt, 4 groove of the support beam, 5 and 6 options for fixing the rafters with a pin and nail).
Important! If the length of the canopy exceeds 2 m or there is no confidence that the wall will support the weight of the roof, then pillars must be placed under the support beam.

The rafters are fixed to the wall with brackets
Ideas for building canopies and canopies - photo gallery
Above are examples of the most simple canopies. But such designs can be more complex. The photo shows that the design of sheds in the yard depends on their purpose - for economic purposes (storing firewood, hay) they choose simple shapes, but for recreation and decoration, real works of art are erected.

A canopy over the porch is not only about protecting the front door from bad weather. This is also decorative element, emphasizing architectural style the entire building. Elegant and massive, metal and wood, plastic and forged - the design of canopies in a private house in the photo is varied and depends only on the imagination of the master.
As you can see, even an inexperienced craftsman can make a canopy over the porch with his own hands. But if you are not sure own strength or do you need exclusive option canopy, then you always have the opportunity to contact professionals who will not only develop a project specifically for you, but also help with the installation of the finished canopy.


