The floor is heated with electricity or water. Both methods are imperfect and have pros and cons. About, and in this article we will talk about how to make a warm floor using water and pipes, or rather, about how to make a water heated floor with your own hands and what is needed for this.
Operating principle of water heated floor
The coolant is heated in two ways:
In both cases, a reduction in coolant temperature is required: the operating parameters of the radiator system for which these sources are created are in the range of 65-95°C, while underfloor heating requires only 35-55°C. This range is explained by the fact that the temperature of a water heated floor, according to SNiP, cannot be higher than 30°C. Agree that it will hardly be pleasant to walk on a hotter floor.
To achieve the desired temperature, the hot coolant is mixed with cooled water from the “return” before entering the pipes. This way the required temperature is obtained, and then, through the underfloor heating manifold, it enters the pipes.
This is all the mechanics of how a water heated floor works, but there are some technological nuances that increase its comfort and simplify adjustment.
Temperature adjustment
In order to be able to maintain a comfortable temperature for the heated floor, there is a special device - a thermostat, or as it is also called a thermostat. This device works in conjunction with sensors that measure the temperature of the floor and coolant.

Water heated floor pie
Now let's talk about the structure of a heated floor: so that you know what and in what order to do when filling it with your own hands. A water heated floor is a multi-layer structure. Approximate diagram shown in the figure.
Thermal insulation is first laid on a flat base (height difference no more than 1 cm per 1 m2). The choice of material and its thickness depend on the initial insulation of the floor and which room is located below (if there is one). The goal is to achieve minimal heat leaks. Then heating will be economical (you will pay little for it, and the house/apartment will be warm). Therefore, when choosing a material and its thickness, it is better to take the characteristics with a reserve: in this case it will definitely not be worse. If there is a heated room below, thermal insulation of 20-30 mm is sufficient; if there is an unheated basement or soil below, a solid thickness of 50 mm or more is required; in the northern regions, the thickness of the insulation can be from 100 to 150 mm.

Installation of a “pie” of a water heated floor
A damper tape is rolled out around the perimeter of the room or a tape is laid thermal insulation material, you can use polystyrene foam, expanded polystyrene or other sheet insulation (about 10 mm thick) cut into strips 10 cm wide; you can also use mineral wool cardboard.
This measure is necessary, firstly, to ensure that cracks do not appear around the perimeter of the floor due to thermal expansion, and also to reduce heat loss through the walls and foundation.

After the pipes are laid, you can begin pouring. A special composition is used - with additives that increase thermal conductivity. In some cases, to increase the strength of the structure and additionally protect the pipes from mechanical loads, a reinforcing mesh is laid on them, and only then the solution is poured. The concrete layer should be such that there is at least 3 cm of solution above the pipe. Only with such a thickness will the floor not “walk” underfoot and its temperature will not have pronounced hot/cold bands.
And there is one more nuance: Pouring a warm water floor with a solution should take place when the pipes are filled, that is, under pressure. Then they take on “working” dimensions and no problems will arise during further operation.
The most unpleasant moment in all this is the long drying time of the screed. At least 28 days must pass after pouring for it to acquire its final strength. But further work can begin after 7-10 days, if the average daily temperature was higher than +17°C.
While the concrete is gaining strength, the heated floor cannot be turned on. An increase in temperature will cause cracks to appear, which will negatively affect the thermal conductivity of the floor and its durability. So wait patiently for it to dry naturally.
Beacons have been installed for pouring screed - for many floor coverings the floor must be perfectly flat. Please note: thermal insulation is installed around the perimeter. Its height is higher than the height of the finished floor; after the screed has dried, the excess is cut off with a knife. A model with markings, like the one produced by Valtec, was used as a substrate for thermal insulation.
These are only the main layers of the water heated floor cake. Often, at the very bottom under the thermal insulation, a hydrobarrier (thick polyethylene film) is laid. It will protect the lower premises in case of leakage. It is often recommended to lay it on a heat insulator heat reflective coating- so that heat does not go down, but is reflected upward. But here it is worth remembering that it is useless to place aluminum foil or foil-coated materials in the screed: after a month or two, the foil collapses and turns into dust. If you use a heat-reflecting coating, it should be metallized. It is very similar to foil, but is made of other metals that perform well in cement-sand mortar for many years. As you can see, installing a water heated floor is not an easy undertaking, with a large number of components and components.
System parameters
To make a warm water floor with your own hands, you need to know a few more features and rules that you cannot do without.
Which pipes to use
Pipes for warm water floors can be used as follows:
All these types of pipes can be used in both screed and deck systems. Moreover, it is necessary to lay coils of pipes without connections inside the floor. If the length of one bay is not enough, you can make several contours, each of which is displayed on.
Pipe parameters: diameter and length
The length of the pipe in one circuit depends on the diameter: the smaller the diameter, the shorter the length can be used, but circuits that are too long are unprofitable. And not only because a meter of such a pipe costs more, but also because there is too much water in the system, and it becomes too inertial and ineffective. For any pipe material, it is recommended to use diameters from 16 mm to 20 mm. This cross-section is sufficient to heat any domestic space.
- When using metal-plastic pipes with a cross-section of 16 mm maximum length the contour is 100 m, but in reality it is better not to do more than 60-80 m.
- When using pipes of the same material, but with a cross-section of 20 mm, a maximum of 140 m can be laid, but in reality - 100-120 m.
Approximately the same loop sizes can be used for other materials. If the declared quantity is not enough for the premises, several circuits are made, each of which is connected to the corresponding input/output of the collector.
If there are several circuits, the damper tape is rolled out not only around the perimeter of the room, but also separates the circuits. And one more nuance: in order to make it easier to maintain the same temperature with several circuits, it is advisable to make the circuits the same length.
Pipe laying diagrams and steps
Water heated floor without screed
Warm floors with screed have several significant disadvantages:
- it has a large height - the thickness of the water-heated floor is 8-10 cm, depending on the thermal insulation layer,
- weighs a lot (a cement-sand mortar with a layer thickness of at least 4-5 cm over the entire area has a solid mass);
- the screed takes a long time to dry;
- has low maintainability.
All these disadvantages lead to the fact that many people are looking for options for installing heated floors without screed. There is such an opportunity and this is it. They do not require “wet” work, are light in weight and height, and are quickly installed. Therefore, they are often used in houses with wooden floors (they cannot be screeded because of its heavy weight) or in rooms with low ceiling heights, where losing 10 cm to install a heated floor is unacceptable.
There are two types of floor heating systems: polystyrene and wood. In both cases, these are slabs in which there are special grooves for laying pipes. Polystyrene boards are a well-known high-density foam plastic in which grooves for pipes are molded. Wooden systems are made of chipboard or OSB. Since these materials have low thermal conductivity, to increase heat transfer, they are placed in the grooves and on the slabs. metal plates with similar grooves, pipes are already secured in them.
After installing the pipes, you can immediately begin laying hard surfaces - laminate, parquet or boards. When using a soft coating, a rigid base is required - sheets of plywood, chipboard, etc. They are laid directly on top of metal pipes, secured, and carpet is rolled out on top or placed. When installing a heated floor without a screed under the tiles, the adhesive can be placed directly on the metal plates, but you must use a special composition for heated floors.
As you can see, doing it with your own hands is even easier than using a screed - the principle is clear, the work is not the most difficult, and there won’t be a lot of materials needed. Moreover, you can not only mount ready-made polystyrene or fiberboard boards, but do everything yourself. It will take more time, but it will require less money.
Results
Do-it-yourself warm water floor is a difficult undertaking to implement, but realistic. Of course, you will spend more time - you need to figure everything out, digest a lot of information. But you will do everything yourself, and according to your mind, and not in the way that is faster or more convenient, and as hired workers often do. You will also save quite a decent amount - the services of builders are not cheap at all.


Construction own home always involves solving a huge range of problems, and one of the most important is always ensuring a comfortable microclimate in all residential premises. In the harsh winter conditions that characterize most of Russia, organizing an effective heating system becomes a major task.
Most private homeowners prefer the usual water heating schemes, open or closed type, with the installation of radiators in the premises in the required calculated quantity. This scheme is time-tested and has long proven its effectiveness. However, it also has serious disadvantages - uneven heating of rooms and the creation of horizontal convection flows that are not always pleasant. It doesn’t matter, in a private house it is much easier to eliminate such disadvantages than in a city apartment - nothing prevents the owner from making water floor heating with his own hands.

If in a multi-storey building such a modernization of the heating system is not always possible for a number of administrative or purely technological reasons, then in the conditions of individual housing, when you have your own and there are no significant restrictions on the height of the premises, this seems to be a completely feasible task. Of course, it cannot be called completely simple - you will have to carry out a lot of calculations, purchase high-quality materials and equipment, and perform a significant amount of construction and installation work.
Basic design of a water floor heating system
At its core, a water “warm floor” is a system of pipes located under the surface of the floor covering, through which coolant circulates from a common heating circuit.
Schematically, the general “pie” of water floor heating looks like this:
 The usual structure of the heated floor “pie”
 - The basis for installing a warm water floor is usually a leveling concrete screed (item 1). It may already have its own insulation (for example, expanded clay) or be without it.
- To prevent absolutely unnecessary consumption of thermal energy to warm up the base of the floor or interfloor covering, a layer of effective thermal insulation will be required (item 2). This level is not laid only if thermal insulation is provided by the design of the leveling screed itself.
- Another layer of thermal insulator - foil backing (item 3) will increase the heating efficiency by reflecting the heat flow from the pipes, directing it to warm the upper layers of the floor. In some cases, when using special insulating mats for heated floors, they do without it.
- Heating of a heated floor array is necessarily accompanied by its rather significant temperature expansion. To prevent deformation around the perimeter of the premises, use a special damper tape (item 4), which will serve as a compensator.
- Main element T heated floor - a system of pipes through which the coolant circulates (item 5). In the process of laying out the pipes, they are attached to the thermal insulating substrate with special brackets (item 6) or are fixed by other methods, which will be discussed below.
- Most often, a concrete screed is poured over installed pipelines (item 7). It not only becomes a reliable basis for laying the finishing coating (item 8). The screed will act as a powerful heat accumulator and promote uniform heating of the entire floor surface, so there are certain requirements for its thickness.
Certain changes may be made to the presented diagram. For example, in some cases, when using special components, you can do without pouring the top screed by using the so-called modular design of a heated floor with profile thermo-reflective metal plates.

However, it is not enough to simply lay the pipes - it is necessary to ensure stable circulation of the coolant through them for uniform heat transfer. Therefore, the most important component of a heated floor is the manifold system, thanks to which the required liquid pressure is created and the required temperature is maintained. Usually, special manifold cabinets of one or another level of complexity and saturation with automation are installed for these purposes.

Now, after a brief acquaintance with the general structure of the underfloor heating system, it makes sense to consider all its elements in more detail.
What materials are required for a water heated floor?
Let's leave out the device of the lower leveling screed - this rather relates to general construction work. The main condition is that it ensures a flat and horizontal surface and has appropriate waterproofing. The concrete surface should not have significant flaws (cracks, crevices, potholes, areas of instability, etc.)
In addition, we proceed from the assumption that the starting screed does not have significant insulation. Means, Firstly we have to deal with its thermal insulation. For these purposes, special mats for heated floors are usually used.
Thermal insulation mats for heated floors
Mats for heated floors can be made in several versions.
- In some cases, for example, when installing water heating on the second floor of a house, provided that the rooms on the first floor are heated and the general thermal insulation requirements of the building are met, rolled mats made of foamed polyethylene with a foil coating may be sufficient.

Their thickness is insignificant - about 3 - 5 mm, however, they can effectively insulate the ceiling and redirect the heat flow upward. They are laid end-to-end in strips, with the metallized surface facing up, with obligatory gluing along the seams, preferably with foil tape.
- More reliable in terms of protection against heat loss are slabs made of extruded polystyrene foam. This material has a high density (about 40 kg/m³) and can easily cope with the load placed on it - the weight of pipes with coolant, screed, finishing coating, pieces of furniture and dynamic influences during operation.

As a rule, such slabs have a system of tongue-and-groove locks, which greatly simplifies their installation. The thickness can be different, from 20 to 100 mm - it is always possible to choose the right one, depending on the degree of insulation of the floor base. Typically, for floors on the ground or above unheated basements (basement rooms), a material with a thickness of 50 to 100 mm is used. If there is a heated room below, you can limit the thickness to 30 mm.
- More convenient to use are ready-made mats made from the same extruded (EPS), designed specifically for heated floors. They can be made in the form of rolls like a “tractor caterpillar” or like an “accordion”.

Very often they are immediately coated with foil thermo-reflective layer. Another significant convenience is that many of these mats have marking lines - this will significantly simplify the process of laying out the water circuit.
- The most modern and convenient approach would be the use of profile mats, which are designed taking into account the need to fix the water circuit pipes. They are provided with relief protrusions ( so-called "bobs"), arranged in a specific order. The shape of these bosses can be different, but they are always located in such a way that pipes of the required diameter are securely fixed between them.
 The most comfortable are profile mats with polymer coating
 The material for the manufacture of such mats is the same EPS, but usually they have a protective polymer coating, which also becomes an additional waterproofing barrier. Such mats have a system of locks for mutual interfacing, which ensures the solidity of the laid layer. Another advantage is that when pouring the finishing screed on top of them, no additional reinforcement will be required - this role will be taken over by the relief of the surface of the mats.
Prices for different types of heating mats
Heating mat
Which pipes will be optimal for heated floors?
Choosing quality pipes is the key to effective and efficient safe work water floor heating systems. Taking into account that the contours in most cases are embedded in the screed and access to them makes it impossible to repair or replace the damaged area, the material must be fully suitable for this function and be of exceptionally high quality.
Pipes for underfloor heating circuits must meet a number of mandatory requirements:
- They must have a reliable margin of safety, both to baric internal load and to external applications of forces. The optimal choice is the choice of pipes designed for a pressure of at least 8 bar.
- The use of seam pipes is absolutely excluded. In addition, the circuit closed by the screed must be uniform - there should be no welding or threaded connections in it (with rare exceptions, which will be mentioned below) - this is always a “weak spot” in which leaks or blockages cannot be ruled out over time .
- High anti-corrosion properties are a mandatory requirement. The material must be chemically inert. The weak point is the oxygen diffusion of the material, that is, the penetration of this gas through the walls of the pipe, which leads to the activation of oxidative processes. The best choice– pipes with a well-thought-out oxygen barrier.
- The inner surface of the pipes should be as smooth as possible so that excessive hydraulic resistance is not created and noise does not arise from the liquid flowing through the circuit.
Which of modern materials may be suitable for laying a heating circuit:
- First of all, it is immediately necessary to abandon conventional metal HCV pipes, even if they are made of stainless steel - the inadmissibility of joints has already been mentioned.
- Not suitable for heated floors and. This material, of course, is good and inexpensive, but does not have the required flexibility. It will not be possible to bend it in accordance with the intended installation pattern, which means you will have to resort to the use of additional elements. A these are welded joints, the inadmissibility of which has already been discussed. On the Internet you can find photographs of such circuits with assurances of their complete reliability, but there is no need to repeat such adventurism.

- Copper pipes are good for everyone for these purposes - they are flexible, have excellent heat dissipation, and provide reliable roller or soldered joints. However, for all these advantages you will have to pay a very high price, so this type of material is still not widely used.

- Metal-plastic pipes seem to have been specially created for the floor heating system - they are flexible and hold the given bend shape well, have high heat transfer, and are easy to install. However, do not rush to immediately rush to the store to purchase them. The fact is that not every metal plastic is suitable for these purposes. That inexpensive option, which is very popular for creating external plumbing or heating networks, can play a cruel joke in the thickness of the floor. If you wish, you can find photographs with a torn pipe body - and this is a disaster for a circuit walled up in a screed. The main problem is that the market is oversaturated with inexpensive and far from high-quality goods. The aluminum layer in such pipes does not have reliable protection from oxygen exposure, over time it becomes brittle due to corrosion processes, and may not be able to cope with the pressure of the coolant.
 RE-Ha pipe made of cross-linked polyethylene
 - Modern cross-linked polyethylene pipes are a good choice. Special chemical treatment The polymer creates multiple additional intermolecular bonds, and the material acquires the highest resistance to baric loads without losing its elasticity.
The “PE-X” symbol indicates the “cross-linking” of polyethylene. In terms of quality, the best performance is achieved by the “PE-Ha” material, which is treated with peroxide – the maximum percentage of “cross-linking” is achieved - up to 85%.
The material is very flexible, which makes it possible to lay it with a loop of only 150 mm in diameter. It is produced in large coils, and this allows you to create a solid contour of any required length.
 The best option, combining the advantages of metal plastic and cross-linked polyethylene
 - Maybe, the most optimal The choice for the heated floor contour would be pipes that combine the advantages of metal-plastic and cross-linked polyethylene. They have a multilayer structure - the inner and outer layers are made of PE-X, and between them, on on reliable adhesive base, there is a layer of aluminum welded using TIG technology (in a protective gas environment). Moreover, many manufacturers additionally equip their products with an intermediate oxygen barrier (EVON technology). This prevents corrosion of the aluminum layer.
Such combined pipes are usually marked PEX-Al-PEX. You can always purchase all the necessary components for connection to the heating system manifold.

- Another option for t rub is corrugated stainless steel. This is a relative novelty, but has already earned good reviews from masters involved in heated floors. Such pipes have excellent flexibility, high heat transfer, reliability, protection from external influences due to the polymer film internal and outer covering. Moreover, they are equipped with a system of fitting connections of such a degree of reliability that such joints can be removed into the thickness of the screed without fear of leakage. The only negative is the still extremely high price for such material.
Preliminary calculation and drawing up a floor laying plan
All practical steps for installing a heated floor must be preceded by the mandatory drawing up of a laying diagram and the necessary calculations.
- Before drawing up the diagram, the location of the manifold cabinet must be determined - this is the point where both ends of all circuits should be brought out. The location of this unit should ensure ease of maintenance and ease of supply of pipes from the boiler or existing heating system. Most likely, you will need a power connection point to operate the circulation pump. Typically, cabinets are placed so that they do not spoil the interior of the room - in a hidden place or by putting them into the wall. The height above the floor level is usually 200 ÷ 300 mm.
- For floor heating circuits, pipes with a diameter of 16 or 20 mm (in rare cases - 25 mm) are usually used. As a rule, 16 mm pipes are used when underfloor heating is planned as an additional element of the home heating system, 20 mm - if such heating becomes the main source of heat in the room.
- As already noted, the contour must be solid, without joints, but its length has certain limitations. You should not make a circuit with a 16 mm pipe longer than 50 ÷ 70 m, and with a 20 mm pipe - the limit is 100 m. This is explained by the fact that the force of internal hydraulic resistance over a too long section may exceed the liquid pressure created by the pump, resulting in a “closed loop” effect through which coolant circulation will become impossible. If this length is not enough for the existing dimensions of the room, you will have to lay two or even more circuits connected to one collector.
There are two basic schemes for laying the contours of a heated floor - “snake” and “snail”.
 Basic pipe layouts - “snail” and “snake”
 From the point of view of ease of installation, “snake” is, of course, preferable. However, this scheme is characterized by pronounced uneven heating of the floor - with distance from the beginning of the supply, the temperature of the coolant decreases noticeably.
When laying “snake”, the supply and return pipes are located parallel to each other, and thereby the temperature difference in them is compensated. True, for this you will have to work a little more when preliminary drawing the diagram and directly when laying the pipes in order to avoid mistakes.
Based on these basic patterns, many other variations of the styling pattern have been developed.

- Next important point, on which the number of required pipes depends - this is the step of their installation. Depending on the degree thermal insulation room, average winter temperatures in the region, tasks facing the underfloor heating system (main or additional heating), this value can vary from 100 to 500 mm. It is difficult to independently determine this value taking into account all the criteria - the system of thermal engineering calculations is quite cumbersome. However, on the Internet you can find special ones that allow you to carry out such calculations with the required level of accuracy. It should be noted that placing pipes too often is an unnecessary waste of material and energy resources. And if the loops of the circuit are too far from each other, a “zebra effect” occurs - alternating cold and heated areas of the floor.
If necessary, a differentiated approach can be applied. In places where it is necessary to create zones of increased comfort or maximum heating (in the coldest areas), you can use a minimum laying step, but increase it in other areas of the room.

- When drawing up a diagram, you should provide for indentations from the walls (so as not to waste energy on heating these very heat-intensive structures). Typically, the pipe closest to the wall is located at a distance of 300 mm. You should not plan to place the circuit under permanently installed pieces of furniture.
- If you intend to lay several circuits connected to a single collector, then ideally they should be the same length - this will ensure uniform circulation through them. In any case, the excess length should not be more than 10-15 meters. However, sometimes this can be solved by installing special balancing fittings.
- You should immediately calculate to what height the floor level will rise, whether the doors will open normally, or whether certain adjustments will have to be made to their design. And the total rise in level can be quite significant:
— The thickness of the insulating layer used – mats and substrate – is taken into account. This can already give 30 ÷ 100 mm of height.
— Mandatory concrete screed on top of the pipes. In order for the underfloor heating system to be effective, it is recommended to provide a thickness of this layer from 30 mm (for 16 mm pipes) to 45 mm (for 20 mm). Important nuance – we're talking about about the height of the screed from the top edge of the pipes. Thus, taking into account their diameter, we obtain a screed with a thickness of approximately 50 and 70 mm, respectively.
- if you add the thickness of the selected finishing coating, you will get the total amount of rise in the level of the floor surface.
- When using several circuits in one room, it is advisable to provide a compensatory gap in the screed between them. A similar approach is also necessary if the total length of the room exceeds 6 meters - it will be necessary to divide it into two sections, separating them with a damping joint, which must be filled with an elastic sealing compound.

In these places, it will be necessary to install pipes in a sleeve, the length of which on each side must be at least 150 - 200 mm.
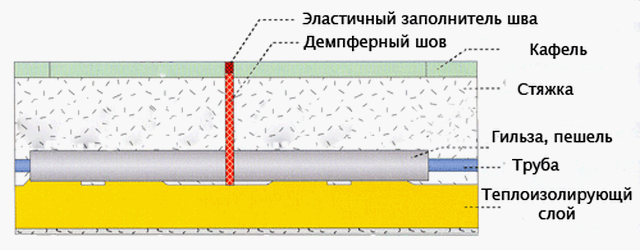
Typically, a polymer corrugated tube of the appropriate diameter is used for this. Similar sleeves (pedestals) must also be installed if it is necessary to pass a pipe through the walls of the room.
- It is necessary to immediately consider a system for fixing pipes to insulating mats. There are no problems with profile mats - everything is already provided there. On flat mats you can do this in several ways.
One way or another, the screed will require reinforcement. Therefore, you can first lay a reinforcing metal mesh, and tie the pipes to them with plastic flexible clamps.

Special fastening brackets with “harpoon” tips are sold, which are convenient for fastening pipes to the polystyrene foam insulating substrate.
 Pipe fixed with a harpoon bracket
 It is convenient to use special mounting rails, metal or plastic, on which grooves or clamps for pipes of clamp or petal type are located.

Based on the drawn up diagram, you can easily calculate the required amount of material - pipes, insulating mats, mounting rails, damper tape and other elements. The required margin for supplying circuits to the manifold cabinet and connecting them to it must be taken into account.
Video: typical mistakes when designing a heated water floor
What is a collector unit?
It would be a serious mistake to believe that it is enough to connect the laid heated floor circuits to the heating pipes or to the boiler, and the system will immediately work in optimal mode. Its correct functioning is possible only if the required pressure is created, the distribution of coolant flows is well-established and balanced, and the required temperature conditions are observed. These are the functions that the collector unit must perform. It includes many devices, instruments and devices.

- As a rule, it includes circulation pump. The pump that stands next to the heating boiler is unlikely to be able to cope with the task of providing the required pressure in all circuits - both in radiators and in heated floors. It is more expedient to provide a separate device that will be responsible for a certain area of the house, connected to one collector.
- There are completely different requirements for the water temperature in radiators and in underfloor heating circuits. So, in convection devices the coolant can reach 70 - 80 degrees, but for floor heating this is unacceptable. It is considered normal to heat the floor surface to 27 - 29 ºС in residential premises, and a little higher - up to 35 ºС, in service, special or passage areas, where tiles are laid. Exceeding these indicators leads to a violation of the integrity of the screed due to its overheating, deformation and drying out of the decorative floor covering.
To maintain the required temperature level in the manifold cabinets, a regulation system is implemented using thermostats based on mechanical or electromechanical two-, three-, or even four-way valves. In these devices, the coolant from the half-summer pipe is mixed with the already cooled coolant from the return.

Control can be carried out manually or by automatic mode when such a faucet is equipped with a servo drive connected to an electronic temperature sensor.
- The circuit pipes are connected to the combs of the supply and return manifolds. For the necessary balancing of pressure in the circuits different lengths, as well as to turn off any circuits if necessary, valves are provided.
- The operation of the heating system may be accompanied by the release of dissolved gases of their coolant. To avoid the occurrence of traffic jams, an automatic air vent valve.
- Instruments for visual monitoring of the operation of the system - a pressure gauge and a thermometer - will never be superfluous.
- It is possible to provide for the independence of the heated floor circuits from the general heating system. This becomes possible when installing a heat exchanger.

In this case, the circuits have a limited volume of coolant that receives the required heating from the general system. Such a warm floor is easier to regulate, but, however, it will require the installation of an additional safety group - a pressure valve and a membrane tank.

Correctly assembling and adjusting the mixing-collector unit is a task of high complexity. However, there is a way out - you can purchase ready-made kits designed for a particular area of the room, the number of connection circuits, with varying degrees of equipment with automatic or manual control and adjustment systems.
Video: operation of a heated floor mixing-collector unit
After the manifold cabinet has been selected, purchased and installed in the place specified in the diagram, you can proceed to the process of laying the pipes of the heated floor circuits.
Laying heated floor pipes
- Work always begins with a thorough cleaning of the room - there should be no debris or dust on the surface of the base concrete screed. If this has not been done previously, perform priming with the composition deep penetration– this will strengthen and remove dust from the surface, and give it additional waterproofing qualities.
- A damper tape with a thickness of at least 5 mm is glued to the walls around the perimeter of the room. If the length of the room is more than 10 mm, the thickness should be increased based on:
h= L× 0.55 (h is the thickness of the compensation gap, L is the length of the room).
The height of the tape should correspond to the total thickness of the future floor, taking into account the screed and finishing coating + 5 mm.
- The next step is styling. Thin rolled material is laid end-to-end with the joints sealed with tape. When using EPS mats, they are joined with interlocking parts. If necessary, you can fix them to the floor surface with polyurethane glue. It is impossible to use adhesive compositions based on organic solvents - they will cause chemical decomposition of polystyrene.

- The joints between the laid mats are taped with waterproof tape. This step is not necessary when using profile mats - the locking system ensures the reliability of their pairing.
- If the EPS does not have an external coating, a layer of thin foil backing is covered (metalized layer up), with the joints sealed with tape.
- If flat mats are used, and the pipes are attached to the fittings, a metal mesh with cells of about 100 × 100 mm is laid. If mounting strips or plastic retaining brackets are used, the reinforcing mesh can be installed later by placing it on pads (stands) so that it is approximately centered between the pipes and the surface of the screed.
- It is advisable to transfer the layout of the contours to the laid out surface in accordance with the drawn up diagram and carefully check its correctness. A marking grid applied to some types of mats can be of great help here.
- One of the most difficult aspects is the correct laying of pipe contours. It is better to do this kind of work together - one unwinds the coil, and the other immediately fixes the coil with staples, between the bosses of the profile mat or in the mounting rails. The manifold cabinet usually leaves a margin of about 500 mm at both ends of the pipe.

Rushing in this process is disastrous - an incorrectly laid circuit (for example, an error led to an unacceptable intersection of pipes) is very problematic to redo.
- After laying the circuits according to the diagram and carefully checking its correctness, you can connect the pipes to the collectors using standard fittings. When making such an insertion, it is necessary to ensure that unnecessary stress is not created in the pipes (they cannot be connected “pull-in”), and that they themselves do not protrude above the surface of the planned screed.
Checking the integrity of the contours and filling the screed
- After the pipe circuits are laid and connected to the manifold combs, it is necessary to ensure that all connections are tight. To do this, the system is filled with coolant, sequentially each circuit through the supply comb, achieving complete air release, for which the corresponding valve is opened.
- The next step is hydraulic testing, or as they are more often called,
- Before starting crimping, it is recommended to temporarily remove air vents and plug the holes. Otherwise, they may fail, since they are designed only for a certain operating pressure.

The crimping process for different types of pipes has its own nuances.
— If the circuits were used metal-plastic pipes, then the system pressure should be set to 6 bar. A pressure gauge installed in the manifold cabinet will allow visual control. If after 24 hours no pressure drop is detected, the test is considered successful. If leaks are detected, the connections are tightened and the test is repeated.
— With cross-linked polyethylene pipes the process is somewhat more complicated. Initially, the pressure also rises to 6 bar. It inevitably begins to decrease due to the plasticity of the pipes, and after 30 minutes it should be raised again to the specified value. A similar cycle is carried out 3 more times. Then, after waiting another hour and a half, the pressure is again raised to 6 bar and the system is left for a day. A fall of no more than 1 is considered acceptable. 5 bar, but, of course, with a guaranteed absence of leaks.
- It is recommended to check the pipes and in extreme temperature conditions. To do this, they are filled with hot coolant (with a temperature of about 80 ºC) with the same test pressure. A similar measure allows us to identify unreliability of individual fitting connections that require additional tightening. In addition, such heating will relieve excess stress in the pipes.
Once this is completed and possible identified deficiencies have been eliminated, you can proceed to pouring the screed. There is no need to drain the water from their system - this will protect the pipes from deformation that can occur from the pressure of uncured concrete. After the screed has set, the load will be evenly distributed, which will no longer pose a threat to the integrity of the pipes.

- It is best to use special compounds adapted specifically for heated floors. They contain plasticizers that ensure uniform filling without the formation of air bubbles (this is especially important when filling “difficult” places - near pipes, bosses of profile mats or mounting strips. In addition, the mixture contains microfiber, which creates reliable internal micro-reinforcement of concrete, increasing its strength under temperature changes.
- The screed is carried out in the usual manner - with the installation of beacons and guides to ensure the horizontal and evenness of the resulting coating.
- The maturation of the screed usually takes from 3 to 4 weeks, depending on the solution used. It is unacceptable to speed up this process by heating the screed with heated floor contours.
Putting a heated floor into operation is carried out only after the screed is completely ready. To do this, the entire system is brought back to normal condition, all removed elements are installed, connections are checked, and accumulated air is released.
You cannot immediately turn on the heated floor at full power - you need to give both the pipes and the screed time to gradually adapt. First, you should set the heating temperature to no more than 20 ºС. Every day you can raise it by 5 degrees, bringing it to the calculated level.
If everything is functioning normally, you can proceed to laying the final floor covering.
Video: example of installing a heated water floor system
Do you want to make your home cozy, modern and warm? Pay attention to the warm water floor. In this article we will describe in detail all its advantages and disadvantages, tell you how to select pipes and lay them, and describe the layout of the collector and control system.
Advantages and disadvantages of water heated floors. Preparing the base. Installation nuances. Selection of pipes, methods of laying them, frequency of turns and fixation options. Screed and ripening time.
A water heated floor is a room heating system in which the coolant circulates along a circuit located under the floor covering. Please note that the pipes are not always screeded. There are “decking systems” in which the contour is not poured with concrete.
Upon closer examination, the water heated floor cake consists of the following elements:
- Prepared base;
- Screed (5 cm);
- Thermal insulator (5 cm);
- Pipes (2 cm);
- Screed (4 cm);
- Floor covering (2 cm).
Depending on the pipes used, there may be several layers of waterproofing. The base is the subfloor in basement or on the first floor of a private house. The first layer of screed is required precisely in the absence of a flat surface.
A 5 cm thick thermal insulator is a standard solution. But if possible, it is better to increase the thickness to 10 cm. This increases the efficiency of the entire system by 10-15%. Especially if the water-heated floor is installed on the first floor. The best material for this layer is extruded polystyrene foam.

Pipes in the vast majority of water heated floors are used with a diameter of 16 mm.
The second layer of screed covers the entire system and serves as a giant heat accumulator.
The thickness of the water heated floor cake varies from 18 to 23 cm. And the mass of 1 m 2 of this system reaches a quarter of a ton! Such harsh conditions significantly limit the spread of water-heated floors.
The circuit is connected to the pump and boiler through an adjustment and control system.
Where can I use it?
Due to the sufficient thickness and mass of the entire system, its use is limited to private housing construction. It is extremely irrational to install water-heated floors in apartments.

The main reason is difficulties with connecting the power. To the system central heating You can connect only after permission from regulatory authorities. And it is almost impossible to get it. Even if it exists, the main leitmotif – autonomy – will disappear. We know of options for installing electric and even gas boilers in an apartment, but these are isolated cases that only confirm the rule: water heated floors are used only in private homes.
Advantages and disadvantages
The advantages of water heated floors are fully revealed only when using cheap energy sources, such as gas, coal, firewood. Heating the coolant with an electric boiler is approximately 7 times more expensive than using gas equipment.
The gigantic heat capacity of the water heated floor system is another plus. A room containing ≈ 100 kg/m2 of heated concrete cannot cool down quickly (only the top layer of screed is taken into account).
But there are also disadvantages. First of all, this is monstrous inertia. It takes time and energy to warm up such a layer of screed.
Inertia leads to the fact that temperature control of a water heated floor is very conditional. Control equipment takes temperature readings from the coolant, floor surface and air (in some thermostats). But the changes made through the thermostat appear very slowly.
Installation of water heated floor
The task is quite difficult, but doable. You just need to level the base first. This is very important requirement, taking into account that leveling will still be required and it is more effective to do this with the first layer of screed. Why?
For example, the height difference in a room is 3 cm. If you immediately lay the pipe and only then level it with a screed, it will turn out that in one corner the height of the cement mixture will be minimal - 4 cm, and in the other 7. This means that during the operation of heated floors, with They will heat 4 cm of concrete on one side and 7 cm of concrete on the other. Such an uneven load has a very detrimental effect on the entire system as a whole and leads to rapid deterioration of the floor covering.

Therefore, the first and important step is to level the floors to the horizon level. To prepare concrete floors you will need:
- Beacon profile;
- Laser level;
- Construction square;
- 5-10 kg of gypsum;
- Primer;
- Mobile concrete mixer;
- Cement;
- Polypropylene fiber.
Work progress:
The floors are swept and primed. While the soil dries, beacons are set up. To do this, install in the middle of the room laser level in such a way that the projection of the horizontal beam is at a height of 15-20 cm from the floor. Then, using a square, measure the height from the floor to the beam in different corners of the room and, based on the results, determine the most high point. In this place, the height of the screed will be the minimum allowable - 4 cm. In other places - according to need.

To install beacons, gypsum is diluted to a thick sour cream state. Then small piles are made from the resulting mass along one wall, in increments of 60-80 cm, and a beacon profile is laid on them. By placing a square on it, level it with the horizon, placing it at the desired height. There should be 50 cm from the wall to the first beacon. Between adjacent beacons the distance varies depending on the length of the rule (guide by 1-1.3 m). Please note that the plaster sets quickly, the work is carried out “without a smoke break”.
After about 30-40 m, you can pour the screed. Cement is diluted with ASG in a ratio of 1:5. Polypropylene fiber is added at the rate of 80 g. per 100 liters of mixture. Fiber is an element of dispersed reinforcement, qualitatively increasing the strength of the coating. In addition, after hardening, the new surface will be perfectly smooth.
Pour the resulting mixture so that each subsequent portion overlaps the previous one by 10-15 cm. The screed is leveled according to the rule, with orientation along the beacons.

After filling the entire surface, time is required for technical maturation cement-sand screed. Calculation is approximately the next 1 cm of thickness – 1 week.
Laying the heat insulator
Extruded polystyrene foam and cross-linked polyethylene foam, only these two materials can be used for thermal insulation in a water heated floor system.
Before laying the heat insulation sheets, a damper tape 10-12 mm thick is glued around the perimeter of the room. It serves not only to compensate for the thermal expansion of the screed, but also to prevent heat from escaping into the walls. In height, it should protrude beyond the boundaries of the top layer of the screed.
The heat insulation sheets are laid out staggered and always on top of the waterproofing layer. For waterproofing, it is best to use polyethylene film with a thickness of 0.2 mm.

If you decide to make the thermal insulation thickness 10 cm, then it will be better if you lay two layers of slabs 5 cm thick. Be sure to space between the layers.
There is an option to use special slabs designed for organizing water-heated floors as a heat insulator. Their difference is in the bosses on one of the surfaces. A pipe is laid between these bosses. But their cost is unreasonably high. In addition, not all pipes will be supported in such slabs. For example, polypropylene and polyethylene pipes are too elastic and will require additional fixation.
The pipes are not attached to the heat insulator. The fastener must pass through the foam layer and be fixed in the screed. This is a very labor-intensive process considering the amount of work involved.

Mounting tapes are a more acceptable solution, but it is very difficult to lay a pipe on them in a spiral (snail).
The best option would be to fix the pipes on the mesh. In this case, the mesh will serve specifically for fastening pipes, and not for reinforcing the screed.
There are special meshes made of biaxially oriented polypropylene, or you can use a simple masonry mesh.
Selection of pipes and their installation
The following types of pipes are suitable for water heated floors:
- Copper;
- Polypropylene;
- Polyethylene PERT and PEX;
- Metal-plastic;
- Corrugated stainless steel.

They have their own strengths and weaknesses.
| Characteristic Material |
Radius | Heat transfer | Elasticity | Electrical conductivity | Life time* | Price for 1 m.** | Comments |
| Polypropylene | Ø 8 | Low | High | No | 20 years | 22 RUR | They bend only with heat. Frost-resistant. |
| Polyethylene PERT/PEX | Ø 5 | Low | High | No | 20/25 years | 36/55 RUR | Can't withstand overheating. |
| Metal-plastic | Ø 8 | Below the average | No | No | 25 years | 60 RUR | Bending only with special equipment. Not frost-resistant. |
| Copper | Ø3 | High | No | Yes, requires grounding | 50 years | 240 RUR | Good electrical conductivity may cause corrosion. Grounding required. |
| Corrugated stainless steel | Ø 2.5-3 | High | No | Yes, requires grounding | 30 years | 92 RUR |
Note:
* pipe characteristics are considered when operating in water-heated floors.
** Prices are taken from Yandex.market.
The choice is very difficult if you try to save on yourself. Of course, you don’t have to consider copper ones - they’re very expensive. But corrugated stainless steel, at a higher price, has exceptionally good heat transfer. The difference in temperature in the return and supply is the largest. This means that they dissipate heat better than their competitors. Given the small bending radius, ease of operation and high performance characteristics, this is the most worthy choice.
Pipe laying is possible in a spiral and snake. Each option has pros and cons:
- Snake - simple installation, almost always a “zebra effect” is observed.
- Snail – uniform heating, material consumption increases by 20%, installation is more labor-intensive and painstaking.
But these methods can be combined within one circuit. For example, along the walls “facing” the street, the pipe is laid in a snake pattern, and in the rest of the area in a snail pattern. You can also change the frequency of turns.

There are generally accepted standards that professionals are guided by:
- Step – 20 cm;
- The length of the pipe in one circuit is no more than 120 m;
- If there are several contours, then their length should be the same.
It is better not to install pipes under stationary and large-sized interior items. For example, under a gas stove.
IMPORTANT: be sure to draw the installation diagram to scale.
Laying begins from the collector. Unwinding the coil, fix the pipe according to the diagram. It is convenient to use plastic clamps for fastening.
Corrugated stainless steel is produced in coils of 50 m. To connect it, proprietary couplings are used.

The last element laid between the turns of pipes is a temperature sensor. It is pushed into a corrugated pipe, the end of which is capped and tied to a mesh. The distance from the wall is at least 0.5 m. Don't forget: 1 circuit - 1 temperature sensor. The other end of the corrugated pipe is led out to the wall and then along the shortest path is brought to the thermostat.
Control system and circuit testing
The control system for water heated floors includes:
- Pump;
- Boiler;
- Collector;
- Thermostat.
The arrangement of all elements in compliance with technical parameters is a very complex thermal engineering task. A lot of parameters are taken into account, starting from the number of fittings and the length of pipes, and ending with the thickness of the walls and the region of the country. In general terms, you can focus on the following data:
- The pump can only be used as a circulation pump. The “wet” type of pump is more reliable than the “Dry” type and less demanding to maintain.

To calculate performance, use the following formula:
P = 0.172 x W.
Where W is the power of the heating system.
For example, with a system power of 20 kW, the pump capacity should be 20 x 0.172 = 3.44 m 3 /h. Round the result to big side.
The pressure is calculated using a more complex technique. After all, the pipes are located horizontally, and the pump characteristics show vertical pressure. Use the following formula: H = (L * K) + Z/10. Where L is the total length of the circuits, K is the pressure loss coefficient due to friction (indicated in the pipe passport, converted to MPa), Z is the pressure reduction coefficient in additional elements
Z 1 – 1.7 thermostat valve;
Z 2 – 1.2 mixer;
Z 3 – 1.3 valves and fittings.
Using an example, it looks like this, let’s say there are 3 circuits, 120 m each. In total there are 18 fittings, 3 thermostat valves, 1 mixer. Pipe – corrugated stainless steel ø16 mm, loss coefficient 0.025 MPa.

H = (120*3*0.025) + ((1.7 * 3) + (1.3 * 1) + (1.2 * 18))/10 = 9 + (5.1 + 1.3 + 21 .6)/10 = 11.8 m. The result is rounded up - the pump head is 12 m.
- The boiler power is calculated using the formula W = S * 0.1. Where S is the area of the house. There are also a lot of correction factors, depending on the thickness and material of the walls of the house, the climate of the region, the number of floors, and the presence of adjacent rooms.
Please note that the outlet water temperature should be more than 30 - 35˚C. To withstand this temperature, a mixer is installed in front of the collector. In it, water is mixed to the desired temperature before entering the circuit.
- The collector regulates the water supply in each circuit. Without it, the water will follow the path of least resistance to flow, that is, along the shortest circuit. The adjustment is carried out by servo drives, according to data from the thermostat.
- Thermostats monitor the temperature in controlled rooms by taking readings from temperature sensors.

Before crimping the circuit, it is washed and only then connected to the manifold. Water is supplied at normal pressure, but the temperature is increased by 4˚C per hour, up to 50˚C. In this mode, the system should function for 60-72 hours. IMPORTANT: constant monitoring is required during crimping!
At home, without use special equipment, crimp high blood pressure impossible.
If the inspection does not reveal any installation flaws, then you can proceed to further operations.
Screed
IMPORTANT: the top layer of screed is poured only when the contour is filled. But before that, the metal pipes are grounded and covered with a thick plastic film. This is an important condition to prevent corrosion due to electrochemical interactions of materials.

The issue of reinforcement can be solved in two ways. The first is to place a masonry mesh on top of the pipe. But with this option, cracks may appear due to shrinkage.
Another method is dispersed fiber reinforcement. When pouring water-heated floors, steel fiber is best suited. Added in an amount of 1 kg/m 3 of solution, it will be evenly distributed throughout the entire volume and will qualitatively increase the strength of hardened concrete. Polypropylene fiber is much less suitable for the top layer of screed, because the strength characteristics of steel and polypropylene do not even compete with each other.
Install the beacons and mix the solution according to the above recipe. The thickness of the screed must be at least 4 cm above the surface of the pipe. Considering that the pipe ø is 16 mm, the total thickness will reach 6 cm. The maturation time of such a layer of cement screed is 1.5 months. IMPORTANT: It is unacceptable to speed up the process including floor heating! This is a complex chemical reaction of the formation of “cement stone”, which occurs in the presence of water. And heating will cause it to evaporate.

You can speed up the maturation of the screed by including special additives in the recipe. Some of them cause complete hydration of cement within 7 days. And besides this, they significantly reduce shrinkage.
You can determine the readiness of the screed by placing a roll of toilet paper on the surface and covering it with a pan. If the ripening process is over, then in the morning the paper will be dry.
First start
A very important stage in the operation of a water heated floor. To prevent the screed from cracking due to uneven heating and the pipes from being damaged, switching on is carried out according to the following scheme:
1 day – temperature 20˚C.
Day 2 – increase the temperature by 3˚C.
3 and the next day, raise the temperature by 4 ˚C until the operating mode is reached.
Only after this can you proceed to the installation of the floor covering.
It won’t be news to anyone that you spend a huge amount of time in the kitchen. Not only is this room intended for cooking, but in addition, when inviting guests home, the owners of the house also, in most cases, set the table in the kitchen. Naturally, hardly anyone will like a cold floor in the kitchen. It is also worth saying that high humidity in this room quite often leads to the appearance of fungus and mold on the floor covering. This situation can be corrected by using a heated floor. In order to save cash In this type of work, you can carry out the process of laying heated floors yourself. Let's talk about how to install heated floors with your own hands.
Currently in process repair work most owners prefer heated floors. After all, through them you can create a comfortable and cozy atmosphere on own kitchen. Not so long ago, heating was placed directly into the screed. Currently thanks to modern technologies Heated floors are installed directly under tiles, parquet boards or laminate.
Installation of heated floors
Every person knows that if you walk for a long time with cold feet, you can later get a cold. Moreover, during the period when the heating is turned off, it is more than uncomfortable to be in a house or apartment due to the cold and dampness. So, all these problems can be solved by simply installing heated floors.

Before you start purchasing the necessary material, you need to think about what purpose the floors will serve, as well as make the required calculations.
Preliminarily draw your kitchen on paper and visually arrange all the items on it. Separately, it should be said that furniture that has legs does not need to be taken into account.
You might be interested in: Construction and design of floors on the ground
In order to determine the length of the heating section, you need to calculate the product of the heating area and the specific power of the section. It is important to take into account the following points: if you use the floor exclusively as a source of additional heat, then the power of the section should not exceed 120 W/sq.m, if heating is the main source of heating in the room, then at least 150 W/sq.m .
As for preparing for installation, here you will need to remove all the furniture in the room and dismantle the old floor. Be sure to check the screed for evenness using a special ruler. If the flatness of the screed is damaged, it must be restored using a special self-leveling mixture.

You need to make a niche for the thermostat. For these works you will need a hammer drill. Starting from the niche, groove the channel in which it will be located power cable, temperature sensor cables and heating sections. So that you can replace the sensors in the future, place parallel to the plastic pipe corrugated pipe, into which the sensor is placed.
The end of the pipe that has the plug must be released onto the rough version of the floor so that a distance of 60 mm remains from the wall. To seal the grooves, use special gypsum for construction work. In the same way, the thermostat mounting box is attached to the building plaster.
Return to contents
How to properly install heated floors in the kitchen?
Separately, it must be said that before laying the heat-insulating material, the surface must be cleaned and leveled as best as possible. Only after this are the thermal insulation strips laid, the seams of which are fastened with tape. An installation tape is attached over the thermal insulation. For these purposes you will need dowels. The mounting tape should be attached at intervals of 0.5 m. It is necessary so that in the future it is possible to fix the hinges of the heating section.

The cable must not cross. The loops, in turn, should be smooth and have no kinks. Do not forget that the distance from the wall must be at least 50 mm. There are special tabs on the mounting tape to which you need to attach the ends of the cable. After you have laid the heating section, it must be filled with a screed containing cement and sand. Its thickness should be no more than 5 cm.
You might be interested in: How to properly pour a heated floor with concrete
Essentially, your floor is ready for decorative covering. The first time you need to turn on the heating no earlier than a month after pouring the screed.
Return to contents
- Skip places in the kitchen where furniture or other objects are installed. This way, you will be able to significantly save money on electricity bills in the future.
- Apply the solution to the floor only after you are sure that the floor works. Only if everything works as it should and there is no damage, you can proceed to applying the screed.
- Take your time! Let the mixture dry thoroughly and only then begin laying the tiles. Drying may take approximately 14 days. Under no circumstances turn on the floor until the mixture has dried. Otherwise, you will not be able to avoid cable burnout.
- Flexible mixtures are ideal for grouting and gluing. They are the ideal option for heated floors.
After you lay the tiles, the floors should be given about a month to dry.
Only after the specified time has passed can the floor be turned on.


