Electric kettles - thermoses, or thermopots, regularly serve 2 - 3 years, then they usually fail. The main reasons for this: they stop boiling water, do not pour boiling water and because of the flow of water. There are a lot of materials on the Internet about repairing thermopots, but there are almost no diagrams. The article briefly describes the models of thermopots, the schemes of which are copied from products, the malfunctions of which the author encountered during the repair. The article provides examples of circuit solutions used in most models of modern thermopots, despite a large number of clones produced by various companies.
In the above diagrams, the designations of most parts correspond to those indicated on the boards. For different models of thermopots, the secondary power supply circuits and control units are very different. All thermo pots have a container for boiling water made of stainless steel. Thermal electric heaters, heating elements, usually two of them, are fixed in its lower part, for boiling and heating water, in this case they are in one block, which has three outputs. A thermal switch is fixed at the bottom of the tank for a temperature of 88 - 96 degrees C or a temperature sensor that gives a signal to turn off the heating element of the boiler when the desired water temperature is reached. On the side wall of the container, a thermal switch connected in series for a temperature of 102 - 110 degrees C and a fuse FU for 125 degrees C / 10A, placed in a silicone tube, are fixed. They cut off the power supply of the thermopot when the temperature of the boiling vessel rises due to lack of water or in the event of a short circuit. To supply hot water in thermopots, the same type of electric motors are used. direct current for voltage 12 V, with centrifugal pump.
Most of the thermopot parts are placed on two boards. The control board, on which the control buttons and LEDs are located, is located in the upper part of the case. The main board, which contains most of the power connectors, control units, relays, sources and stabilizers of the secondary voltage, is located in the lower part of the case under the tank for boiling water. Both boards are interconnected by wire harnesses with connectors.
The diagram of the Elenberg ТН-6030 thermopot is shown in Fig. 1. Earlier, in 2014, the author posted it on the go-radio website, so a link to this site is given. The TN-6030 circuit is quite simple and completely analog. Constantly, a pulsating current flows through the EK1 water heating element and the VD9 diode in only one direction, therefore the resistance of this heating element is two times less than that of a similar heating element of the same power in other models where it is powered by alternating current. When the electric motor is turned on, a constant pulsating current of a different polarity, up to 150 mA, begins to flow through it and the VD10 diode, and through the heating element EK1 alternating current. Automatic switching on and off of the heating element for boiling water EK2 is carried out by the thermal switch SF1. Forced switching on of the heating element EK2 for up to 2 minutes is carried out by contacts K1.1 of relay K1. On transistors VT1 - VT2 of the control cascade of relay K1, a constant voltage of 14 V, stabilized by the chain R3 and VD6, is supplied from the diode bridge VD1 - VD4. Frequent malfunction This model of thermopot is the burnout of the contacts of the thermal switch SF1, because the entire current of the heating element EK2 passes through it. Replacing the thermal switch is not difficult, you need to unscrew the two screws on the flange, and rearrange the two power connectors. Detailed videos of this replacement are available online.
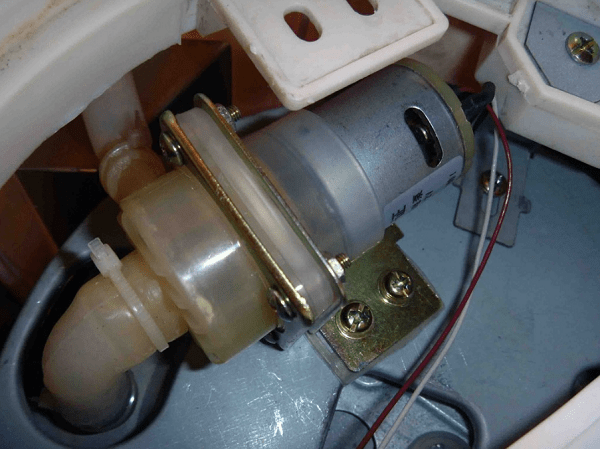
Another malfunction, poor operation of the hot water supply pump. Its cause is an increase in friction of the rotor axis of an electric motor operating at elevated temperatures due to a deterioration in the quality of the lubricant. The magnetic clutch of the pump consists of a magnetic disk put on the rotor shaft of the electric motor and a pump impeller put on the axle shaft in the pump housing cover. A magnetic disk is also fixed at the base of the impeller. A sealed gasket is installed between the two magnetic disks. Rice. 2.

The author lubricated the rotor support points at the ends of the electric motor housing with ordinary spindle oil. Helped for a couple of months. It was difficult to get to the front support point, I had to disassemble the pump and pour oil under the magnetic disk, and turn it with your finger, at this moment the electric motor is in a vertical position so that the oil flows to the right place. The remaining oil is drained over the edge. It is not necessary to remove the disk from the rotor axis, a couple of removals and it will not stay on the rotor axis. It's easier to just replace the motor with the pump.
Water leaks in thermopots are rare, usually due to mechanical damage. Once, the reason for the appearance of water under the kettle turned out to be an inconspicuous crack in the upper part of the plastic case, under the lid, passing along the rim of the container for boiling water. Steam penetrated this gap, which then condensed on inner surface case walls, the plastic crumbled along the crack. That kettle was beyond repair.

The diagram of the Vitek VT-1188 thermopot is shown in fig. 3. In this model, the secondary voltage of 12 - 14 V is supplied to the control units from the transformer T1, installed at the bottom of the case under the water tank, and from the rectifier bridge VD1 - VD4. The 5 V voltage from the ic2 regulator is supplied to power the ic1 processor, which controls the entire operation of the thermopot. At the command of the ic3 optocoupler, the ic1 processor should signal the protection operation, SF1 or FU1, although it is not clear how - the buzzer is not installed in this model. At the bottom of the boiling tank, a temperature sensor RT is installed from two MF58 thermistors connected in parallel with a negative TKS in KD-3 cases. Boiler switch-off temperature is set manually by button sw2. Thermopots VT-1188 and VT-1187 do not have a heating element for heating water, which is why turning on and off the heating element for boiling, EK1 occurs more often than in other models. Therefore, in the VT-1188, the relay contacts burn out more often and the heating element burns out. The case of burnout of the mounting output of the relay on the board is described in. In the event of all these malfunctions, the indication, the pump motor work normally at the kettle, only there is no boiling water. In case of burning and sticking of the relay contacts, or a breakdown of the transistor Q1, the boiling mode may not turn off. When repairing these breakdowns, defective parts are replaced.

Photo of the main board VT-1188. Rice. 4.

The diagram of the VT-1191 thermopot is shown in Fig. 5. The source of secondary voltage for control units is pulsed, made on a VIPer 12A microcircuit according to a transformerless circuit. A constant voltage of 18 V at its output is filtered by capacitors EL3, C3 and a choke L2, then it is lowered by a zener diode ZD2 to 12 V. The control circuit works on the ic1 processor, there is no marking on its case, there is only a label indicating the thermopot model. The voltage of 5 V to ic1 is supplied from the stabilizer on the transistor Q4 and the zener diode ZD3. There are two heating elements in the VT-1191 thermopot: EK1 for boiling and EK2 for heating water. Contacts K1,1 of relay K1 alternately connect the conclusions of one of them to the network, depending on the voltage at pin No. 5 of ic1, which is supplied to the base of transistor Q1 through connector CN1, LED HL2 and R7. A small base current of the transistor Q2 flows through the thermal switch SF2, so SF2 is connected to the board, and pin No. 4 of ic1 with a low-current connector. The electric motor is turned on by transistor Q3 when a “+” appears at pin No. 3 of ic1. The malfunction of the thermopot manifested itself in the fact that it did not boil or pour water, only the green indicator HL3 was on. The cause of the failure was the failure of the ic1 processor.
 Fig.6 Photo of the main board VT-1191 fixed in the thermopot case.
There are already a lot of tips for repairing thermopots, but I will add two more:
1) Take pictures of the entire process of disassembling and repairing the kettle. This will then facilitate its subsequent assembly and especially the installation of power connectors. (Fig. 6).
2) If the housings of low-current connectors installed on the boards even slightly stagger in their places, these housings must be glued to the board and the contacts soldered. Violation of the connector contacts after repair and assembly of the thermopot can lead to new malfunctions.
Bibliography
- "Repair of the relay of the Vitek VT-1188 electric kettle"
- Magazine "Radio" 2016-8-35.
A thermo pot has many advantages, however, like a simple kettle, it can sometimes break. In order to repair a thermos kettle with your own hands, you should imagine how it works.
Device
All thermoses-heaters have a similar device and principle of operation, differing only additional features, as well as the material of manufacture. The working parts of the thermopot are enclosed in a case, and in order to repair the thermopot, it will have to be removed. Water is poured into a stainless steel tank, in the bottom of which two heating elements are built. One of them produces the main heating to the state of boiling water, and the second only heats the water. There is also a general conclusion. Each wire is covered with ceramic protection - "beads". This prevents the wires from coming into contact with the metal container.
On the side you can see a cylindrical object. This is a thermopot engine ( water pump) for water supply. In different models, the voltage drop across the motor ranges from 8 to 24 volts.
It is impossible not to notice the electronic board on which the circuit (time relay) is mounted, which is responsible for re-boiling. Also, the circuit is needed to convert the voltage for the pump and relay. You can solder the broken contacts on the circuit with your own hands, repairing them in this way.
In addition to the main board, the thermopot has a control board. With its help, the buttons for water supply, reheating work, and red and LED indicators are connected to it, indicating what mode the thermopot is in.
Of great importance in all heating devices is a thermal switch. It is installed in the bottom and on the side of the water tank. In case the thermal switch does not work, a thermal fuse is also provided. This allows you to prevent overheating and damage to the thermal pot if it is turned on empty.
Knowing the location of all the main parts of the thermopot, it is much easier to identify the problem and make repairs. It is even better to study the diagram in order to understand what is connected how, and what details can be changed. In some cases, repairs do not make sense, and even specialists do not undertake it.
We disassemble the thermopot
It is immediately worth noting that it is easiest to remove with your own hands upper part thermos heater. To disassemble the thermopot, it is necessary to find and unscrew the screws located at the bottom of the device. After that, the case can be easily removed. First you need to visually inspect the board. It happens that a crack is found on the soldering, and the soldered element disappears. In this case, you should use a soldering iron to fix everything as it was.

Be sure to inspect the thermal switch located in the bottom. Its condition is checked with an ohmmeter. The working device has almost zero resistance. A defective part must be replaced with a new one. And then the question becomes, where to buy the necessary spare parts. Often this can be done only through online stores.
To remove the pump in case of a malfunction, it is necessary to disconnect the inlet pipe from it and unscrew the bolts. Sometimes cleaning the impeller and magnet with a regular cloth gives its results. In some cases, repairs will no longer help, and you will have to resort to replacing the thermopot.
How to fix some crashes
We will analyze what malfunctions a thermopot can have, and how to fix them with your own hands.
- The indicator panel does not turn on and the appliance does not work at all. In this case, check all wires, all connections, as well as the fuse and thermal regulator. If there are several reasons, then the repair will be more difficult to perform.
- Only the reboil button works. The main first boil is not carried out. In this case, check the thermal switch located in the bottom.
- The first boiling works, and when boiling again, the thermopot does not turn on. You should inspect the circuit on the main board.
- Water can only be heated, the thermopot does not boil. Most likely, the heating element burned out or the contact broke.
- The water supply function has stopped working. There is a problem with the pump power circuit. Quite often, the additional heating coil also burns out, after which the voltage stops being supplied to the motor.
If the spirals of the heating elements are burned out, then it is not economically feasible to repair the thermopot. Firstly, it is difficult to disassemble the tank, and secondly, the cost of insulation and high-resistance wires is quite high.
When the repair is completed, it is necessary to check the electrical safety of the device. To do this, it is necessary to measure the resistance between the plug contacts and the tank, as well as between the plug contacts and the outer casing. The resistance must be infinite.
Thermopot is a duet of a thermos and an electric kettle, which is designed to store water at a constant temperature (close to boiling). This is achieved by self-reheating the liquid when it cools below a predetermined level. The process occurs continuously as long as there is liquid in the kettle, or until it is forcibly disconnected from electrical network. But, like any other electrical appliance, this technique also fails. However, do not be upset and immediately carry it to the service. If the breakdown is not very serious, then it is quite possible to repair the thermopot with your own hands.
The principle of operation of the thermopot
To understand the causes of breakdowns and better understand how to repair a thermopot, you should familiarize yourself with the principle of its operation. First, the device boils water like a regular kettle, and then the control module of the device comes into action, which, by means of a thermostat, monitors the set minimum temperature liquid and, as soon as it falls below the norm, it immediately turns on re-boiling. For heating, the thermopot uses a second heating element, which is always less powerful than the main one, since its operation is very fleeting.
Due to the large dimensions and considerable weight of the thermopot, for pouring boiling water into a cup built-in pump. It can be powered by electricity, like Marta products. Such a pump allows the possibility of setting autofilling through the control module. There is also a mechanical (manual) pump, like MAGNIT RTP-002, then the liquid is pumped into a mug manually through a special spout. Many models (for example: Vitek vt 1187 gy, Saturn ST-EK8032, Mystery MTP-2403 and Bravo TA-65 S thermos kettle) have both types of pumps.
In addition to the above details (control module, thermostat, two heating elements and a pump), the circuit necessarily includes thermostat(sometimes two, like Maxwell and Scarlett products) and thermal fuse. Their main task is to prevent overheating and ignition of the device. For the correct operation of the electric pump and the control module, a power supply with step down transformer.
Mostly all thermopots work according to one general scheme and differ only in details. For example, some models are equipped with an auto-on timer. IN budget options there may be no low-power heating element (as in the products of Vitek and Magnit). But there are thermo pots (for example, a thermos kettle Polaris PWP 4012D), which combines almost all useful functions.

Disassembly of the thermopot
To quickly find and fix faults, the thermopot must be disassembled. And since all models have a similar structure, there is a general algorithm of actions. Dismantling the device is not difficult, for this it is enough to follow the following instructions:
- disconnect the device from the mains and pour water out of it;
- unscrew the screws at the bottom;
- remove the clamps from the ring and unscrew the loose screws;
- remove the pallet;
- dismantle the pump, having previously disconnected the hoses from it;
- remove the cover of the thermopot for the convenience of installing the device on the table upside down;
- unscrew printed circuit board and move it to the side so as not to interfere;
- unscrew the screws hidden under the board gasket;
- remove the bottom together with the pallet;
- unscrew 8 more screws holding the protective cover;
- remove the cover and remove the heater.
Advice! So that the assembly of the thermopot after repair does not cause problems, you should fix the location of the wires and parts on the camera.
Typical breakdowns and their elimination
For devices manufactured according to the same scheme, typical faults. How to find and eliminate them will be described in the pictures below.
Doesn't turn on
If the device does not turn on, then the matter in violation of the contacts of the electrical circuit. The only question is where the break occurred. You need to start checking with the power cord. If it is unusable, replace the wire with a new one. Then all connections of both thermal switches must be checked. An emergency opening may have occurred, and due to a faulty thermostat, the contacts did not return to their place. Also, the connection at the thermal fuse may not be restored. To check, you need to disconnect the questionable part and close the wires directly. If it works, the defective part is replaced with a new one.

Constantly boils water
The situation when the water is constantly boiling and the device does not turn off can only occur in the most budget models with one thermostat. It is because of its breakdown that the thermopot does not turn off after boiling. Here you should immediately, without any checks, change the thermal switch. In good and reliable samples, there is always a backup thermostat. And some manufacturers install additional control in the form of a thermal fuse, which will insure if for some reason both protections do not work, and the kettle constantly boils water.
Shuts off before boiling
Usually this happens only with devices that have worked for more than one year. It's connected with loss of its properties by a bimetallic plate in the thermostat, which over time begins to respond to a lower temperature than planned. To remedy the situation, you can try to temporarily bend the contacts at the plate. A best solution the thermostat will be replaced.

The fact that the thermal pot has stopped boiling water may be to blame commonplace scale. Settling in a thick layer on the heating element, it lowers its thermal conductivity. The heating element gradually starts to overheat. At some point, the thermostat sees this as a fire hazard and opens electrical circuit moments before the water boils. You can get rid of scale on the heating element by simply boiling the solution citric acid. If this does not help, then you will have to disconnect the heater and clean it with a knife.
Important! Thermopot may not boil water also due to leakage in the flask. Even a few drops of liquid can cause overheating. The search for cracks is carried out visually, and it is more reliable to eliminate them in the workshop.
Other causes of breakdowns can be bad contacts. In this case, all connections to the wires of the heating element and the thermal switch should be checked. If necessary, the contacts are soldered.
Water button not working
If the water supply button does not work, then there may be several reasons. First of all, this could be due to blockage in the system. Garbage is most often particles of scale that settle on the walls of pipes and hoses, gradually reducing their clearance. This eventually leads to the fact that the pump does not pump water.
For descaling you also need to use citric acid or vinegar by boiling water with them in the apparatus. In the case of insoluble waste, complete disassembly pump and the entire water system. To do this, disconnect all hoses and blow through them. The pump itself should be disassembled as follows:
- disconnect it from the body of the device;
- unscrew the impeller and clean the scale from it;
- free the magnet from dirt.
Advice! If, after cleaning, everything also does not pump the pump, this may mean that the winding on the motor has burned out. And it is better and more reliable to eliminate such breakdowns in the service.
The liquid filling button does not work and in case of bad contacts on the key itself or at the junction of the wires with the electric pump. To eliminate it is necessary to check the entire circuit for breaks. If the second heating element fails, the electric pump motor is no longer supplied with voltage.
Important! If the thermopot has only one electric pump, and the water supply does not work, then first of all you need to check the serviceability of the outlet and the presence of electricity in the house.
Doesn't heat water when light is on
When the device does not heat water when the indicator is on, the first thing to do is to check the heating element. But if the heater is working, then the reason may be in the electrical circuit. That is, the thermopot does not heat the water, but the light bulb is on if there is a fuse in the circuit after the indicator that has blown. To correct the problem, the defective part must be replaced.

Other malfunctions
With prolonged or incorrect operation of the thermal kettle, other problems may occur.
- Reboil not working- the cause must be sought in the additional heater and control module.
- No main boil whereas re-boil button works- Check the thermostat.
- Thermopot only works for heating, but does not boil - the culprit is the burnt-out main heating element.
Prevention
In order for the thermal kettle to work for many years and be constantly in good condition, regular preventive maintenance should be carried out.
- Once in two months boil a solution of citric acid or vinegar. After that, thoroughly rinse the flask under running water.
- Once every six months preferably disassemble the device to remove all internal debris and mechanically clean out the sediment that the acid has not coped with. Along the way, you need to check all contacts for integrity.
Advice! If the upcoming work causes uncertainty or difficulties, then you can watch the corresponding video or use the services of a qualified craftsman.
Thermopot will serve for many years without serious disturbances in operation during operation according to the instructions, careful handling and periodic maintenance.
The most reliable thermopots
Thermopot Kitfort KT-2504 on Yandex Market
Thermopot Kitfort KT-2503 on Yandex Market
Thermopot Polaris PWP 5010 on Yandex Market
Thermopot Great Rivers of Chaya-8 on Yandex Market
Thermopot Kitfort KT-2502 on Yandex Market
Dmitry Ivanov: Hello. There is such a problem. Thermopot After it was filled with water TO THE LEVEL and turned on, it boiled. And then every 40-50 minutes it starts to boil again. What can be???
first second: And how many volts of the motor
Vyacheslav Kablaev: Liked the video very much! All plain language and voluminous. And so it is clearer even to me stupid. Thank you! My + and subscription!
Aidar Khuzin: hello weak pressure what can i do? Flushing did not help
Gray Fox: Hello, I have such a problem, the heating coil burned out, I took it apart somewhere, removed a couple of turns, twisted it, it worked, but ... after boiling, the heating turns on and the lock immediately lights up and does not allow pouring water, what is the reason?
Otto Dietrich: I press the Block button, then pour water. The pump twitches, the button unit turns off. What could be
Urzhum: Obviously, the bottom of the thermopot from the hostess scooped up water in the sink. Turned it on and didn't wait for the water to dry. As a result, the short circuit and failure of the transistor. The instructions must be read at least once from cover to cover, there is a warning about what to avoid. Many have not a single breakdown even after 7 years of operation. The coating peels off over time - because they pour cold water into the hot bowl of the machine. There is zero attention to this, the mesh filter delays delamination, it must be monitored and removed from the mesh.
Nader Ibeidou: Very helpful video…..thank you very much
Tanks are not afraid of dirt.: Hello. I have a Chinese thermopot from METRO-Cash&Carry, no name, some for sales only in the Metro. At 4.2 liters with an electric pump. Recently, after filling the mug with boiling water, the boiling heater began to turn on for a few seconds. What could be? Faced with such a defect?
Sergey: I've got a scheme. I came up with a new one and made it https://files.icq.net/get/0ZZySij86dZ3S5mqoqfPum59f431b71ab
Vakha Patiyev: hello, I have the same problem, can it be solved what do you think? i.e. it boils but does not supply water, please look and if you can answer [email protected] something like this https://www.youtube.com/watch?v=zkpIl6GvEyQ
Damir Akhmetov: Hello Oleg, tell me. The thermopod is a new Chinese-made model "Tiffany", it has a "water supply" button. But there is no "reconnection" at all. ??
MoOvik: By the way, while doing this, I changed the diodes from 1000V to 400V, the rest of the specifications are the same, what are the consequences?
MoOvik: but I didn’t have a tester nearby, I looked at how you check the motor and it started up and now I have a 12V power supply from the kettle))
Sony Bravia:!!! I have a similar Panasonic NC-EM40P thermopot, it stopped boiling water, it only works in heating mode. I rang the contacts of the heating element at 3:30, yellow - orange are ringing and yellow - red is not. I tried to find it in the workshops, but nowhere is there anything at all, probably the heating elements are not supplied, now I'm racking my brains on what to do, it's a pity to throw it away. Can you tell me something?..
Mohd Rizal kamal: Hi there, can someone speak in english.. i would like to know how did you test the dynamo(pump)? … are u using battery or using electric?
Sony Bravia:!!! 5:12 mine also peeled off the inner coating, and now the heating element burned out, I don’t know where to get it ... (((
Peter Starygin: Hi, please tell me, heats boils and does not turn off
Andrey Malinovsky: What is the operating voltage of the pump motor
Kirill Stadnik: On the contrary, it shakes me without interruption - what do you advise?
How to repair a thermopot with your own hands

Surely, many in the kitchen you can find not a simple electric kettle, but a thermos or the so-called "thermal pot".
Advantages and disadvantages
In addition, a thermopot can save not only your time (you do not need to wait for the water to heat up), but also electricity (you do not need to turn on an electrical appliance every time someone in the household wants to drink hot tea or brew porridge or other food).
- A large amount of liquid, four to five liters, boil more time than in an electric kettle;
Causes of failure
From this video, you will learn what causes of breakage exist in thermopots. Recommended for viewing!

Vitek thermopot board
Repair of various parts of the thermopot
- Network cord. To carry out the repair of the power cord, it is necessary to unscrew several screws to which the body of the thermopot is attached. Inside there is a special block, and visually inspect all internal parts. Carefully separate the cord and check it with a tester, if it is faulty, we replace it;
Diodes. It is much more difficult to determine the breakdown of diodes, I am glad that they break quite rarely. It is necessary to sample the element and call its sides in order to understand whether it is in working condition;
Panasonic thermopot repair does not pump water
For a Vitek thermopot, a new pump costs about $ 30. An experienced electrician can easily determine which part has failed. It is also necessary to check the thermopot pump for suitability.
Repair of heating elements
What are the features of the Karcher vertical clothes steamer, this article will tell. do not miss your chance to get acquainted with useful material!
Based on materials from the site: http://tehnosektor.ru
Do-it-yourself thermopot repair does not pump the pump.
How to repair a thermopot with your own hands.
Today, in many areas of human activity, various technological devices occupy a priority place.
The field of cooking also has many technological innovations to make our lives easier.
Surely, many in the kitchen you can find not a simple electric kettle, but a thermos or the so-called “thermal pot”.
This word comes from in English and literally means a temperature pot or thermos.
Advantages and disadvantages.
The main advantage of thermopot over electric kettle is that you can not only boil water in it, but also store it, keeping it at a high temperature, like in a thermos.
You can set the temperature yourself.
Most models are equipped with four water heating modes.
It is able to maintain the temperature you need for several hours.
The water remains hot, as if it had just boiled, but if you need, you can choose a lower setting.
By purchasing a thermopot, there will always be water with the required temperature, for example, for brewing a cup of tea or cooking baby food for a child.
In addition, a thermopot can save not only your time (you do not need to wait for the water to heat up), but also electricity (you do not need to turn on an electrical appliance every time someone in the household wants to drink hot tea or brew porridge or other food.
A large amount of liquid, four to five liters, boil more time than in an electric kettle.
Its cost is several times more than a simple electric kettle.
Causes of breakdown.
From this video, you will learn what causes of breakage exist in thermopots. Recommended for viewing.
Despite the fact that such a device has an excellent and solid construction, they break quite often due to Bad quality their electrical nodes.
Since the cost of a new, such a kettle is not small, in many cases it is best to repair it yourself or by contacting the master and not overpay a significant amount of money to buy a new kettle.
The main reasons why a thermopot can fail, as well as methods for their elimination.
Lack of indication of the special control panel of the thermopot does not turn on.
It is necessary to check the integrity of all wires, as well as check the operation of the thermal fuse and the safety switch.
The thermo pot reboil button does not execute the command and does not boil water when it is first turned on, as well as when water is poured into it. It is necessary to check the operation of the thermal switch located at the bottom of the tank.
Lack of operation of the device, in all modes.
With this problem, it failed circuit diagram forced boiling will actually break parts such as a transistor relay or a rectifier.
Failure of the water supply lever. Most likely, the engine for supplying water or the rectifier diodes on the engine power circuit are not working.
This is a list of the main thermopot malfunctions that have a similar design.
Vitek thermopot board.
Repair of various parts of the thermopot.
Network cord. To carry out the repair of the power cord, it is necessary to unscrew several screws to which the body of the thermopot is attached. Inside there is a special block, and visually inspect all internal parts. Carefully separate the cord and check it with a tester, if it is faulty, we replace it.
Chip. An ordinary thermopot has two microcircuits: a power supply and a control one. We inspect them visually in order to determine swollen capacitors, burnt transistors, broken fuses, and other breakdowns. In order to replace elements that are out of order, it is necessary to use soldering; it does not restore contacts in the presentation methods. Initially, when repairing a microcircuit, you need to check whether all the fuses are in place and whether they are intact. consists in its electronic stuffing. Because it has a short circuit.
Capacitor. Much easier to deal with a broken capacitor. Since they swell and are easily determined by appearance. Diodes. It is much more difficult to determine the breakdown of diodes, I am glad that they break quite rarely. It is necessary to sample the element and ring its sides in order to understand whether it is in working condition.
Board tracks. In order to bring the broken tracks on the board into working condition, they are lightly sanded to make the top layer of varnish out of them. The shiny surface is aligned and covered with a layer of solder.
Water pump. Also, each device contains a special pump for supplying water, both automatically and manually. For a Vitek thermopot, a new pump costs about $ 30. An experienced electrician can easily determine which part has failed. It is also necessary to check the thermopot pump for suitability.
Repair of heating elements.
If the heating elements break, in almost all cases they must be replaced.
New heating elements start at $40.
The standard device contains several thermal switches.
One is assigned to control water parameters, and the second serves to protect against turning on the thermopot in the absence of water in it.
The thermal switch works in such a way that the surface of the tank and the flange are in contact.
To improve contact, a special lubricant is used, similar to that used in personal computers.
When a certain temperature of the switch is reached, its contacts close, as soon as the temperature decreases, their conductivity is restored.
These thermopot components can be easily found, as their description is made on the body and marked accordingly.
What are the features of the Karcher vertical clothes steamer, this article will tell. do not miss your chance to get acquainted with useful material.
Here. you will be able to find a description of the portable gas heater for a tent.
But most often the manufacturer also adds an additional temperature fuse, it is a small cylindrical part, which fits snugly against the wall on the bike.
Works exactly the same as a conventional thermal switch.
In order to check the operation of a metal contact, it is necessary to make a dial-up book, having previously completed the working contacts from the thermopot, they will be short-circuited.
Repair tips.
The internal stuffing of most thermopots is slightly different from each other.
And the simplest models are easy to self-repair.
Repair of Vitek thermopot can be carried out according to standard schemes.
To repair this device, on their own you need to soberly evaluate your knowledge and experience.
And do not try to solder microchips that require a hot air gun with an inappropriate soldering iron.
To begin with, you need to know the basic techniques for working with electrical components, which often do not tolerate static electricity and high temperatures.
In order to make repairs, you will need tweezers, a tester, a screwdriver with a voltage indicator, as well as a soldering iron and other tools.
How to repair a thermopot with your own hands.
All thermoses-heaters have a similar device and principle of operation, differing only in additional functions, as well as in the material of manufacture. The working parts of the thermopot are enclosed in a case, and in order to repair the thermopot, it will have to be removed. Water is poured into a stainless steel tank, in the bottom of which two heating elements are built. One of them produces the main heating to the state of boiling water, and the second only heats the water. There is also a general conclusion. Each wire is covered with ceramic protection - "beads". This prevents the wires from coming into contact with the metal container.
On the side you can see a cylindrical object. This is a thermopot engine (water pump) designed to supply water. In different models, the voltage drop across the motor ranges from 8 to 24 volts.
It is impossible not to notice the electronic board on which the circuit (time relay) is mounted, which is responsible for re-boiling. Also, the circuit is needed to convert the voltage for the pump and relay. You can solder the broken contacts on the circuit with your own hands, repairing them in this way.
In addition to the main board, the thermopot has a control board. With its help, the buttons for water supply, reheating work, and red and LED indicators are connected to it, indicating what mode the thermopot is in.
Of great importance in all heating devices is a thermal switch. It is installed in the bottom and on the side of the water tank. In case the thermal switch does not work, a thermal fuse is also provided. This allows you to prevent overheating and damage to the thermal pot if it is turned on empty.
Knowing the location of all the main parts of the thermopot, it is much easier to identify the problem and make repairs.
It is even better to study the diagram in order to understand what is connected how, and what details can be changed. In some cases, repairs do not make sense, and even specialists do not undertake it.
We disassemble the thermopot.
It is immediately worth noting that it is easiest to remove the upper part of the thermos-heater with your own hands. To disassemble the thermopot, it is necessary to find and unscrew the screws located at the bottom of the device. After that, the case can be easily removed. First you need to visually inspect the board. It happens that a crack is found on the soldering, and the soldered element disappears. In this case, you should use a soldering iron to fix everything as it was.
Be sure to inspect the thermal switch located in the bottom. Its condition is checked with an ohmmeter.
Do-it-yourself thermopot repair
The working device has almost zero resistance. A defective part must be replaced with a new one. And then the question becomes, where to buy the necessary spare parts. Often this can be done only through online stores.
To remove the pump in case of a malfunction, it is necessary to disconnect the inlet pipe from it and unscrew the bolts. Sometimes cleaning the impeller and magnet with a regular cloth gives its results. In some cases, repairs will no longer help, and you will have to resort to replacing the thermopot.
How to fix some crashes.
We will analyze what malfunctions a thermopot can have, and how to fix them with your own hands.
The indicator panel does not turn on and the appliance does not work at all. In this case, check all wires, all connections, as well as the fuse and thermal regulator. If there are several reasons, then the repair will be more difficult to perform.
Only the reboil button works. The main first boil is not carried out. In this case, check the thermal switch located in the bottom.
The first boiling works, and when boiling again, the thermopot does not turn on. You should inspect the circuit on the main board.
Water can only be heated, the thermopot does not boil. Most likely, the heating element burned out or the contact broke.
The water supply function has stopped working. There is a problem with the pump power circuit. Quite often, the additional heating coil also burns out, after which the voltage stops being supplied to the motor.
If the spirals of the heating elements are burned out, then it is not economically feasible to repair the thermopot. Firstly, it is difficult to disassemble the tank, and secondly, the cost of insulation and high-resistance wires is quite high.
When the repair is completed, it is necessary to check the electrical safety of the device. To do this, it is necessary to measure the resistance between the plug contacts and the tank, as well as between the plug contacts and the outer casing. The resistance must be infinite.
Why is the water supply in the thermopot not working.
All home appliances designed to provide comfort to the user. As we get used to easy exploitation, we get frustrated when a feature doesn't work. Quite often, the pump does not work at the thermopot. As a result, water enters the cup manually. It seems that in general the equipment works, but a small breakdown makes it difficult to use the device. Today we will understand why the water supply in the thermopot does not work.
What to do if the pump does not pump.
Work begins with the dismantling of the bottom cover of the device. Usually it is mounted on several bolts that need to be removed. Then you should disassemble the pump, it will be more convenient to do this if you remove the inlet pipe. Next, you need to check the condition of the connecting tubes. Namely, whether they are clogged with scale. If necessary, remove and clean them.
The next step is to remove the magnet from the engine. All parts must be thoroughly cleaned from scale and debris. This is best done with a napkin or cloth. When disassembling the pump and engine, do not forget to keep the gaskets intact. They will come in handy when assembling the device.
After such simple actions, the thermopot must again supply water. If the problem persists, you will most likely need to replace parts.
The pump does not work and the temperature is not maintained.
If the breakdown is complex, then look for the cause of the malfunction in the heating element. Most often this indicates overheating of the heating element. In this case, work begins with the dismantling of the top cover. Next, we perform the following steps.
Turn the thermopot over and remove the support ring. To do this, you will need a screwdriver and a little effort.
3. Under the lid, all the insides of the thermopot are hidden. We need to remove the upper part of the equipment case.
5. The next step is to remove the heating element. It is important to proceed carefully here. The contacts can be released with a socket wrench, and with a Phillips screwdriver - with a heating element coupler.
6. It remains only to ring the heating element, replace it and make sure it works.
Be careful when replacing the heating element. Their size may vary depending on the model. For example, there are heating elements 150 or 160 mm. Therefore, before buying, you should clarify what size you need for your thermopot.
Questions and answers.
Thermopot is a modern household appliance to heat the water poured into it and keep it hot. The device is indispensable where you need to gradually spend hot water for a long time. But with frequent use, breakdowns are not excluded (for example, control systems, pumps, pumps, etc.). In this article, we will consider repairing a thermopot pump with our own hands.
General thermopot device
Its capacity is usually 3-5 liters. For coffee breaks at large conferences, thermopots with a capacity of 6, 8 and 10 liters are used. The thermopot is arranged not much more complicated than a kettle. Inside the plastic case are the main components of the device:
- Flask. It is made of stainless steel or special hardened glass. At the bottom of the flask is a heating element. It has the shape of a spiral or is built into the bottom of the vessel. The top of the flask is closed with a sealed lid;
- There is a hot water dispenser on the front. It consists of a tube that goes down to the bottom of the flask, filters and a spout under which cups are placed;
- Electric pump. This is a mini compressor that pumps water through a spout;
- Manual pump. Many models are equipped with a manual pump in addition to the electric one or as the main pump;
- Power unit. This unit provides power to the electric heater, and also converts AC mains voltage of 220 to low voltage DC to power the pump and control system;
- Control and indication system. The electronic unit controls: allows you to set and maintain the required water temperature, unlock the pump, controls its operation. The block shows on the display the current operating mode of the device and the water temperature.
Advantages and disadvantages
The presence of a spout makes it possible not to tilt the device to pour water. This eliminates the risk of tipping and spilling hot water that could cause severe burns. Thermopot provides much more high level security than a kettle or thermos. This makes it indispensable for use by children, the sick and the elderly. In addition, most models are equipped with a system for blocking the inclusion of water supply in case of accidental pressing.
Figure 1 Thermopot. General form
Water can be boiled in advance and set to maintain the desired temperature. At the same time, power consumption is minimal. Usually several heating modes are supported - for an hour, three, six and nine hours. So you can prepare in advance for a coffee break during a meeting or conference, and at home boil water for the whole day during the cheap rate.
The device also has disadvantages. Boiling water takes much longer than in ordinary teapot. If the flask runs out of water, again there will be a long wait for a new portion of hot water. For conferences, in this case, they usually provide several thermal pots or add hot water boiled in an ordinary kettle to them.
Why do you need a thermopot pump?
A pump, or pump, is needed to supply water through a spout. After the lid is hermetically closed and the water is heated to the required temperature, you must press the unlock button. The lock LED indicator goes out and you can press the power key. The pump starts pumping water that flows out of the spout. As soon as the user releases the key, the pump turns off and the water supply stops. After a few seconds, the lock is activated, again locking the circuit for turning on the electric motor. The control system of advanced models includes a water level sensor. If the water in the flask runs out, the pump turns off.
Many models are equipped with a backup hand pump in the event of a power outage. It is a corrugated reservoir located under the top cover of the device.
Its device and principle of operation
An electric pump is an electric motor and the actual pump mounted on its working shaft - a chamber with an impeller, inlet and outlet pipes. When the engine is turned on, the impeller begins to rotate and distill water from the inlet pipe leading into the flask into the outlet pipe leading to the spout. In some models, there is a filter in front of the pump that traps mechanical inclusions, such as, for example, tea leaves that have fallen into the flask. Its condition also needs to be checked, washed or replaced if necessary.
The hand pump is a corrugated plastic cylinder. In the parts list, it is listed as " air pump". This pump works only when the thermopot lid is closed, when the flask is a sealed volume. When the large button on the lid is pressed, the cylinder compresses and forces air into the top of the flask. Overpressure displaces a portion of water through the nozzles into the spout. When the manual feed button is released, the elasticity of the cylinder and the pressure in the flask return the manual pump to its original position. The pump is ready for the next cycle.
Causes of breakdowns of the electric pump
Important! Before you start troubleshooting, you need to take care of your safety. During disassembly of the device, it should be disconnected from the mains and drained of hot water.
Common causes of failures are as follows:
- Control system malfunction.
- The heat pump is not working.
- The impeller chamber is dirty.
If - the problem is not necessarily in the pump. Before disassembling the assembly, you need to make sure that sufficient voltage is applied to the motor contacts. This can be done with a tester (multimeter). There is another option. The motor contacts are supplied with a constant voltage of 12 volts from another source, for example, a car battery. If the engine starts to rotate, the problem is in the control system, and you need to diagnose it further.
If the device does not have a standby heating function, you should check the condition of the power supply rectifier diodes.
If there is such a function, you need to check the resistance of the standby heating coil, and it could fail (burn out). The engine is powered through it.
If the engine itself is working, then you can do a small repair of the thermopot pump with your own hands.
Causes of a non-working hand pump can be the following:
- Violation of the integrity of the corrugated plastic cylinder.
- Deterioration of the silicone gasket of the top cover.
These malfunctions are detected by external inspection and do not require diagnostic tools and disassembly of the device. But to replace faulty parts, you will have to disassemble the thermopot cover in the first case, and the thermopot case in the second.
How to repair a thermopot pump with your own hands?
If the rest of the systems are checked and it is found that the thermopot pump is not working, then a large disassembly of the device is to be done - the pump is hidden deep in its depths. After all the bottom parts are dismantled, you can see the pump. When the thermopot does not pump the ox, the pump can be repaired with your own hands

Figure 2 Pump after removing the bottom. Branch pipes and contacts are visible (on the right)
The sequence of actions for disassembling the node is as follows:
- Disconnect the inlet and outlet pipes. If they are filled with scale, the pump does not pump water well. They should be cleaned, rinsed and blown.
- Unscrew the screws holding the motor housing to the pump chamber.

Figure 3 Beginning pump disassembly
- Carefully separate the pump chamber with impeller from the motor housing. In this case, you need to be careful with the silicone gasket. If it is worn or damaged, it must be replaced with a serviceable one.
- There may be scale in the chamber that interferes with the rotation of the impeller. It must be carefully removed with a plastic or wooden spatula. The use of sharp metal objects is not recommended as the camera body may be damaged.

Figure 4 Scale in the chamber
- After dismantling the impeller, a magnet recessed into the chamber housing becomes visible, which is also subject to scale deposits. It must be cleaned with care. You can do this with a screwdriver, but it's safer to use a plastic or wooden spatula.

Figure 5 Scale prevents the impeller from rotating

Figure 6 Cleaning the magnet from dirt
- After cleaning the pump parts from scale, carefully reassemble it in the reverse order of disassembly. Particular attention should be paid to the uniform tightening of the screws securing the electric motor to the pump housing and even laying of the gasket.
After assembly, you need to conduct a trial inclusion. If the pump still does not work, it will have to be replaced. The engine is made non-separable and cannot be repaired.
What to do if the hand pump does not work? It is much simpler. Actually, it consists of a single part - a corrugated cylinder. If it is worn out and leaky, it ceases to perform its functions and pump air into the flask.

Figure 7 Dirty hand pump
In this case, it must be replaced. To replace it, you will have to remove the cover of the thermostat and disassemble it. On some models, the hand pump is pressed against the top cover, which is attached with several screws. These screws will need to be unscrewed. On other models, the cover that holds the hand pump cylinder is snapped on. They must be squeezed out with a thin screwdriver, being careful. If the latches break, you will have to change the entire cover, and it costs from one and a half to two and a half thousand rubles.

Figure 8 Spare Part for Hand Pump
The hand pump may not pump water in one more case - if the silicone gasket of the thermopot cover is leaky. In this case, the air pumped by the button freely exits, and water is not supplied through the spout. In this case, the gasket will need to be replaced. To do this, you will need to disassemble the case. In some models, the gasket can be carefully pry off with a spatula or a thin screwdriver. On others, you have to remove the flask.